Are you a real estate agent or enthusiast with a desire to share your knowledge and insights with others while making money online doing it?
If yes, then starting a real estate blog might be the perfect solution.
In this post, we’ll teach you how to get started, including the basics of setting up your blog and adding content. We’ll also share some tips for monetizing your blog and growing your audience.
If you have any questions along the way, just drop a comment and I will help you out.
So read on to learn how to create a real estate blog and make money online!
How to Start a Real Estate Blog in 7 Steps
- Define Your Real Estate Blogging Goals
- Choose a Real Estate Niche
- Pick & Register a Blog Domain Name
- Setup WordPress
- Write & Publish Blog Posts
- Promote Your Real Estate Blog
- Monetize & Make Money
1. Define Your Real Estate Blogging Goals
The first step in starting a successful real estate blog is to clearly define your goals and objectives. Some common goals for real estate bloggers include:
- Sharing knowledge and insights about the real estate industry.
- Promoting your own brand or services as a real estate agent or real estate professional.
- Generating leads for your business.
- Monetize your knowledge of real estate.
Once you know what you hope to accomplish with your blog, it will be easier to create content that resonates with your audience and achieves your larger goals.
What is a Real Estate Blog?
A real estate blog is a website that shares news, advice, and insights about the real estate industry. Real estate blogs can be maintained by individuals or organizations, including real estate agents and agencies, and can be used to generate leads and promote the brand and services offered.
Why Start a Real Estate Blog?
There are many reasons that people choose to start a real estate blog. Some of the benefits of starting a real estate blog include:
- Increase authority and credibility in the industry
- Promote their business or services as a real estate agent or agency
- Generate leads for a business through blogging
- Become a real estate influencer
- Monetize real estate knowledge and skills
These are just some of the benefits of starting your own real estate blog.
How much money can you make from real estate blogging?
If you monetize with ads, you can make $15-$25 for every 1000 ad views on your real estate blog. An SEO optimized blog post can get anywhere between 300 to 1000 visits per month. So, a real estate blog with 100 blog posts can make as high as $2500 every month. You can make even more money if you monetize with affiliate marketing and digital products.
2. Choose a Real Estate Niche
The next step in how to start a real estate blog is to choose your niche.
Your niche is the specific focus of your blog. It’s the topic or angle that you’ll be writing about. When choosing a niche, it’s important to consider your goals for starting a blog.
Why choose a niche?
Choosing a niche helps you to focus your content and target your audience more effectively. It also allows you to become an expert in a specific area of real estate, which can help to establish your blog as a go-to resource for that topic or issue.
If you blog about everything under real estate then it will be difficult to establish yourself as an authority, and your blog will lack focus.
Finding Your Ideal Niche
There are many different niches you can choose within the larger category of real estate. Finding the right one for you will depend on what interests you and aligns with your goals.
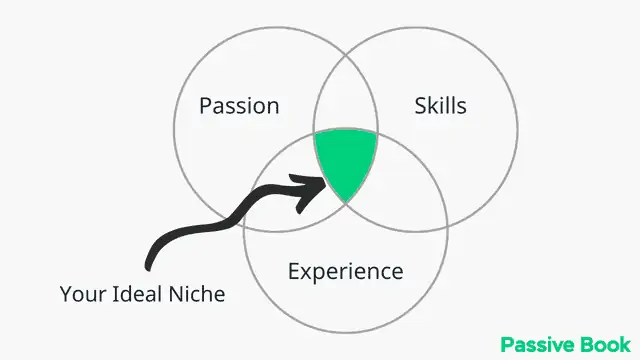
Once you have defined your goals for starting a blog, it will be easier to determine how niche you should go. To find the perfect niche for you, try brainstorming ideas around those goals and interests. Your niche will be the specific area of focus for your blog and business.
Some examples of popular real estate niches include:
- Real estate investing
- Real estate trends & news
- Residential real estate
- Commercial real estate
- Property management
- Realtor Tips
- Home buying and selling
- Luxury real estate
- New Construction
- Resale Properties
- Investing in property
- Flipping houses
You can also choose a sub-niche within one of these categories. For example, if you’re interested in writing about real estate trends, you could focus on a specific type of trend like home design trends or technology trends in real estate.
Examples of Real Estate Blogs
Sometimes looking at other real estate blogs will help inspire ideas of your own. Here are some of the more popular examples of real estate blogs:
1. The Real Estate Tomato
This blog covers a range of real estate blog topics, including home buying and selling tips, remodeling ideas, and helpful resources for homeowners. The blog is meant to promote the website design services that they offer real estate agents.

2. Max Real Estate Exposure
This blog focuses on helping readers get the most exposure for their listings. The blog covers topics such as real estate marketing, social media for agents, and how to use technology to sell more homes.
3. Housing Wire
This blog covers the latest news in the housing industry, with a focus on mortgage and real estate finance. The Housing Wire team also provides analysis and commentary on the latest housing market trends.
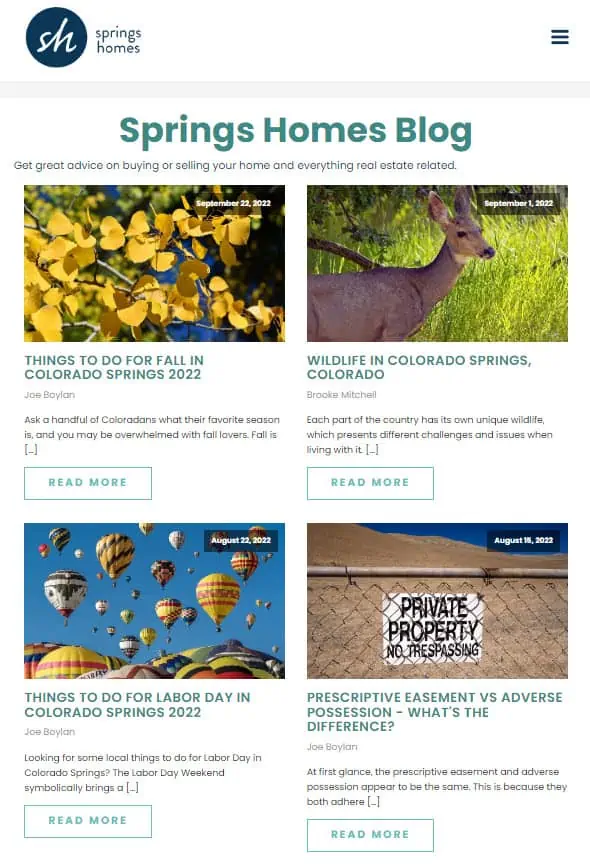
4. Springs Homes
This blog provides homebuyers and sellers in Colorado Springs with resources, information, and advice. The blog covers educational real estate content. Each blog post is a byte size real estate course and focuses on a specific topic on how the real estate industry operates.
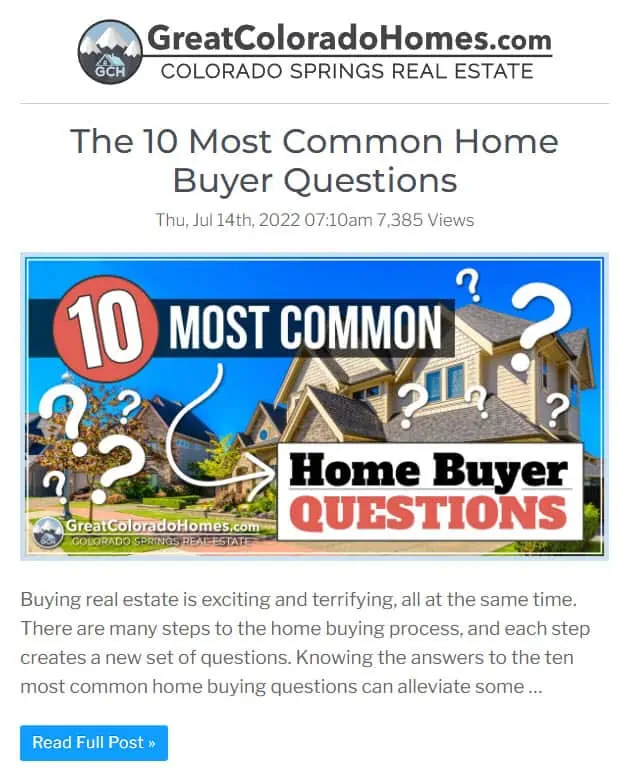
5. Great Colorado Homes
This blog is all about how to find and buy the perfect home in Colorado. It focuses on sharing news, advice, and resources for buying a home in the state.
3. Pick & Register a Blog Domain Name
Once you have chosen your niche, it is time to brainstorm a few names for your real estate blog.
We recommend you keep your real estate blog’s name to two words (Example: Springs Homes). One of the two words should be a keyword from your niche. The other word can be something that makes your website brandable. For example, our blog teaches people how to make passive income, so we have named it Passive Book.
Here are some of the words that you can mix and match into your blog name:
- Home
- Homes
- Property
- House
- Real Estate
- Estate
- Realtor
Use a Business Name Generator to brainstorm the name of your blog.
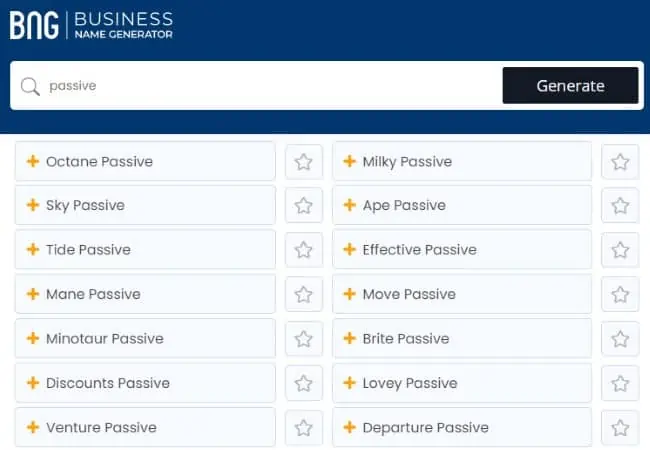
You can also use your own name for your blog. But if you ever plan to sell your website in the future, it is much more difficult to transfer your brand to the buyer when it is your name.
Check Domain Name Availability
After you have brainstormed a few names for your real estate blog, you should check if the .com domain name is available.
A domain name is the web address of your blog. It is how people will find your blog online. It is usually your blog name followed by .com.
You must check if both the .com domain name and the social media handles are available. You can use Namechk to check the availability of both your domain name and social media handles.
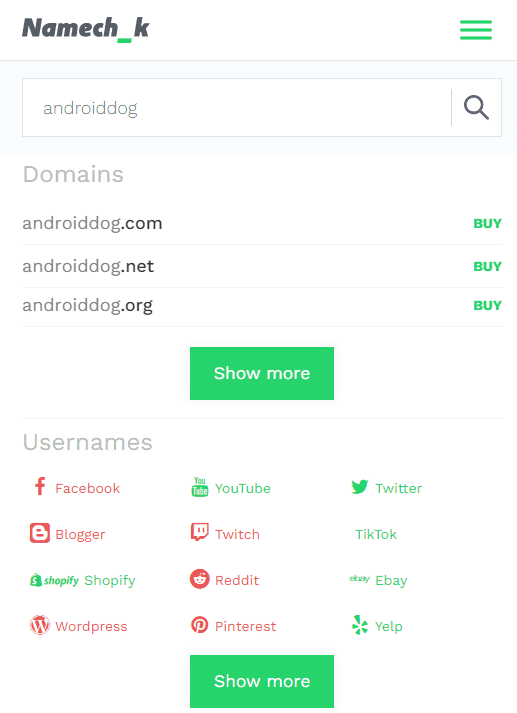
Here are a few things to keep in mind when selecting a domain name:
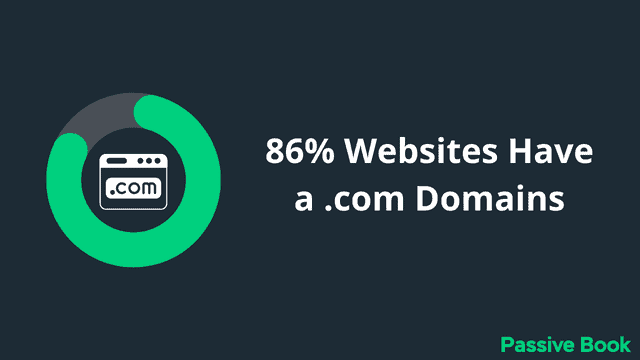
- Choose a .com domain name. 86% of the internet uses .com, so your visitors are likely to try visiting your blog by typing .com. Avoid other extensions like .net or .org.
- Don’t include hyphens and numbers.
- Do not use words with multiple spellings (for example colour vs color).
- Shorter domain names are better. Try to keep it under 12 characters.
- Spelling & Pronunciation should be easy and intuitive.
- It should be easy to remember.
- Avoid words that can be misread together. For example, therapistjohn.com can be read as Therapist John or The Rapist John.
- Make sure it’s not trademarked or copyrighted by someone else. The AI writing software Jarvis.ai had to rebrand to Jasper.ai because Marvel sued them for the Iron Man reference. Lawsuits will happen once your blog is established.
Register a Domain Name
Once you decide your domain name it is time to register it.
You should register your domain with NameCheap because you will get domain privacy for free. Other providers charge $12 per year for domain privacy. Without domain privacy, your name, home & email address will be accessible to the public.
Step 1: Go to NameCheap. Enter your domain name with the .com extension.
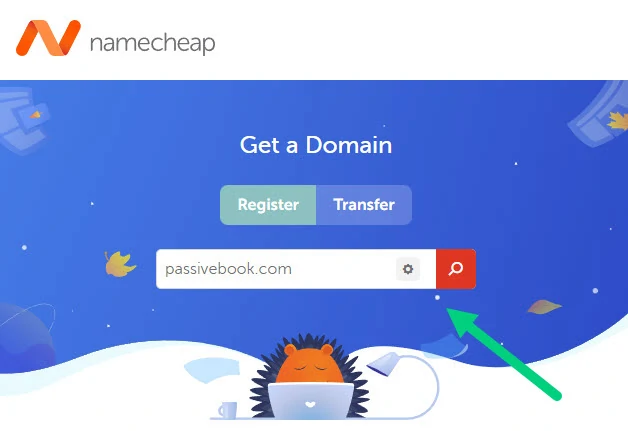
Step 2: Select the .com extension and click the Add to Cart button.
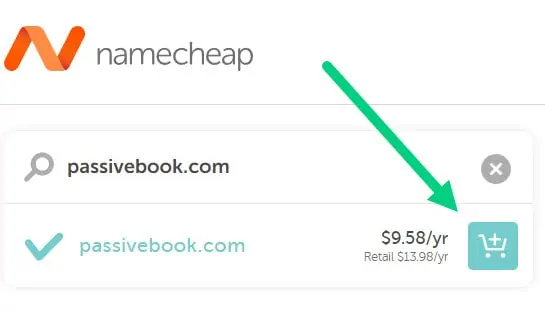
Step 3: After adding the domain to the cart, click on the Checkout button.
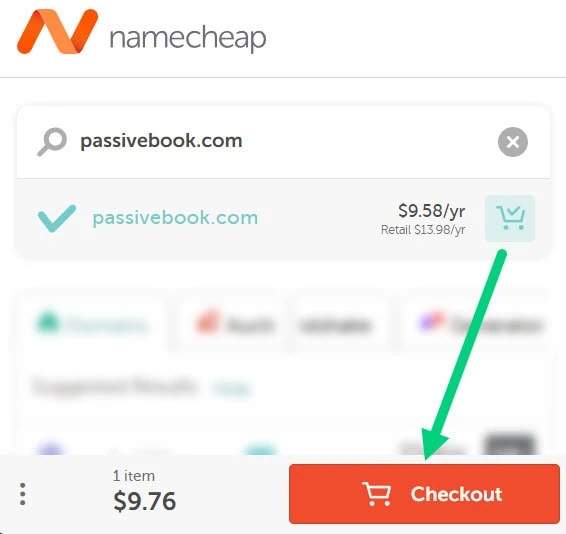
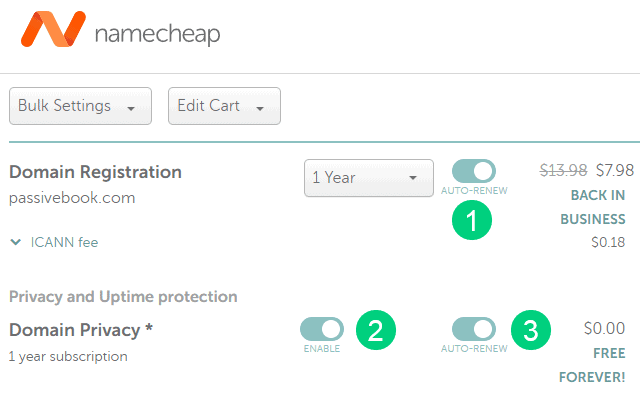
Step 4: Enable Domain Privacy that comes for free along with auto-renew. You don’t need any other paid addon.
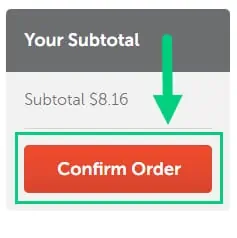
Step 5: Click on Confirm Order. Pay to complete your purchase.
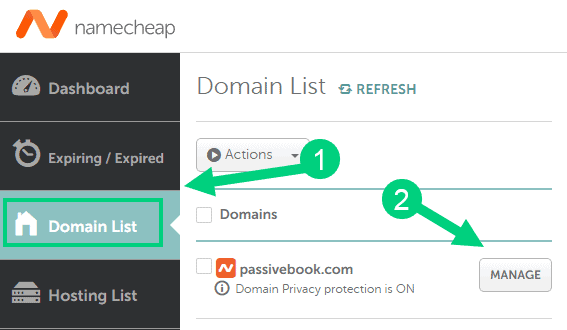
Step 6: Log in to Namecheap and click on Domain List ❶ in the left sidebar and then click Manage ❷ next to the domain you just purchased.
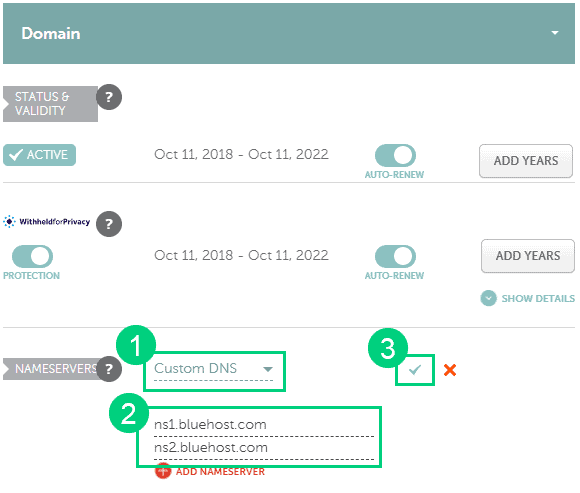
Step 7: Under the Nameservers section, select “Custom DNS” from the dropdown ❶. Then enter the following two nameservers ❷ ns1.bluehost.com and ns2.bluehost.com as shown in the image. Then click the green tick ❸ to save. If you use a hosting provider other than Bluehost, enter their nameserver values in this step instead.
Can I get a free domain name?
Your web hosting provider might give you a free domain name for one year but they charge $12 for domain privacy which is free in Namecheap. From the second year, you will pay for both the domain and privacy which will cost you more than $20+. So it is cheaper to just register your domain with Namecheap from the beginning. Also using different companies for web hosting and domain registration will allow you to easily switch your blog host later without transferring domains.
Can I change the name of my blog later?
You will lose your search engine rankings if you change your blog’s name once it gets links from other websites. It will take as long as a year or more for you to regain the lost traffic. It is possible to mitigate problems by having proper redirects. But you will have to renew both your old and new domains every year. So try to avoid changing your blog’s name once it is established.
4. Setup WordPress
The next step is to get your blog up and running in WordPress.
WordPress is a content management system (CMS) that allows you to easily create and manage your blog’s content.
Why Choose WordPress.org?
There are many blogging platforms but the self-hosted wordpress.org powers 70% of blogs on the internet. 42% of all websites on the internet use WordPress.
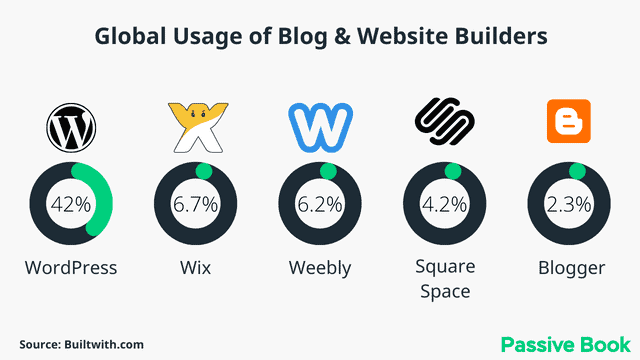
Some of the advantages of using WordPress are:
- It is free and open source.
- It is very easy to use. You can create a blog in less than 30 minutes without any technical knowledge.
- It is very flexible. You can easily change the look and feel of your blog with themes and plugins.
- It has a large and active community of users. You can easily find help online, or in WordPress forums if you have any questions.
WordPress.org vs WordPress.com
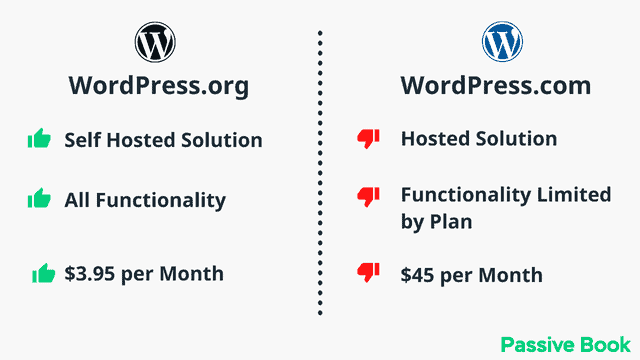
There are two WordPress platforms:
- WordPress.org: The self-hosted version of WordPress where you need to buy your own hosting and domain name. This is the platform we recommend. It gives you full control over your blog and how you monetize it.
- WordPress.com: The hosted version of WordPress where they provide everything for you including hosting and a domain name (for a price). You do not have full control over this platform as they can delete your blog at any time if they find that you are violating their terms of service. You are also limited by how you can monetize your blog.
Why Avoid Free Blogging Platforms
While there are many free platforms like Blogger, Tumblr, and Wix to choose from, we do not recommend them.
Some of the disadvantages include:
- Limited Search Traffic. You will find it extremely difficult to drive search traffic to these free platforms because they are not optimized for search engines.
- Limited monetization options. You will be limited in how you can make money from your blog on a free platform.
- Lack of control. Many of these platforms have strict guidelines and often delete blogs if they violate their terms of service.
- No ownership over the content. When using a free blogging platform or website, you do not own the content that you create and are only renting it from the company behind it. If they decide to shut down your account, then all your content (including previously published posts) would be permanently deleted as well.

If you want to start a blog that you can monetize and grow over time, then we recommend using the self-hosted version of WordPress.
How much does it cost to start a real estate blog?
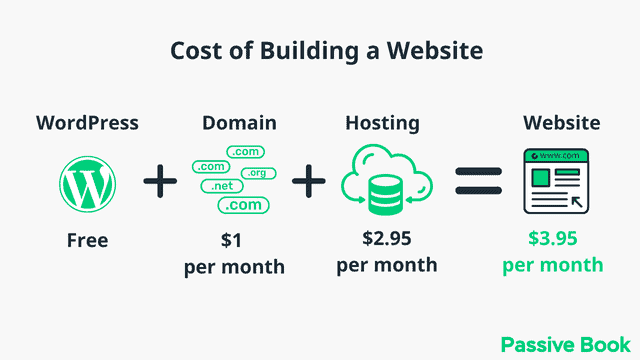
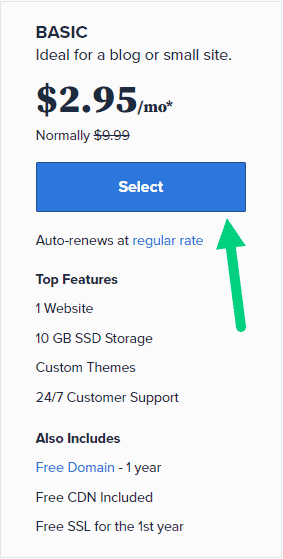
It will cost you $2.95 per month to host your WordPress real estate blog in Bluehost. A domain will cost you $12/year. So that is a total of $4.2 per month, which is less than the price of Netflix for all the unlimited features that a self-hosted WordPress blog has to offer.
What to do if you already have a free blog?
Migrating to WordPress is very easy using a free import plugin. Your posts, pages, images, and comments will get migrated to your new WordPress blog.
Install WordPress in Hosting
To start using WordPress you need to host it on a web server. Your hosting provider will give you the webserver to install and set up WordPress.
Hosting provides the space and bandwidth for your blog to reside online. When a visitor types in your domain name in their web browser, your hosting provider will transfer the files from your web server to the visitor’s browser allowing them to access it.
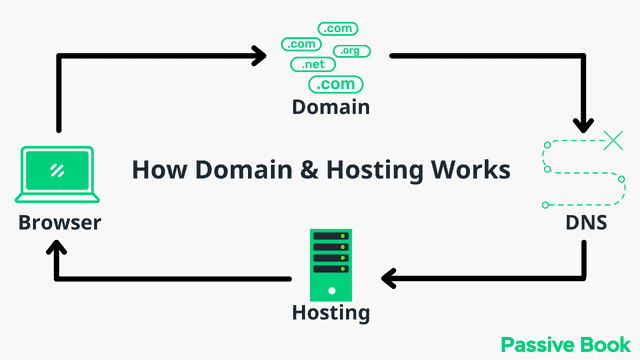
For this guide, we will use BlueHost as our web host. It is a cheap hosting that is extremely easy for beginners to set up. If you use any other web host, the steps will be the same but the user interface may be slightly different.
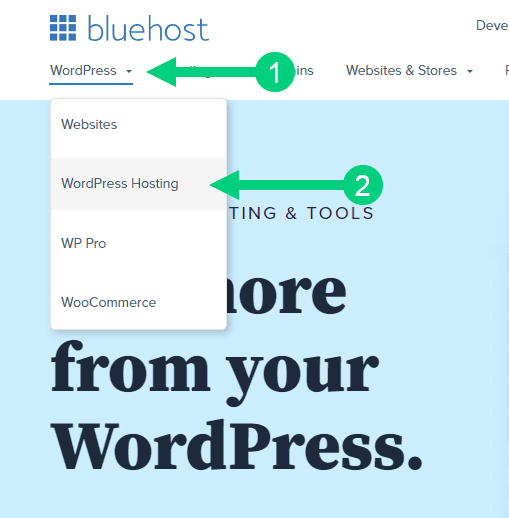
1. Go to BlueHost using this link to get a special discount. Select WordPress > WordPress Hosting from the top menu.
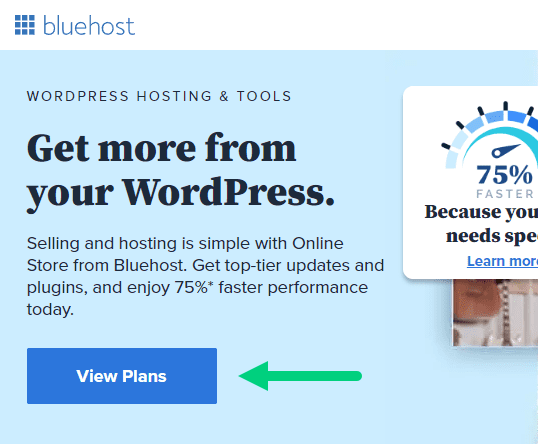
2. Click on the button you see on this page and you will be taken to the pricing section.
3. Select the Basic Plan. You can upgrade to a different hosting plan as you grow.
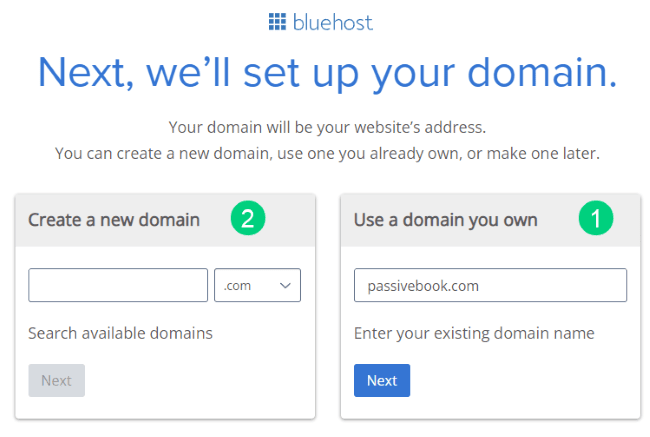
4. If you already have a domain name that you purchased with Namecheap you can put that in the “Use a domain you own” ❶ section. If you don’t have a domain name yet, choose the “Create a New Domain” ❷ to purchase a new domain.
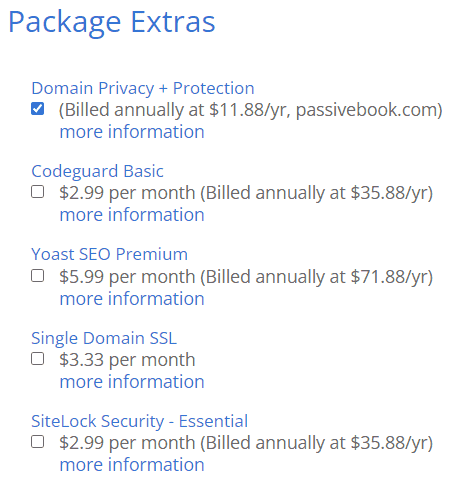
5. In the next screen, enter your information. Uncheck all package extras. If you purchase your domain through Bluehost instead of Namecheap, you may want to enable Domain Privacy. You won’t see the Domain Privacy option if you bought your domain through Namecheap. Namecheap will give you this Domain Privacy for free.
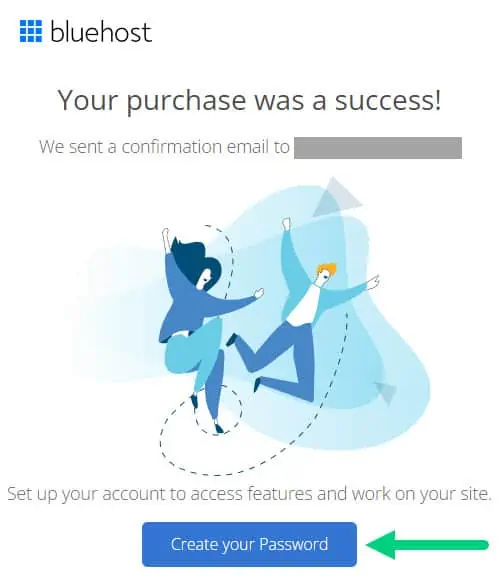
6. Once you have successfully paid, you will be prompted to set a password. Click on the “Create your Password” button.
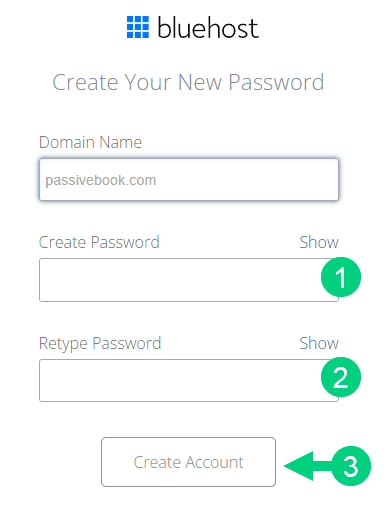
7. Enter your password and create your account. If you lose this password, you can reset it.
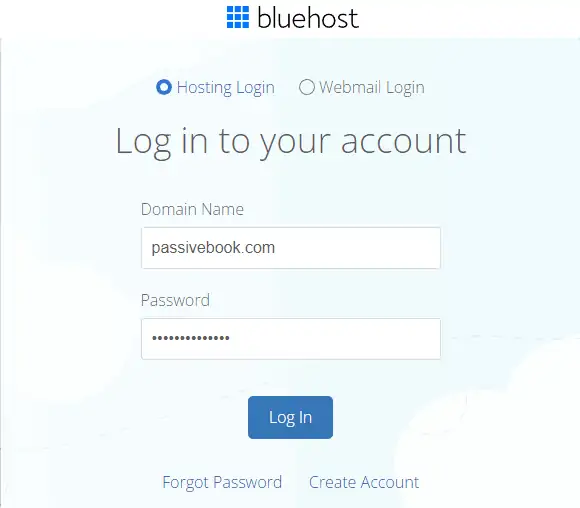
8. After you set your password, log in to Bluehost.
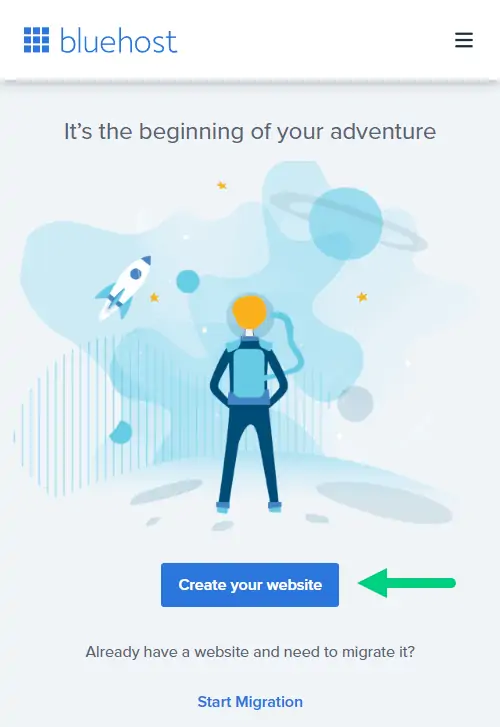
9. Click on the Create your website button on the following screen. This will start a Bluehost Wizard, just click Skip this step wherever possible.
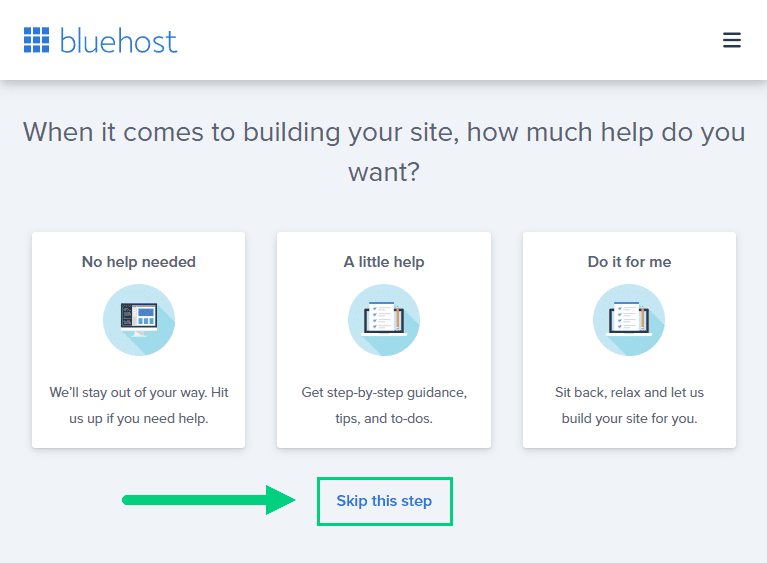
10. On the following page, click “No help needed” or “Skip this step”. We don’t want Bluehost to limit our customization options.
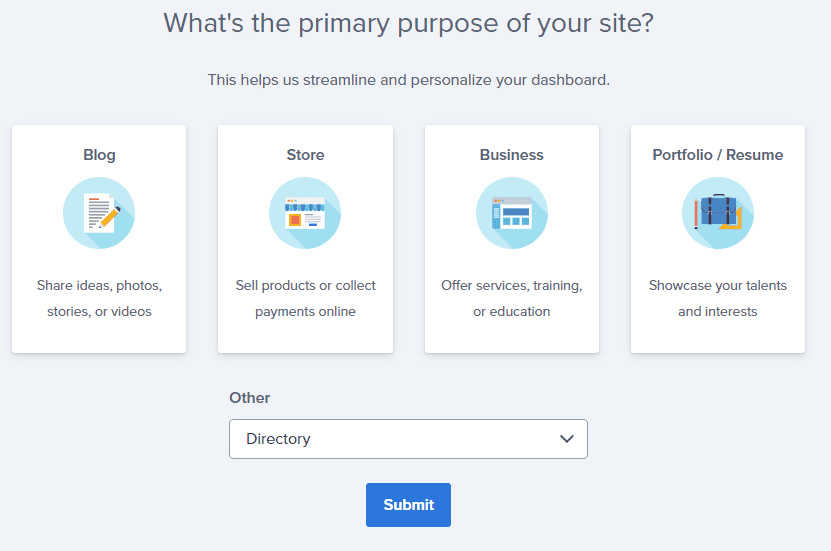
11. On the next page, you will be asked about the purpose of your website. You can choose from any of the available options.
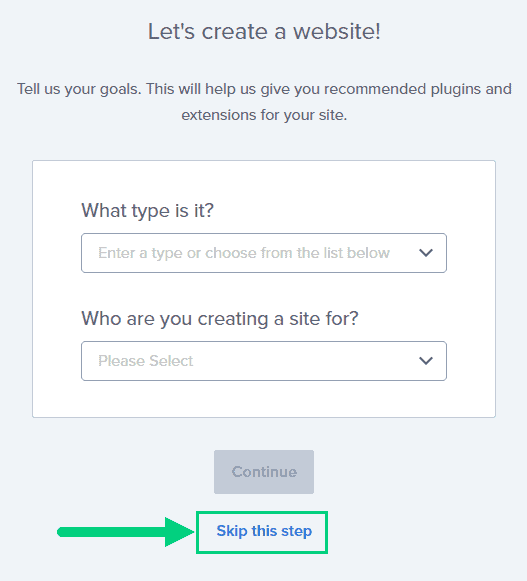
12. On the next page, click Skip this step.
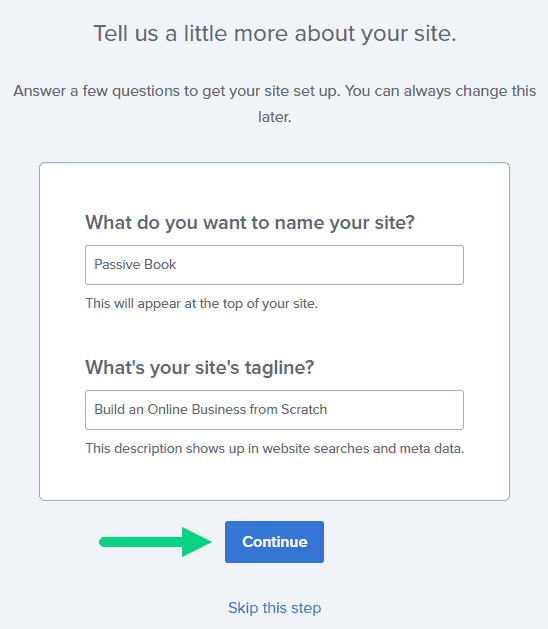
13. On the following page, enter the blog’s name and tagline. You can change this later so feel free to click “Skip this step” or enter something as a placeholder and click Continue.
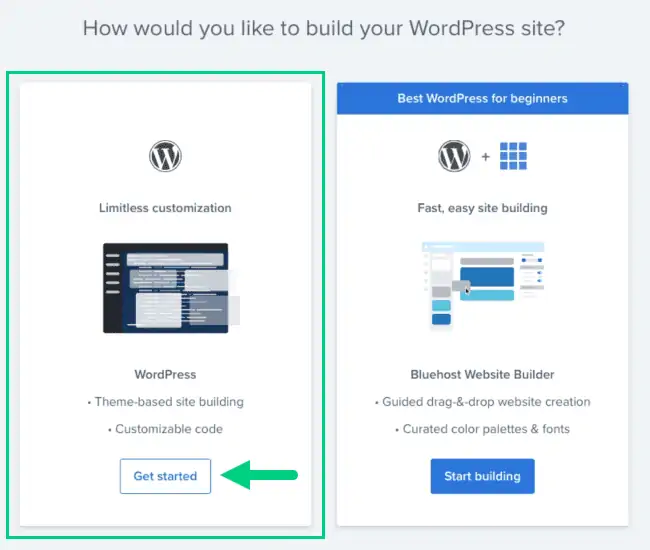
14. Finally you will be asked how you want to build your website. Choose “Limitless customization” to have all the options.
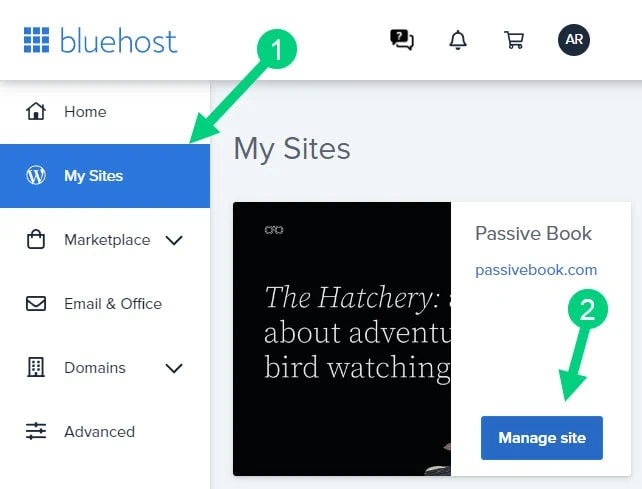
15. You can see your blog by going to yourdomain.com. Go to the Bluehost dashboard and click on the My Sites tab ❶ in the left sidebar and click on the “Manage site” button ❷.
16. Your WordPress site has separate login credentials different from the ones you use to log into Bluehost. You can use this to log in to the WordPress dashboard directly without logging into Bluehost. To get this:
❶ Click on Users on top.
❷ You will be able to see your username and email that you can use to log in to WordPress.
❸ If you click on the three dots you will see the option to Reset your password. ❹
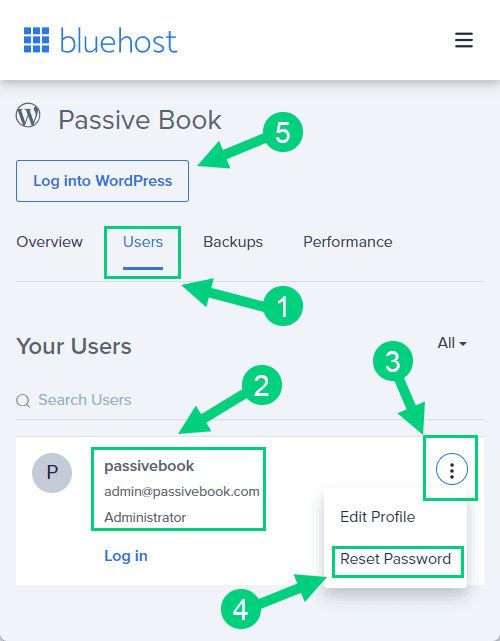
You can log into WordPress from the Bluehost dashboard by clicking the Log in to WordPress button ❺. But it is not recommended you rely on this as your primary login method because you will get locked out of your site if you ever change hosting providers.
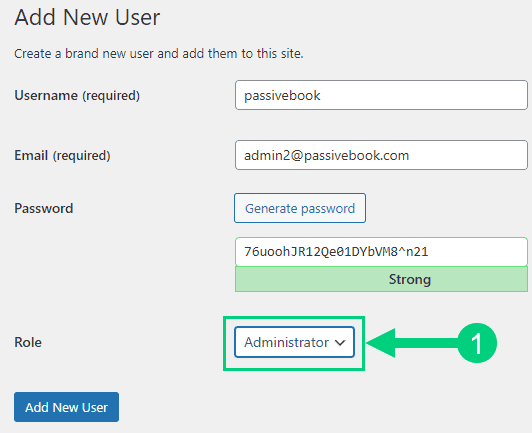
17. You will be taken to the WordPress dashboard where you can reset your password ❶. If you don’t like the username Bluehost created for you, you can Add a New User ❷.

18. If you are adding a new user make sure you specify the user role as Administrator ❶. You can log in as the new user and safely delete the default user created by Bluehost.
Congratulations! You have successfully set up WordPress.
Configure WordPress
Now that you have the basic version of WordPress installed, it is time to customize it to make it look and feel the way you want.
Login to WordPress Dashboard
You can access the WordPress dashboard by visiting yourdomain.com/wp-admin. Use the Email and Password you provided during installation to log in to your WordPress dashboard. If you don’t have a password, use the “Lost your password?” to generate a new password.
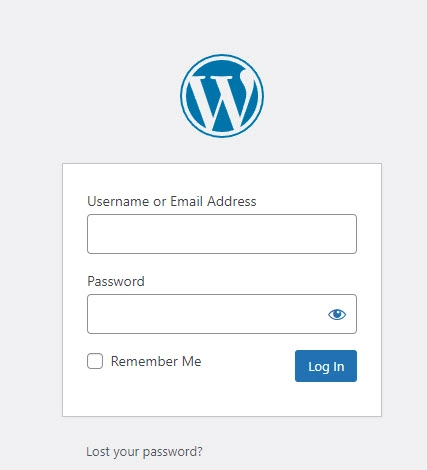
The WordPress dashboard is where you will find all the tools and options to manage your website. The following are some of the things you can do from the WordPress dashboard:
- Add new posts and pages
- Edit existing posts and pages
- Upload images and media files
- Change the look and feel of your website with themes and plugins
- Manage users and comments
- View traffic and analytics
Install WP Themes
A WordPress Theme is a collection of files that control the look and feel of your website. When you install a WordPress theme, it will change the entire design of your website including the fonts, colors, layouts, and how your posts and pages are displayed.
Your new WordPress blog will be installed with a default blog theme that doesn’t look very great.
To install a new WordPress Theme:
Go to Appearance > Themes > Add New in your WordPress dashboard.
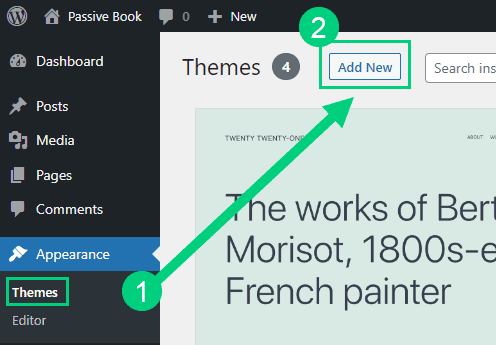
Use the search to find a theme that you like ❶. Before you install the theme, you can see a demo of the theme and learn about its features from the preview screen ❷. If you like the theme, you can install it by clicking the install button ❸. You can also upload a theme from a file on your computer ❹.
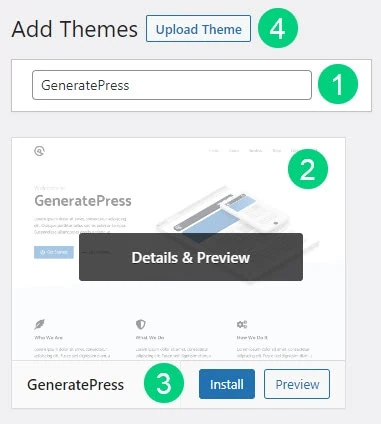
Once installed, click the Activate button to enable the theme.
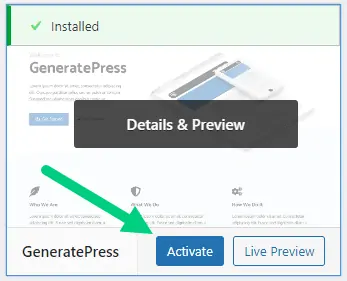
Although you can use a free theme (there are thousands of free themes available), we recommend using a premium theme.
Premium themes not only reduce your website’s load time but also help you customize your website to your heart’s desire.
Here are the premium themes we recommend:
There are also several custom-made real estate blog themes. These themes tend to be bloated with poor code which will slow down the performance of your website. We suggest getting one of our recommended themes for a fast website with unlimited customization possibilities.
Install WP Plugins
A WordPress plugin is software that extends the functionality of WordPress. There are tens of thousands of plugins available for free on the WordPress.org plugin repository.
There are also many premium plugins that you can purchase from independent developers or from companies like Thrive Themes, who offer a suite of premium plugins for their customers.
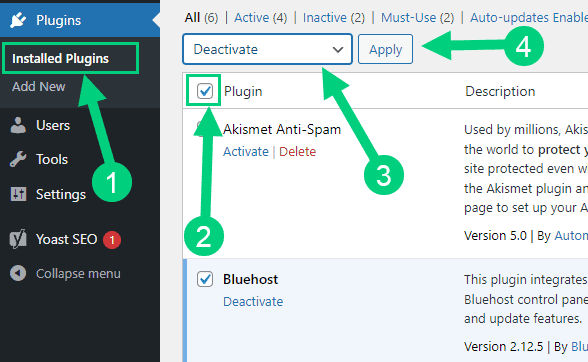
Too many wordpress plugins can slow down your blog site. So before you install new plugins, it will be worth clearing out any existing plugins that your hosting provider installed by default.
Plugins first need to be deactivated before they can be deleted.
❶ Go to WP Admin > Plugins > Installed Plugins
❷ Click on the checkbox to select all plugins.
❸ Select Deactivate from the drop-down.
❹ Click Apply.
❺ Repeat the above steps but select “Delete” instead of “Deactivate” from the dropdown in ❸ to delete all the deactivated plugins.
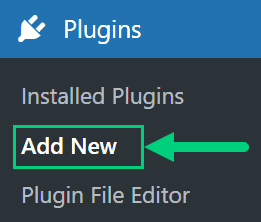
To install new plugins go to the WP Admin > Plugins > Add New.
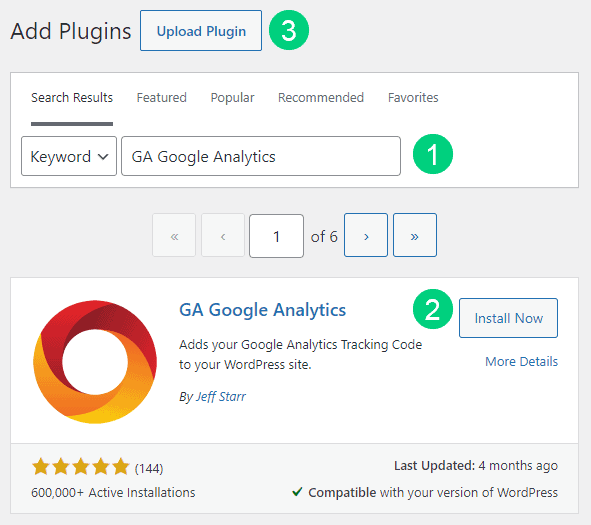
On the plugins page:
❶ Search for the plugin you want in the search bar
❷ Click Install Now. Once you install the plugin, you must also activate the plugin for it to be enabled.
❸ If you are installing a paid plugin you can upload the plugin instead.
There are many different real estate blog plugins that you can install, but here are the ones which we recommend:
Real Estate Listing Plugins: Real estate listing plugins help you easily manage your real estate listings on your website. The plugins should integrate well with popular IDX and MLS providers and allow you to easily manage your real estate listings and property details from your WordPress dashboard.
Recommended Plugin: Realtyna (free) or Elastik (free).
Backup Plugin: A WordPress Backup Plugin helps you create backups of your website so that you can restore it in the event of a disaster.
Recommended Plugin: WPVivid (paid) or UpdraftPlus (free).
SEO Plugin: A WordPress SEO Plugin helps you optimize your website for search engines.
Recommended Plugin: RankMath (paid).
Google Analytics Plugin: A WordPress Google Analytics Plugin helps you connect your website with Google Analytics, so you can track your website traffic and how users interact with your website.
Recommended Plugin: RankMath (paid) or GA Google Analytics (free).
Cache Plugin: A WordPress Cache Plugin helps you speed up your website by caching your website’s static files.
Caching static files means that the plugin will store a copy of your website’s static files (like images, CSS, and JavaScript files) on the server and serve them to your users instead of having to generate them every time they access your website.
This can significantly improve the performance of your website and reduce load times for your users.
Recommended Plugin: WP Rocket (paid).
Page Builder Plugin: A WordPress Page Builder Plugin helps you easily create custom pages and posts with drag-and-drop.
Recommended Plugin: Thrive Architect (paid).
Security Plugin: A WordPress Security Plugin helps you secure your website from hackers and malware.
Recommended Plugin: Wordfence (free).
Social Media Plugin: A WordPress Social Share Plugin helps you easily add social media buttons to your website so that your users can share your content on their social media profiles.
Recommended Plugin: Easy Social Share Buttons (paid).
Email List & Lead Generation Plugin: A WordPress Email Opt-in Form Plugin helps you collect email addresses from your website’s visitors so that you can add them to your email list.
Recommended Plugin: Thrive Leads (paid).
Customize WordPress
Once you have installed your theme and plugins, it is time to customize the wordpress blog platform:
Change Colors, Fonts & Spacing
You can set the font, colors, and spacing by going to Appearance > Customize in your WordPress dashboard. Premium themes like GeneratePress allow you to customize every aspect of your blog.
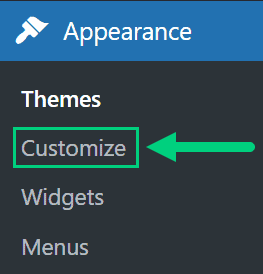
Check out our Blog Fonts & Typography guide to choose the right font and typography settings for your blog.
Add Your Logo
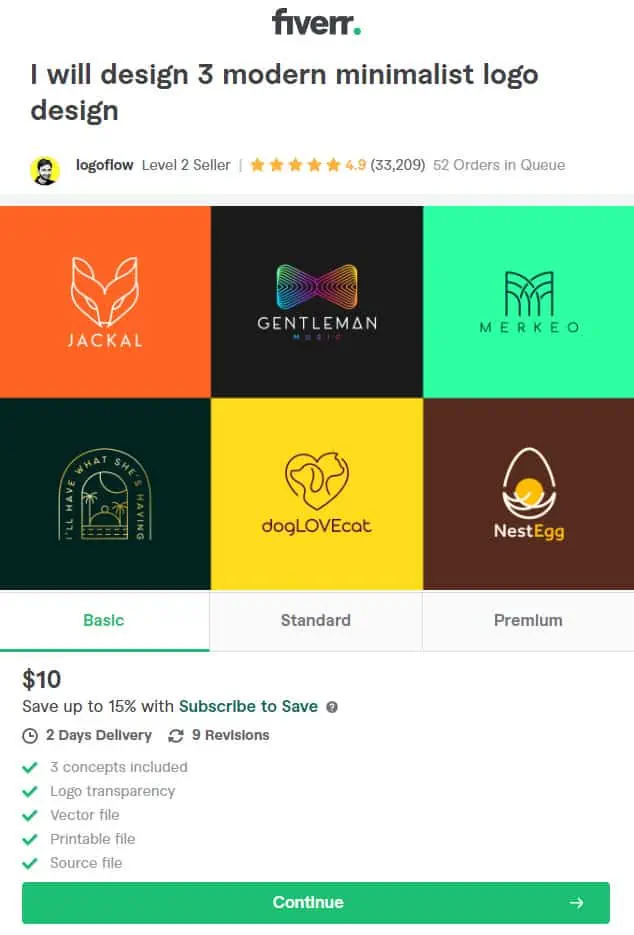
Get a logo designed for your blog from Fiverr. Then set the logo of your blog by going to Appearance > Customize in your WordPress dashboard. A logo is not required for a successful blog but it can definitely help appeal to your target audience.
Change Favicon
Favicon is the image that appears in the browser tab and bookmarks. Set the Favicon from the Appearance > Customize section of the WordPress dashboard.

Create Menus
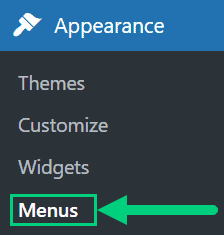
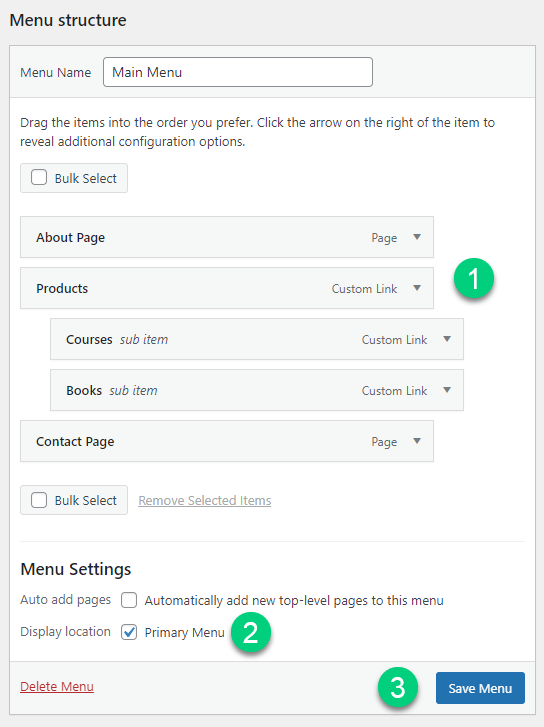
The header and the footer menu can be set from the Appearance > Menus in your WordPress blog dashboard.
You can nest menu items so that it appears as a dropdown menu ❶. You can use the menu as your primary or secondary navigation menu ❷. Don’t forget to save your menu ❸.
Create Widgets
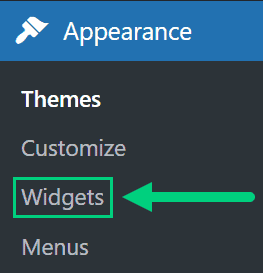
If you have a sidebar, you can add widgets to it. Go to Appearance > Widgets in your WordPress admin dashboard.
Check out the list of the most useful Blog Widgets and how to add them to your blog.
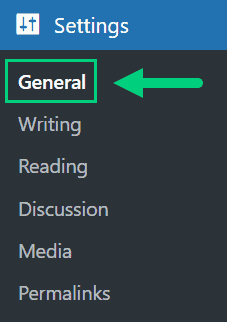
Set Title & Tag Line
The next step is to change your General Settings. Go to Settings > General in the WordPress Admin area.
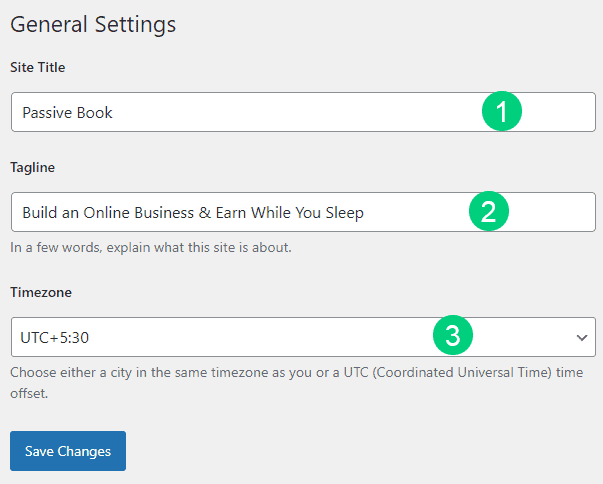
You can set your Site Title, Tagline, and Time Zone from this screen.
Set Permalinks
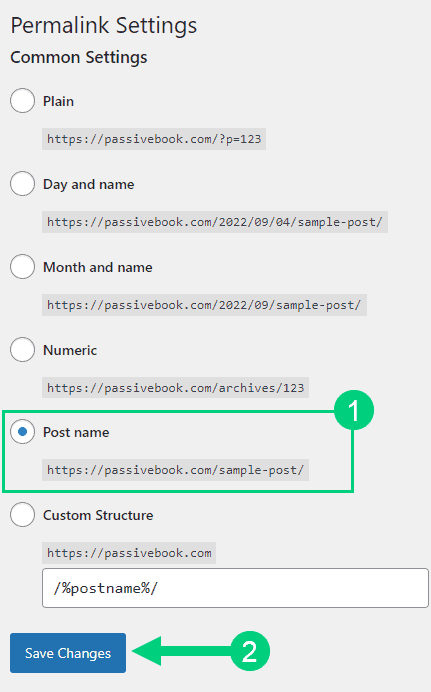
The ideal URL structure for SEO is yourdomain.com/sample-post. Set your permalink structure by going to Settings > Permalinks in your WordPress blog dashboard.
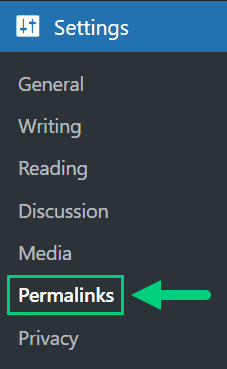
Select the “Post name” radio button and save changes.
Enable Search Visibility
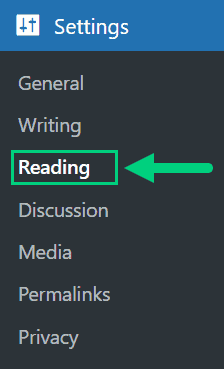
Chances are you want your blog to show up on Google so people can find you. Go to Settings > Reading in your WordPress dashboard.
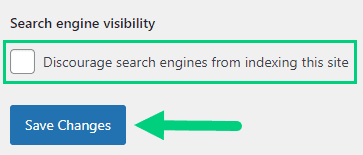
To get search engine traffic, ensure the checkbox “Disable search engines from indexing this site” is Unchecked. You can find this option in Settings > Reading. Most of the time this should be unchecked by default but if it is not, then uncheck it to ensure your site gets traffic from search engines.
Adjust Comment Settings
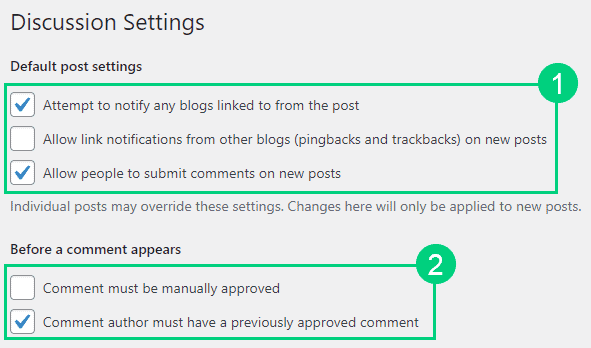
Next, you will want to change the Discussion Setting (aka Comments). Go to Settings > Discussion in your WordPress admin area.
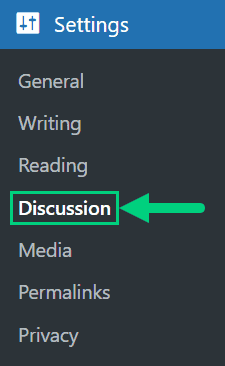
❶ You may want to enable or disable comments on this page. You can also disable pingbacks and enable comment moderation.
❷ You can also set comment approval settings.
If you want to design your blog further, check out our dedicated guide on blog design which has all our best blog design recommendations.
Create Static Pages
There are a few essential pages that you need to create for your real estate blog before you can start blogging.
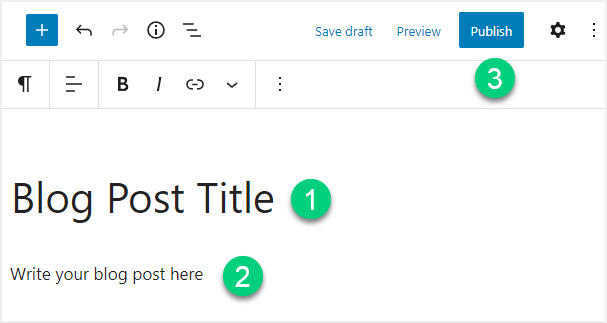
Use pages in WordPress to add static content. Go to WP Dashboard > Pages > Add New.
- Write the headline of your content.
- Populate the body content
- Click the publish button.
You may want to create the following pages:
Home Page
A home page is the main page of your website. It is the page that your users see when they first visit your website. The home page typically contains a welcome message, a description of your website, and a list of your latest blog content.
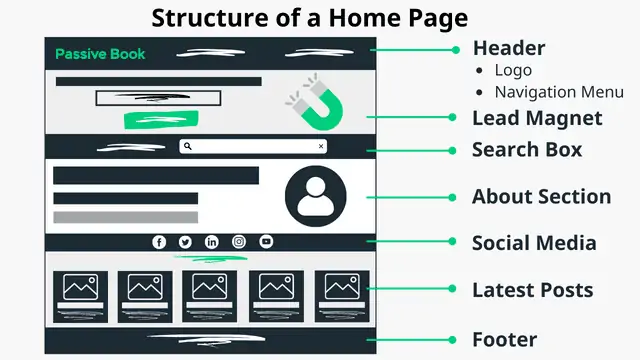
You can create a professional home page for your real estate blog using a page builder like Thrive Architect.
About Page
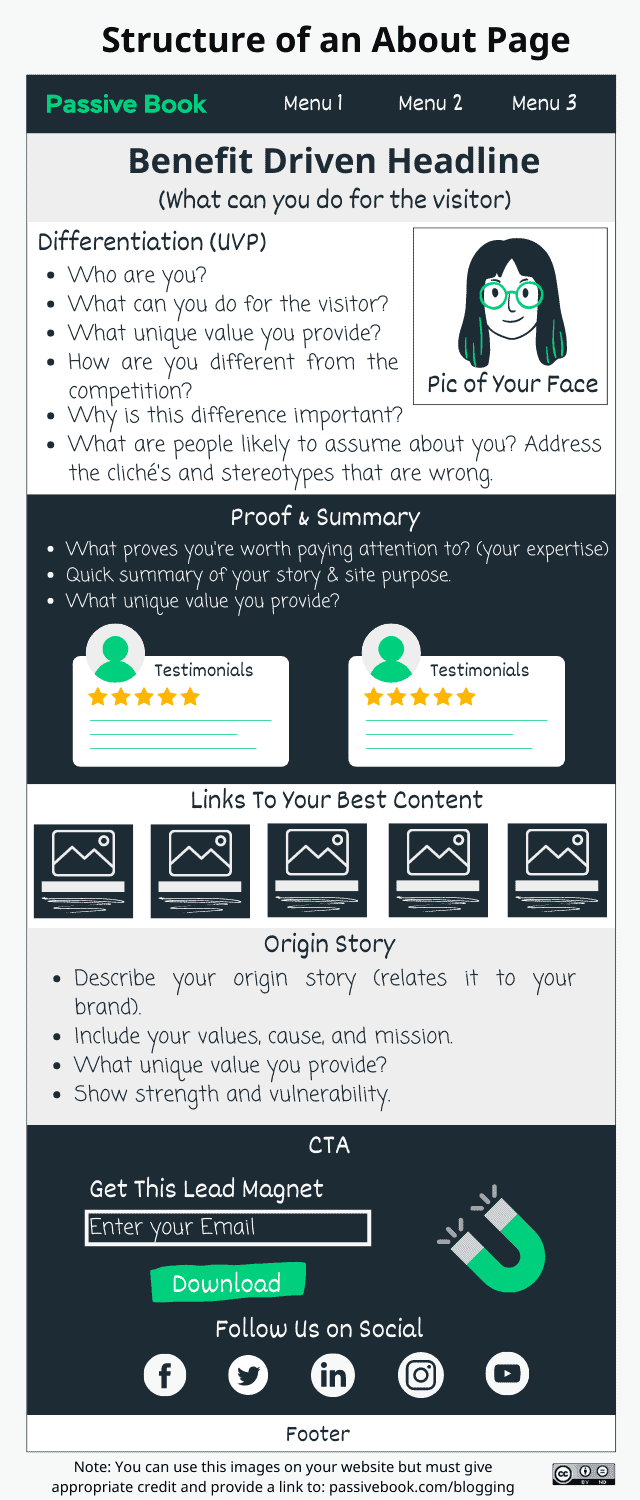
An about page is a page that tells your users who you are and what your website is about. It is one of the most important pages on your website because it helps your users understand what they can expect from your website.
Your About page should include:
- A brief description of who you are
- A photo of you or your logo
- A list of your website’s key features or services
- Links to your social media profiles
Contact Page
A contact page is an important page for any website. It allows your users to easily get in touch with you if they have questions or comments about your website.
Your contact page should include:
- A contact form that visitors can fill out to send you a message
- Your email address or a link to your email address
- Your phone number
- Your mailing address (if you have one)
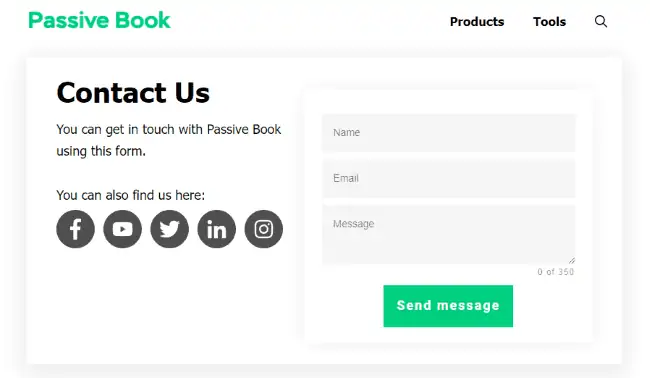
Use contact form plugins like Fluent Forms to create the form on your contact page.
Privacy Policy
A privacy policy page is a page that tells your users how you collect, use, and protect their personal information.
If you plan to collect any personal information from your website’s visitors (such as their name, email address, or phone number), then you need to have a privacy policy page.
WordPress generates its privacy policy for you. But you can also use a tool like Termly to generate your privacy policy.
Terms of Service
A terms of service page is a page that tells your users how they can and cannot use your website. It includes rules, guidelines, and restrictions for how your users can interact with your website or its content.
You may also want to include information about how you collect and use user data on your terms of service page. For example, if you plan to collect user data for marketing purposes, you should include that in your terms of service page.
Use a terms & conditions generator like Termly to create it.
5. Write & Publish Blog Posts
Now that you have your real estate blog set up, it’s time to write and publish your first blog post. To craft the perfect blog post, check out our in-depth guide on How to Write A Blog Post. Here we will go over specific tips for a real estate blog.
1. Brainstorm Topics
You should brainstorm 100 topic ideas for your real estate blog. This will ensure that you always have content to write about in your real estate blog.
The goal is to find topics for your real estate blog that your audience is searching for in Google. The type of content you write on your real estate blog will depend on your specific niche.
Here are a few real estate blog post ideas, you can potentially cover in your real estate blog:
- How-To Guides
- List Posts
- Tips Posts
There are a few ways to brainstorm specific content:
Look at Competitors
Competitors are a great source of inspiration for content ideas.
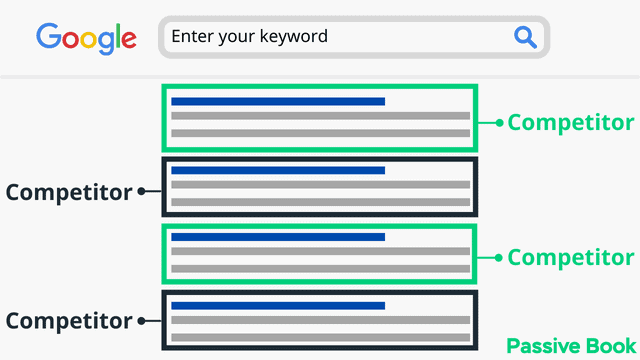
When you’re looking for topics to write about in your real estate blog, it can be helpful to look at the articles your competitors are writing. This will give you an idea of what topics are popular in your industry, and it will help you come up with new ideas for your own blog.
To find competitor blog posts, you can just google your keyword and look at the pages ranking on top.
Do Keyword Research
One great way to come up with topic ideas for your real estate blog is to use a keyword research tool like KeywordTool.io. This tool will help you find keywords that your audience is searching for in Google.
To use this tool, simply enter a topic or keyword into the search bar. KeywordTool.io will then generate a list of related keywords.
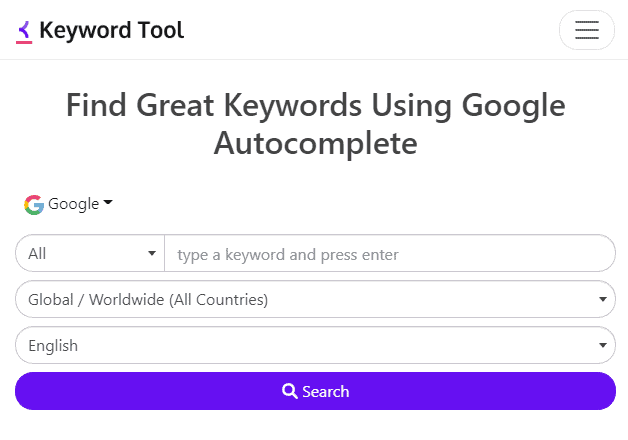
You can then use these keywords to come up with ideas for blog posts.
Community & Forums
One great way to come up with topics for your real estate blog is to look at the discussions happening in online communities and forums. This will give you an idea of the types of questions people are asking about real estate, and it will help you come up with new ideas for your own blog.
2. Create an Editorial Calendar
An editorial calendar is a planning tool that will help you stay on track with your content creation and publishing schedule.
A good editorial calendar will include:
- The topics/keywords for each blog post
- The due dates for each post
- Any supporting images or other media that need to be created
It’s a good idea to create your editorial calendar in a spreadsheet, as this will make it easier to sort and organize all of your content ideas.
Download Content Calendar Template

Steal our exclusive content calendar template. Have it delivered directly to your inbox:
3. Write a Blog Post
Now that you have a topic for your first blog post, it’s time to start writing!
How-To Posts
One of the most popular types of content in real estate blogs are how-to posts.
How-to posts are instructional articles that take your readers step by step through how to do something related to real estate.
To write how-to blog posts, start by breaking down the task you’re writing about into simple steps.
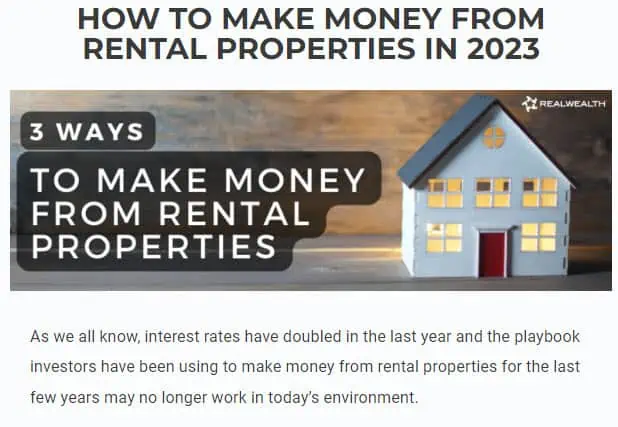
Once you have your steps, you can start writing each step as its own section in your blog post.
Make sure to use clear and concise language so that your readers will be able to follow along easily.
It can also be helpful to include images or videos throughout your how-to post, as this will make it even easier for your readers to follow along.
List Posts
Another popular type of content in real estate blogs are list posts.
List posts are articles that are formatted as a list of items related to real estate.
For example, a list post about real estate investing could include a list of the best books on real estate investing or the top 10 websites for real estate investors.
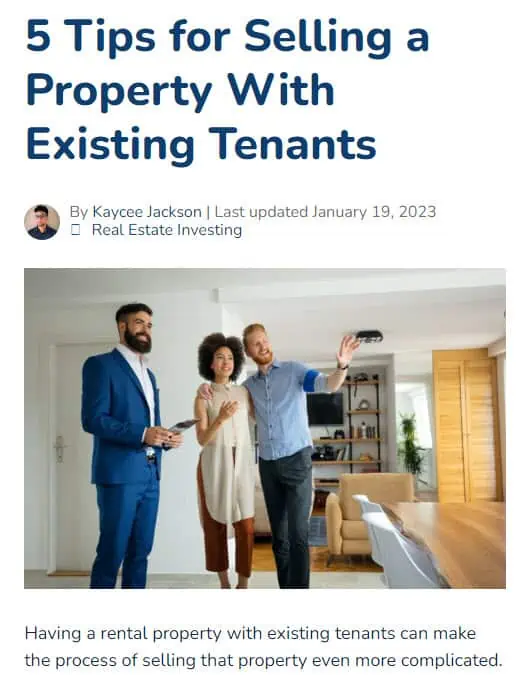
To write a list post, start by brainstorming a list of items that are related to your topic.
Once you have your list, organize the items in an order that makes sense. For example, if you’re writing about how to invest in real estate, you might want to start with beginner topics and then move on to more advanced topics.
Next, create short descriptions for each item on your list. These brief summaries will be used as section headings throughout your blog post.
Finally, write a brief introduction for your list post and include any supplemental information you think readers might need or find helpful.
Neighborhood & Market Updates
Neighborhood and market updates blog post type provides updates on local real estate trends, housing market conditions, and new developments in specific neighborhoods or areas.
Examples of blog post titles for this type of post include:
- “Real Estate Market Update: [Neighborhood Name]”
- “New Developments Changing the Face of [Neighborhood Name]”
- “Housing Market Trends to Watch in [City Name]”
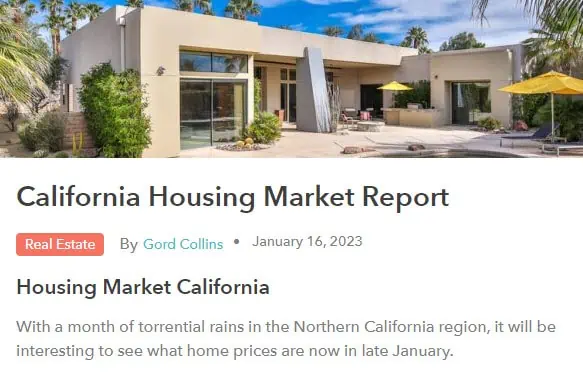
Research the latest market trends and data for the specific area you are writing about. Use a variety of sources, such as real estate data websites, local news, and government reports, to gather information. Keep your tone informative, but also engaging, and use visuals like images and charts to make your post more interesting.
Home Buying & Selling Tips
This blog post offers advice for real estate investors including tips on the home buying and selling process, including how to find a good real estate agent, how to negotiate a fair price, and how to prepare a home for sale.
Examples of blog post titles for this type of post include:
- “10 Tips for Finding the Perfect Real Estate Agent”
- “Negotiating the Best Price for Your Home: A Guide for Sellers”
- “Preparing Your Home for Sale: A Checklist for Homeowners”

Use your personal experience and expertise as a real estate agent to provide valuable insights and advice. Be specific and detailed in your tips, and include examples and case studies if possible. Use a conversational tone and avoid industry jargon to make your post accessible to a wide audience.
Home Improvement & Renovation ideas
Home improvement and renovation ideas blog post type shares ideas and tips on how to improve and update a home, including DIY projects, design inspiration, and cost-effective solutions.
Here are a few examples:
- “DIY Home Improvement Projects: How to Update Your Home on a Budget”
- “Design Inspiration: The Hottest Home Renovation Trends of the Year”
- “Cost-Effective Solutions for Updating Your Home: Tips from a Professional Contractor”
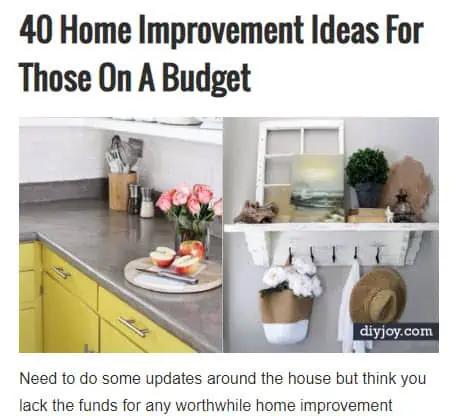
Research the latest home design trends and innovations. Use plenty of visuals, such as images and videos, to show readers what you’re talking about. Provide detailed instructions and materials lists for any DIY projects you include.
Investment & Rental Property Tips
Investment and rental property tips post offer advice and tips on buying and managing rental properties and other real estate investments.
Here are a few examples:
- “The Beginner’s Guide to Investing in Rental Properties”
- “Maximizing Returns on Your Real Estate Investments: Tips from a Pro”
- “Managing Rental Properties: A Landlord’s Guide to Success”
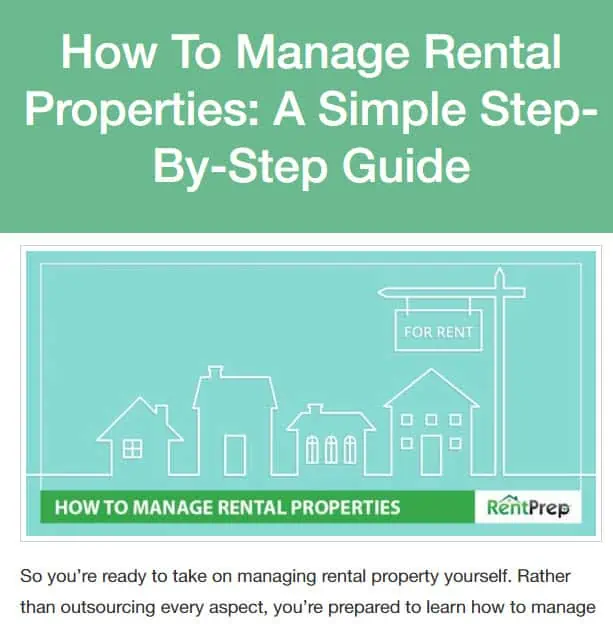
Draw on your own experience and research to provide valuable insights and advice. Use examples and case studies to illustrate your points. Be mindful of your target audience – if you are writing for new landlords, explain the basics, if you are writing for experienced landlords, provide more advanced tips.
First-time Homebuyer Guides
First-time homebuyer guides blog post type creates a comprehensive guide for first-time homebuyers, covering everything from budgeting and saving for a down payment, to understanding the home buying process and getting a mortgage.
Here are a few examples:
- “First-Time Homebuyer’s Guide: Everything You Need to Know”
- “Saving for a Down Payment: Tips and Tricks for First-Time Homebuyers”
- “Navigating the Home Buying Process: A Step-by-Step Guide for First-Time Buyers”

Break down the home-buying process into simple and easy-to-understand steps. Include links to helpful resources, such as government websites, financial calculators, and other guides to provide more detailed information.
Home Staging & Decorating
Home staging and decorating blog post type shares tips and ideas on how to stage a home for sale, and how to decorate a new home to make it feel like your own.
Here are a few examples:
- “Home Staging 101: How to Prepare Your Home for Sale”
- “Decorating on a Budget: How to Make Your New Home Feel Like Your Own”
- “Design Trends for Staging Your Home: What’s Hot and What’s Not”

Use plenty of visuals, such as images and videos, to show readers what you’re talking about. Be mindful of the target audience – if you are writing for homeowners looking to sell, focus on staging, if you are writing for new homeowners, focus on decorating. Provide specific and actionable tips that readers can use right away.
Real Estate Market Forecasts
Real estate market forecasts blog post type shares your predictions and analysis of future real estate market conditions, including where the market is headed and what to expect in the coming months or years.
Here are a few examples:
- “Real Estate Market Forecast: What to Expect in [Year]”
- “Housing Market Trends to Watch in [City/Region]”
- “Real Estate Investing: Where the Market is Headed”

Research the latest market trends and data to provide accurate and up-to-date forecasts. Use a variety of sources, such as real estate data websites, local news, and government reports, to gather information. If you are writing for homeowners, focus on the local market, if you are writing for investors, focus on the national or global market.
Mortgage & Financing Guides
Mortgage and financing guides blog post type provides information and advice on the various types of mortgages and financing options available, and how to choose the best one for a specific situation.
Here are a few examples:
- “Mortgage 101: A Beginner’s Guide to Home Financing”
- “Choosing the Right Mortgage: A Guide to the Different Types of Loans”
- “Getting a Mortgage: Tips and Tricks for First-Time Homebuyers”

Real Estate Technology & Innovation
Real estate technology and innovation blog post type highlight new technologies and innovations that are impacting the real estate industry, such as virtual reality, blockchain, and smart home systems.
Here are a few examples:
- “How Virtual Reality is Changing the Real Estate Industry”
- “The Future of Real Estate: How Blockchain is Impacting the Industry”
- “Smart Homes: The Latest Technology for Real Estate”

Explain the technical aspects in simple terms so that the general audience can understand. Provide examples of how these technologies are currently being used in the industry and the potential future impact.
Industry expert interviews
This blog post interviews industry experts, such as other real estate agents, lenders, and home builders, to get their perspectives on the industry and share their insights with your readers.
Here are a few examples:
- “Expert Interview: [Expert Name], [Expert Title], on [specific topic]”
- “Insider Perspective: An Interview with a [specific industry expert]”
- “Gaining insights from the industry: A conversation with [Expert Name]”

Research the expert you are interviewing, and prepare a list of relevant and thought-provoking questions. Make the interview conversational, and let the expert’s voice shine through. Provide context and background information on the expert and the topic they are discussing to give the readers a better understanding.
Write 5x Faster with AI
You can write your new blog post at 5x speed using the AI writing software Jasper. I was able to write over a hundred blog articles in 3 months using Jasper. This blog article you are reading right now was written with the help of Jasper. AI will not only help you write blog posts fast but also with higher quality.
Jasper can write plagiarism-free blog content, articles, social media content, emails, and ad copy. All you have to do is provide a few inputs on what you want and Jasper will do all the hard work of creating the blog content for you. No more writer’s block.
Check out the video below to see Jasper in action:
Try Jasper for free using the links on this page and get 10,000 bonus credits you can use to start writing your first articles.
Once you sign up for Jasper I recommend you spend some time going through the tutorial videos in the Jasper Bootcamp to truly unlock the power of this amazing software.
Check out our guide on How to Write a Blog Post Fast in 15 mins Without Losing Quality for more tips to write fast.
Outsource Writing
If you’re not a confident writer or if you don’t have the time to write blog posts, you can always outsource your content creation.
There are several different ways to outsource your content, but one of the most popular is through online content mills like Fiverr or Upwork.
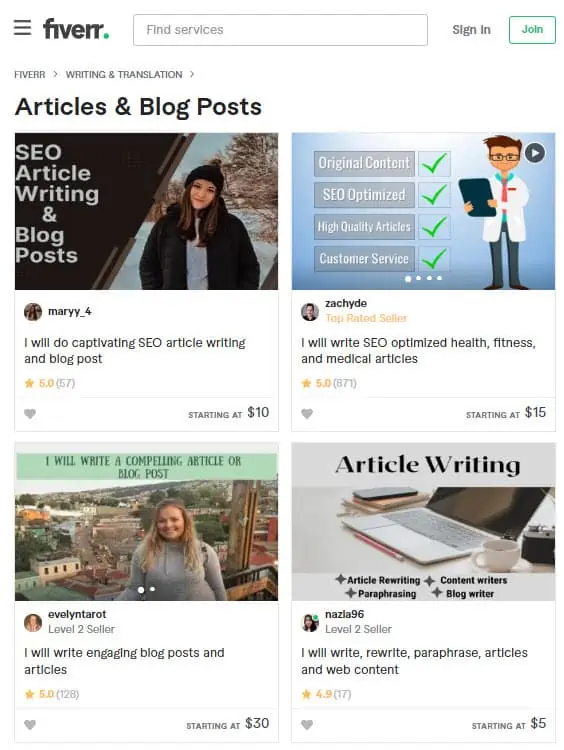
These platforms allow you to connect with freelance writers who can create content for your blog.
When outsourcing your content, be sure to provide clear instructions and examples of the type of content you’re looking for.
You should also budget for how much you’re willing to pay for each article.
4. Add Images
Including images with your blog posts is a great way to make your content more visually appealing and engaging.
There are many different ways to include images with your content, including:
- Stock photos
- Custom graphics or infographics
- Charts, graphs, and other data visualizations
If you’re not comfortable creating images on your own, there are also many stock photo websites that you can use:
Free Options: Pixabay, Pexels, Upsplash
Paid Options: Deposit Photos, Shutterstock, iStock, Getty Images, 123rf.
Canva is a free online graphic design platform that makes it easy to create visuals for your blog posts.

If you’re looking for high-quality stock images to use in your blog posts, upgrading to Canva Pro may be a good option. The Canva Pro library includes thousands of stock photos, illustrations, and graphics that you can use in your content. Plus, Canva Pro also includes several additional features that can help you create better visuals for your blog.
6. Promote Your Real Estate Blog
Once you’ve started writing content for your real estate blog, it’s time to start promoting your blog posts.
Search Engine Optimization (SEO)
SEO is the process of optimizing your website and blog posts so that they rank higher in search engine results pages.
When someone searches for a term related to real estate, you want your blog post to be one of the first results that show up.
There are many different things you can do to improve your SEO, including:
- Choosing keywords carefully and incorporating them into your blog post title, headlines, and body content
- Including links to other relevant pages on your website
- Updating old blog posts with new information or trends
Many factors go into SEO, and it can be a bit confusing to figure out where to start. You can master the more advanced SEO tactics by checking out our SEO Resources.
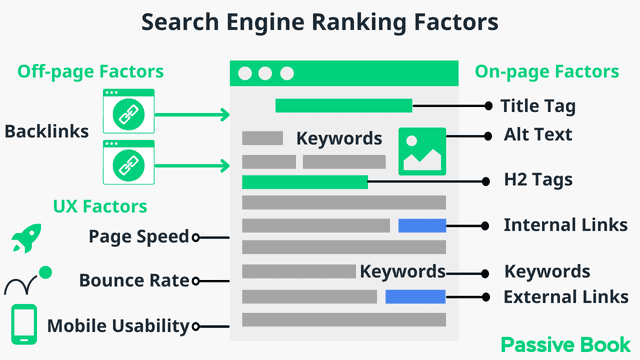
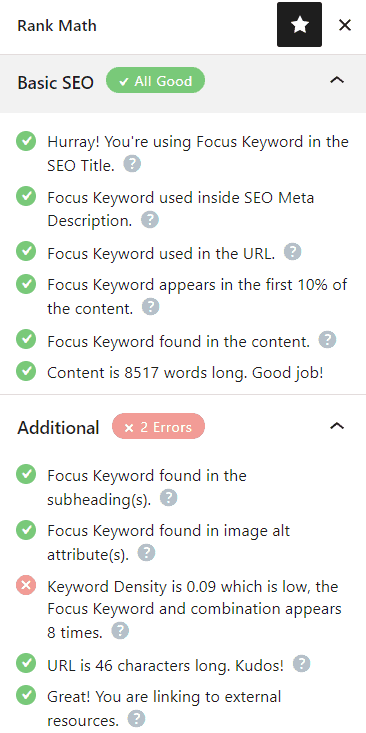
You can ensure you get the basics of SEO right, by completing the recommendations given by the RankMath plugin.
Email Marketing
Another great way to promote your real estate blog is through email marketing. Email marketing can be a powerful tool for staying connected with your readers and building trust. You can email your latest posts and real estate listings.
To get started, simply create an opt-in form to collect email addresses. Then connect your opt-in form to an email marketing service so that your new subscribers are automatically emailed.
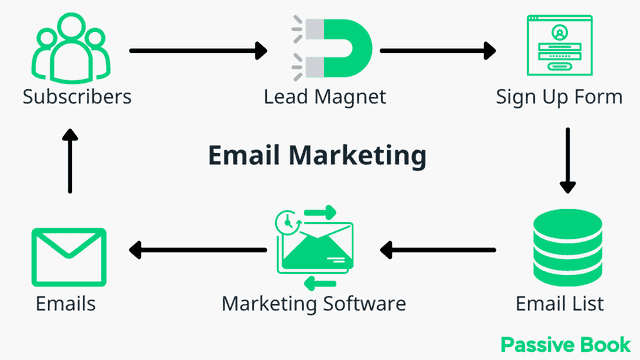
You can use the Thrive Leads plugin to build opt-in forms to collect email addresses. You can then connect the opt-in form to an email marketing service like Active Campaign to send out the emails.
Check out our Email Marketing resources to learn more.
Social Media Marketing
Social media platforms like Facebook, Twitter, and Instagram are also great places to share your real estate blog posts.
When sharing your blog post on social media, be sure to use a catchy headline and include an image. You should also include a call-to-action (CTA) that encourages people to click through to read your post.
There are also several real estate Facebook groups that you can join to connect with other local real estate agents and promote your blog posts.
Guest blogging
Guest blogging is a great way to get your name and your blog in front of a new audience. When you guest blog, you write a blog post that is published on someone else’s website or blog.
To find guest blogging opportunities, start by searching Google for “guest blog real estate” or “submit guest post real estate.” You can also contact other real estate bloggers and ask if they accept guest posts.
When writing a guest blog post, be sure to write an engaging and informative article that will appeal to the blogger’s audience. You should also include a link back to your own website or blog in your author bio.
7. Monetize & Make Money
Now that you’ve started writing content and promoting your real estate blog, it’s time to start monetizing your blog.
Advertising
One of the most common ways to monetize a blog is by selling advertising space. You can sell ad space on your blog directly to advertisers, or use an Ad Network that will automatically place ads on your site and split the revenue with you. We recommend you use an Ad Network because it will help you generate more money and they will manage a lot of the negotiation for you.
To start advertising on your blog, you can sign up for an ad network like Ezoic (they pay more than Google Adsense). When your blog starts getting more than 100,000 page views a month you can monetize with Adthrive.
| Ad Network | Earnings Per 1K Impressions (EPM) | Monthly Traffic Requirement |
|---|---|---|
| Ad Thrive | $13 | 100,000 |
| Ezoic | $3 | 10,000 |
| Media.net | $1 | – |
| Google Adsense | $1 | – |
Affiliate Marketing
Affiliate marketing is a great way to make money from your real estate blog. With affiliate marketing, you promote products or services on your blog and earn a commission when someone clicks through your link and makes a purchase.
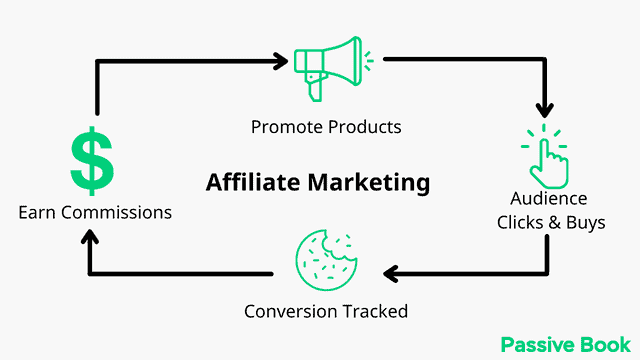
For example, if you wrote a blog post about “The 10 Best Real Estate CRMs” and included an affiliate link to one of those products, you would earn a commission on any sales made through your link.
Digital Products
Another way to monetize your real estate blog is by selling digital products. Digital products are information products that are delivered electronically, such as eBooks, online courses, and webinars.
You can create digital products yourself or partner with other businesses to sell their products on your blog. For example, you could partner with a real estate coaching program and sell their online course on your blog.
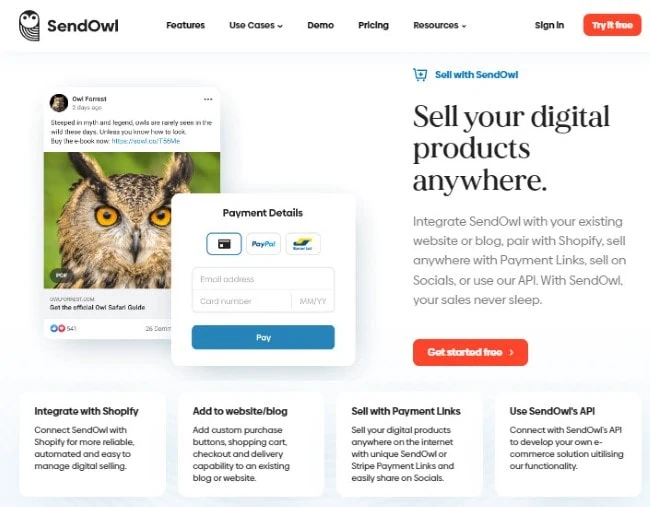
You can use Teachable if you want to sell video courses. Your students will have a dedicated course members area and a community system to ask questions and interact with each other. If you only want to sell eBooks, you can use SendOwl which lets you sell your digital products and eBooks for free.
Sell Services
You can also sell services directly on your blog. If you’re a real estate agent, you could sell your listings or home buyer/seller consultation services.
You can use your blog to generate leads for your business and then follow up with those leads via email or phone.
Sponsored Posts
Another way to monetize your blog is by selling sponsored posts. Sponsored posts are blog posts that are written by someone else but published on your blog. The person who writes the sponsored post pays you to have their article published on your site.

To find sponsored post opportunities, start by searching Google for “sponsored post real estate” or “submit sponsored post real estate.” You can also contact companies that offer products or services related to real estate and ask if they would be interested in sponsoring a post on your blog.
When selling sponsored posts, be sure to disclose that the post is sponsored and include a nofollow link to the sponsor’s website.
FAQ
What does blogging mean in real estate?
Real estate blogging refers to the process of creating and publishing blog posts related to the real estate industry. Real estate blogs can be used to generate leads for businesses, promote properties, or simply provide information and advice to readers.
How often should I post on my real estate blog?
This will depend on your specific goals for your blog, but generally speaking, it is best to post new content on your blog at least once a week to keep readers engaged. You can also supplement your blog posts with images, videos, or infographics to break up the text and keep readers interested.
What are some real estate blog post ideas?
Some popular real estate blog post ideas include guides (such as how to buy a home or how to stage a home for sale), top lists (such as the best neighborhoods for families or the most expensive homes in your city), interviews with industry experts (such as real estate agents or mortgage brokers), and behind-the-scenes looks at properties on the market.
What is an IDX?
An IDX, or Internet Data Exchange, is a service that allows real estate agents and brokers to display listings on their websites in a standardized format. This makes it easier for users to search and browse available homes and properties, helping them find the right home or investment quickly. Some popular IDX services include Redfin, Zillow, and Homesnap. To use an IDX successfully, it is important to have high-quality content on your website that encourages users to engage with your site and explore available properties. Additionally, you should make sure your website is optimized for SEO so that you can drive more traffic to your site from search engines like Google and Bing. Overall, using an IDX service can help improve the visibility of your real estate business and help you connect with potential clients more easily. You can use the WordPress Real Estate Listing Plugin Realtyna to use IDX in your real estate blog.
How much is an IDX?
The cost of an IDX can vary depending on the specific service you choose and the features you need. For example, some IDX services may have a monthly subscription fee, while others may charge a commission for each lead generated. Additionally, some IDX providers offer different levels of service, so be sure to compare pricing and features before choosing a provider. Overall, the cost of an IDX can range from $50-$500 per month, depending on your specific needs. You can use the WordPress Real Estate Listing Plugin Realtyna to use IDX in your real estate blog.
What is an MLS?
An MLS, or Multiple Listing Service, is a service that allows real estate agents and brokers to list properties for sale in a centralized database. This database can be searched by potential buyers who are looking for homes in specific areas or price ranges. Additionally, MLSs typically offer other services such as property valuation estimates and market data analysis. Some popular MLSs include Realtor.com, Zillow, and Trulia. You can use the WordPress Real Estate Listing Plugin Realtyna to use MLS in your real estate blog.
What is RETS?
RETS, or Real Estate Transaction Standard, is a standardized protocol used to connect real estate applications and databases with one another. This allows different systems to share data efficiently, helping to improve the accuracy and efficiency of your real estate business. You can use the WordPress Real Estate Listing Plugin Realtyna to use RETS in your real estate blog.
How can I use RETS for my real estate website?
You can use the WordPress Real Estate Listing Plugin Realtyna to use RETS in your real estate blog. There are many ways that you can use RETS for your real estate website. For example, you could integrate an IDX service into your site so that users can easily search for homes in their area. Additionally, RETS can be used to integrate other 3rd-party services such as title companies and escrow offices into your site, making it easier to complete transactions with clients. Another potential application of RETS is data analytics and reporting, which can help you track your website’s performance and understand how users are interacting with your site.
What Next?
Whether you’re a new real estate agent looking to build your online presence, or an experienced broker looking to grow your business, starting a real estate blog can be a great way to connect with potential clients and build your brand.
By focusing on creating high-quality content, promoting your blog effectively, and choosing the right monetization strategies, you can establish yourself as an authority in the industry and grow your business over time.
We hope this guide showed you how to start a real estate blog.
If you have any questions as you set up your new blog, leave a comment below so we can help you out.
Have you started your real estate blog yet? What type of real estate blog are you going to start? Let us know in the comments.
Share this post with your friends & followers:
