Wondering how to make a website but don’t know where to start?
You have come to the right place.
We will show you how to create a website in under 15 minutes, without writing a single line of code.
You will learn how to build a website for less than the price of a coffee.

Whether it is a static website, blog, forum, e-commerce, or online store, our guide will help you build it step-by-step.
In fact, I followed the steps in this guide to build the website that you are on right now.
Ready to get started? Let’s dive right in.
7 Steps to Start a Website in 2025
There are 7 steps to start a website:
- Decide the Website Type
- Choose a Website Builder
- Register a Domain Name
- Choose a Hosting Provider
- Set Up WordPress
- Configure WordPress
- Drive Traffic
1. Decide the Website Type
Before you make a website you need to decide what type of website you want to make. There are five types of websites:
1. Content websites or Blogs are websites where you write articles to get search engine traffic. Traffic is monetized with ads, affiliate links, or digital products. Our website Passive Book & recipe blog Pinch of Yum are examples of content websites.

2. Membership website restricts access to content. Only paying customers can access the member’s area. Neiru is a membership website that offers Japanese nail art lessons.

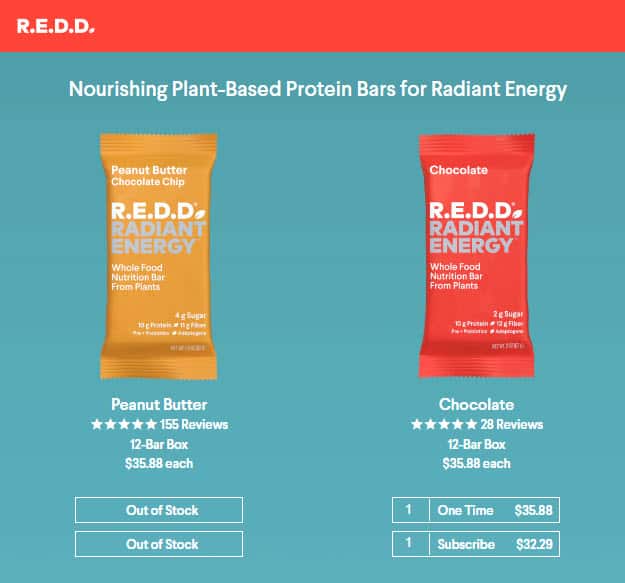
3. Ecommerce website is an online store like Amazon where you can sell physical or digital products. ReddBar sells energy bars through their ecommerce website.
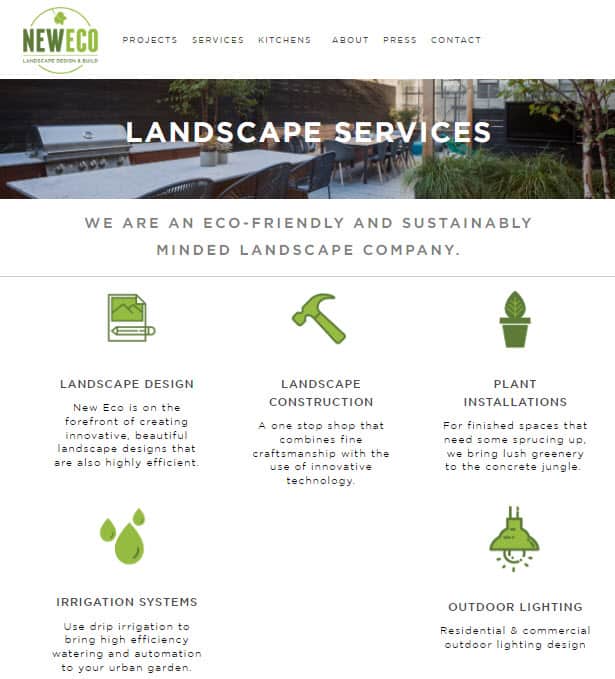
4. Static websites are used by local businesses to have an online presence. Small business websites are rarely updated and contain a business address, contact info, photo gallery, and product offerings. New Eco Landscapes is an example of a static business website.
5. Forum website is a place where people can have online discussions around a topic. Blood Sugar Diet Forum is an example of a forum.
2. Choose a Website Builder
A website builder lets you create a website without knowing how to code or learning web design. You can be a complete beginner and still have a website set up and running in under an hour when you use a website builder.
Which is the best website builder?
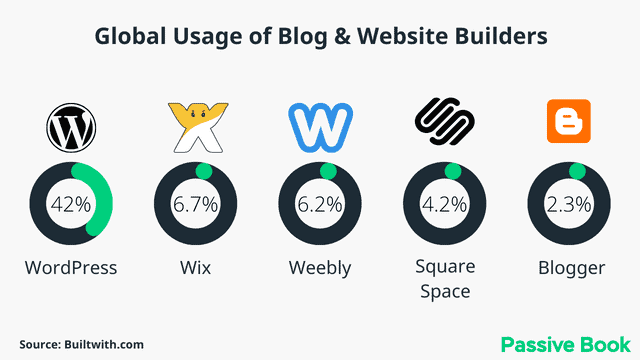
WordPress is the most popular content management system, letting you build any type of site imaginable. WordPress powers 42% of websites on the internet. That is nearly half the internet. Our website PassiveBook.com is also built on WordPress. If you need to create a website without being limited by features and functionality, we recommend WordPress.
Why use WordPress to Build Your Site?
- Cost: There are no recurring subscriptions to use WordPress. Other website builders are more expensive.
- Highly Customizable: Over 58,000+ free WordPress plugins will help you build any type of website imaginable. Other website builders are not so flexible.
- Beginner Friendly: You don’t need coding skills and you can get comfortable with using WordPress in a few hours.
- Complete Control: Website builders show their ads on your website. With WordPress, your content cannot be deleted or modified by anyone other than you.
- Portability: WordPress lets you change web hosting companies whenever you want. Changing providers with other website builders means rebuilding the site from scratch.
What is the cost of making a website?
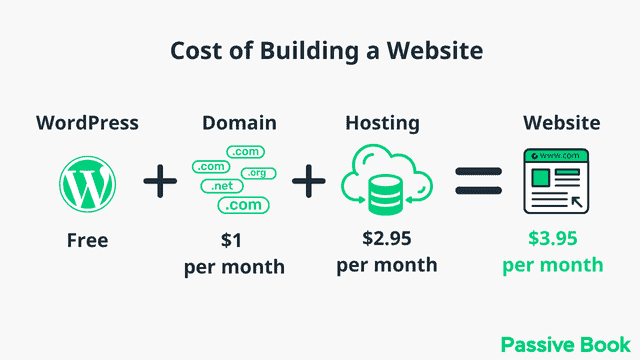
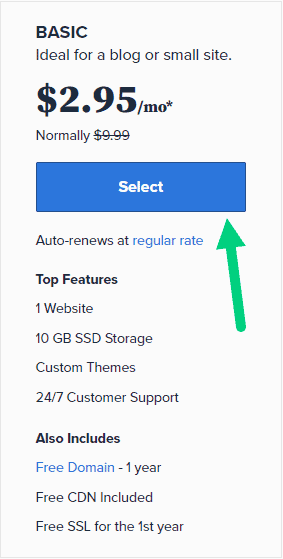
To create a professional website you need a domain and hosting. It will cost you around $12 per year to register a .com domain name with NameCheap. It will cost $2.95 per month to get WordPress hosting with BlueHost.
So in total, it will cost you $3.95 per month which is less than the price of a Starbucks coffee.
Can you create a website for free?
You can build a free website but here are the main drawbacks:
- Custom Domains Cost Extra: Free website builders do not let you add a custom domain name unless you get their paid plan. To replace passivebook.wix.com with a custom domain like passivebook.com, it will cost you $16 per month in Wix. Additional features cost as high as $49/month. Compare this to a WordPress website costing $3.95 for unlimited features.
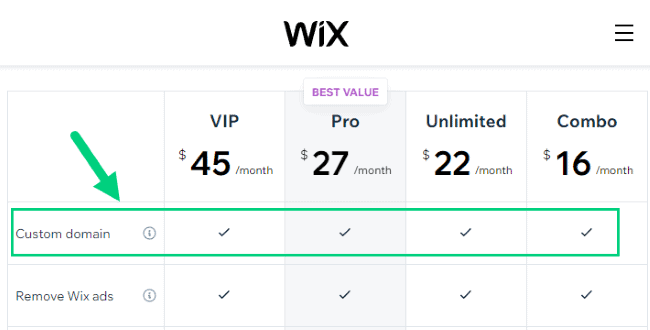
- Limited Features: All free website builder options are greatly limited in features. Even if you upgrade to the paid plan, you won’t get half the features of a self-hosted WordPress website.
- Ads on Your Website: Free website builders make money from the free plan by showing ads on your site. They don’t share the profits with you so it just makes your website look spammy.
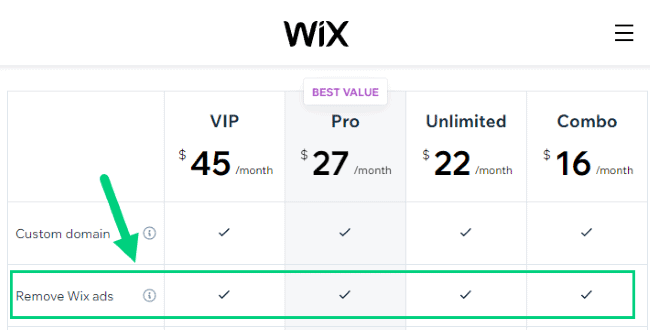
- Difficult to Drive Traffic: Search for anything on Google and try to find a .blogspot.com website ranking on top. You won’t find any. Even if your content is great your competitors can easily outrank your free website, stunting your site’s traffic & revenue.
- You Don’t Own Your Content: Your website can be taken down without notice. Even if you upgrade to their paid plan, you don’t own your content, your website builder does. Here is an example of what you will see when your free website is banned by Blogger:

What is the difference between WordPress.org & WordPress.com?
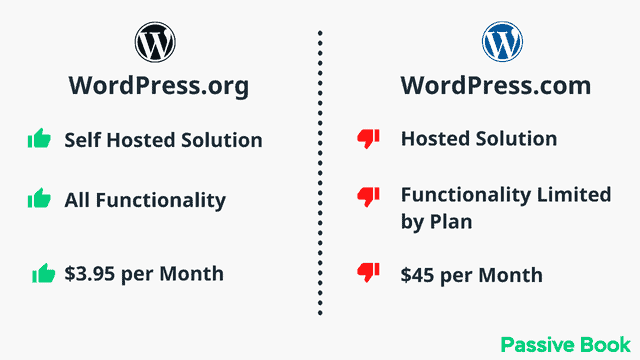
WordPress in this guide refers to self-hosted WordPress.org. In a self-hosted WordPress website, you can install plugins for free, but you must get web hosting separately from another company. It will cost you $3.95 per month to self-host WordPress.
Some people make the mistake of using the hosted WordPress.com. On Wordpress.com, you don’t have to get separate web hosting, but you must pay $45/month to install plugins.
Avoid WordPress.com. Follow this guide and install self-hosted WordPress on your own server. It will cost you less money.
When to Consider Other Website Builders?
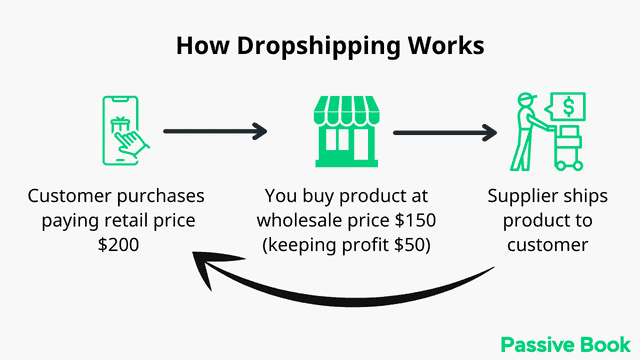
Dropshipping: Consider Shopify if you want a dropshipping site that integrates with all third-party tools. It costs more than having an ecommerce store on a WordPress website. But the dedicated dropshipping features make it worth considering.
Static Websites: If you just want a static website for your local business or portfolio, you can use Google sites which is completely free. But the functionality and customization options are extremely limited. Your website will look and feel like every other google site because of the limited template options.
3. Register a Domain Name
Before you create your website, you will need a domain name. The domain name is the address that people type in their browsers to find your website. Usually, it is the name of your website. For example, the domain name of this website is passivebook.com.
Choosing a domain name
Changing domain names once your website becomes popular is painful. So getting it right the first time is important. Here are a few things to keep in mind:
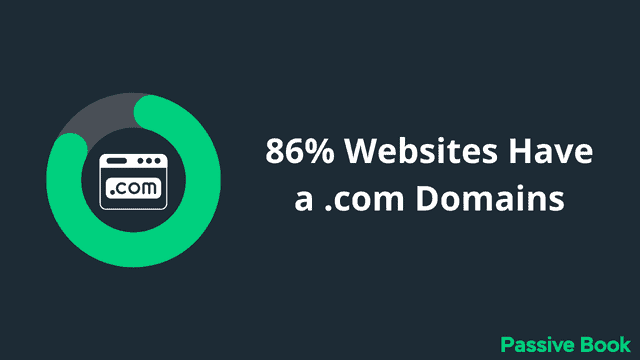
- Choose a .com domain.
- Have brandable domain names (like chewy.com) instead of keyword-stuffed domain names (like bestdogfood.com).
- Avoid hyphens & numbers in domain names (like 2-create-a-website.com).
- Shorter the domain name better. Try to keep it under 12 characters.
- Try to use two-word combinations. Example: Name Cheap, Passive Book & You Tube.
- Avoid words with multiple spellings. Example Colour vs Color.
- Spelling should be easy and intuitive. Tell the name of your site to your friends and ask them to spell it.
- Pronunciation should be easy and intuitive. Spell the name of your site to your friends and ask them to pronounce it.
If you are stuck you can use a domain name generator like Lean Domain Search & Instant Domain Search.
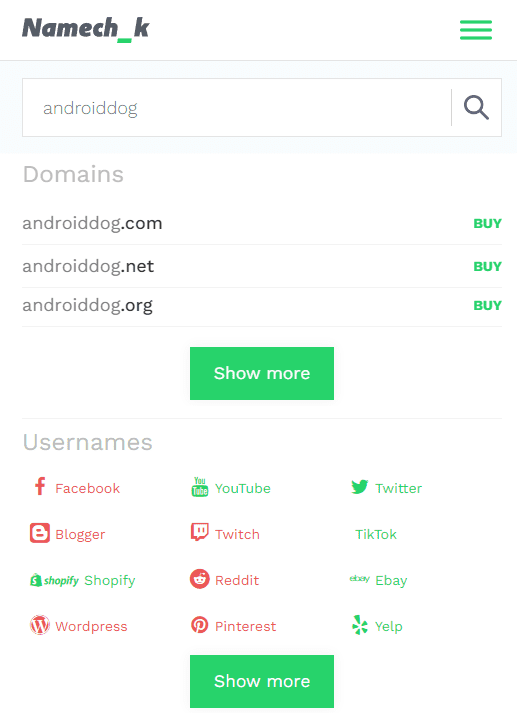
Use Namechk to check if your domain is available along with the associated social media profiles. Register a domain name that has both social media profiles and a .com domain available.
How to Register a Domain Name
Once you decide your domain name it is time to register it.
You should register your domain with NameCheap because you will get domain privacy for free. Other providers charge $12 per year for domain privacy. Without domain privacy, your name, home & email address will be accessible to the public.
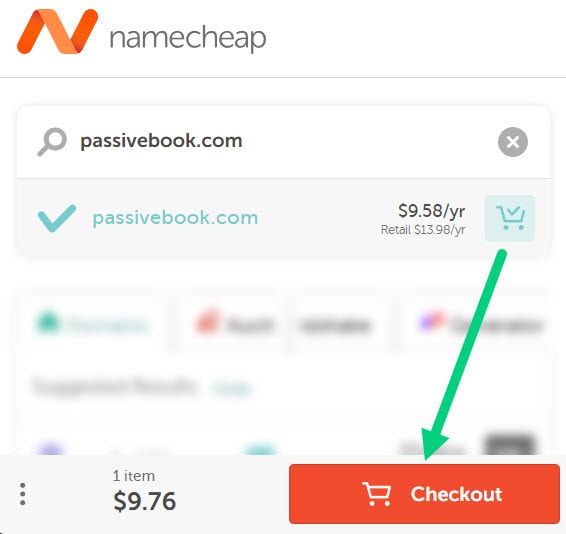
Step 1: Go to NameCheap. Enter your domain name with the .com extension.
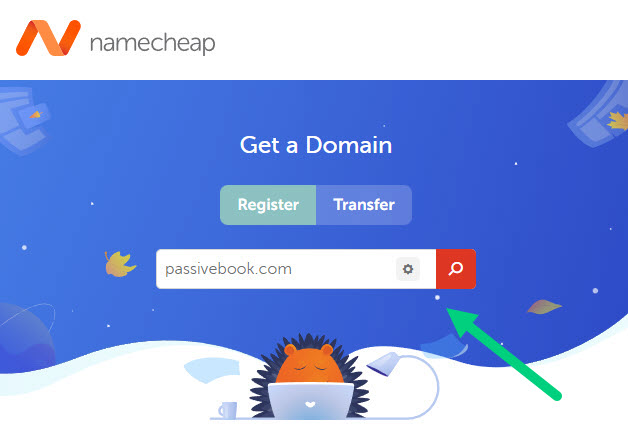
Step 2: Select the .com extension and click the Add to Cart button.
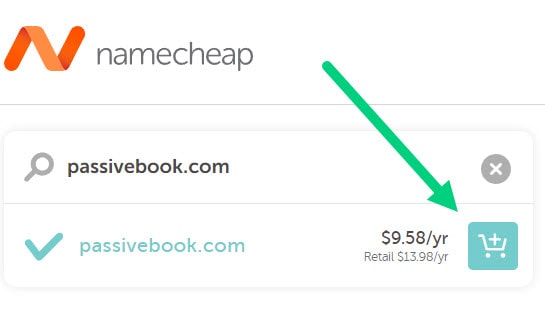
Step 3: After adding the domain to the cart, click on the Checkout button.
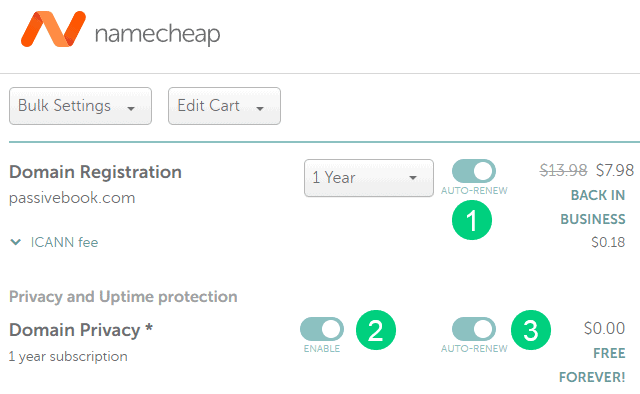
Step 4: Enable Domain Privacy that comes for free along with auto-renew. You don’t need any other paid addon.
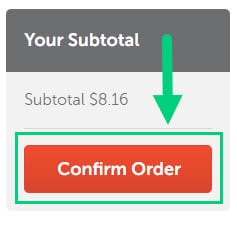
Step 5: Click on Confirm Order. Pay to complete your purchase.
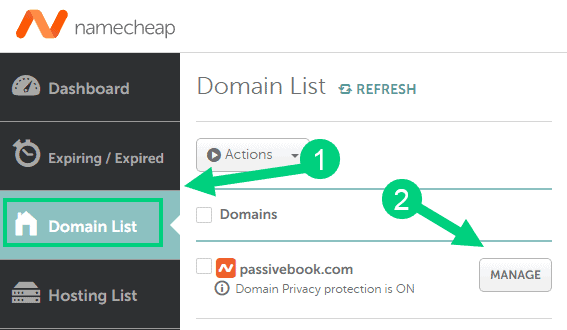
Step 6: Log in to Namecheap and click on Domain List ❶ in the left sidebar and then click Manage ❷ next to the domain you just purchased.
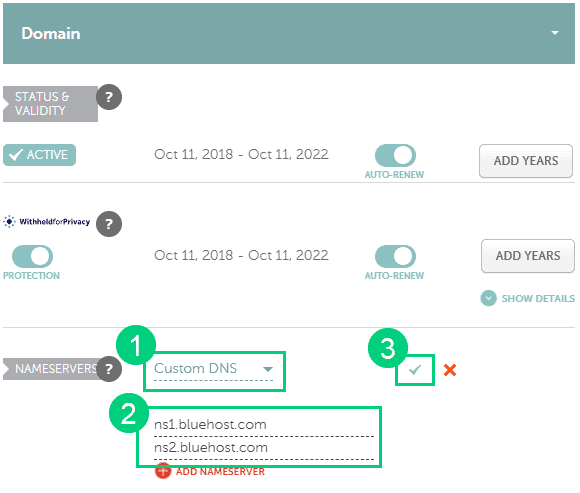
Step 7: Under the Nameservers section, select “Custom DNS” from the dropdown ❶. Then enter the following two nameservers ❷ ns1.bluehost.com and ns2.bluehost.com as shown in the image. Then click the green tick ❸ to save. If you use a hosting provider other than Bluehost, enter their nameserver values in this step instead.
Can I get a free domain name?
Your web hosting provider might give you a free domain name for one year but they charge $12 for domain privacy which is free in Namecheap. From the second year, you will pay for both the domain and privacy which will cost you more than $20+. So it is cheaper to just register your domain with Namecheap from the beginning. Also using different companies for web hosting and domain registration will allow you to easily switch your blog host later without transferring domains.
Can I change the name of my blog later?
You will lose your search engine rankings if you change your blog’s name once it gets links from other websites. It will take as long as a year or more for you to regain the lost traffic. It is possible to mitigate problems by having proper redirects. But you will have to renew both your old and new domains every year. So try to avoid changing your blog’s name once it is established.
4. Choose a Hosting Provider
Web hosting is an account on a computer (aka web server), that hosts your site’s data. Your visitors type your domain name in a browser. The DNS (Domain Name Server) converts the domain name into the IP Address of your web hosting account. Your website is downloaded from your web hosting server and displayed in your visitor’s browser.
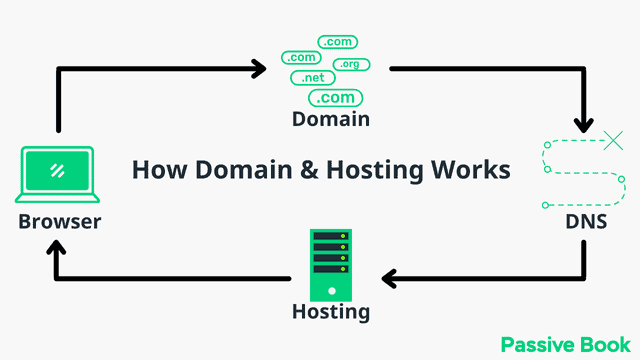
If your domain name is the “address” of your business on the internet, then hosting is the “land” or space where your business (aka website files) resides. You need website hosting to install WordPress & publish your website on the internet.
What are the Types of Hosting
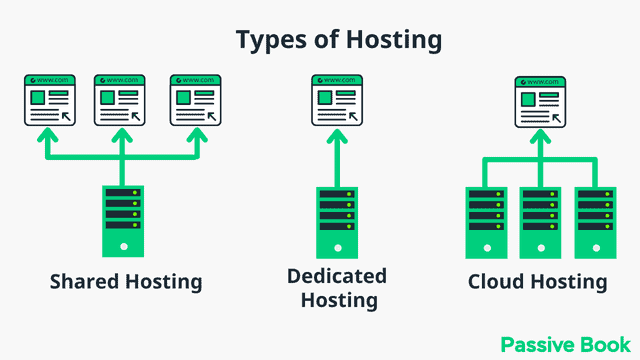
When it comes to choosing a hosting provider there are thousands of options available. But not all hosting companies are the same. There are different types of web hosting available:
Shared Hosting is the cheapest hosting. In shared hosting, you share resources with other websites on the same server. The downside is your website will slow down or crash if the other websites are overloaded. Choose shared hosting if you are on a tight budget (Recommendation: BlueHost).
Cloud Hosting stores your website data across multiple servers which work together. We recommend cloud hosting for most users because it has the best performance for the least cost. Passive Book uses cloud hosting (Recommendation: Cloudways).
Dedicated Hosting is the most expensive hosting. You have a server all for yourself. If you have a high-traffic enterprise website, use a dedicated server (Recommendation: LiquidWeb).
Virtual Private Server or VPS Hosting shares the server with other websites like shared hosting. But you will have dedicated server resources which improve reliability. But cloud hosting offers better performance for a lower cost than VPS hosting (Recommendation: BlueHost).
WordPress Hosting can be shared WordPress hosting or managed WordPress hosting. Shared WordPress hosting is shared hosting with WordPress pre-installed (Recommendation: BlueHost). Managed WordPress hosting offers extra features like security and caching but costs more (Recommendation: WP Engine).
Recommended Hosting Providers
When it comes to choosing your ideal hosting providers you have to choose two from the following three:
- Cheap: The price you pay
- Easy: A non-technical, user-friendly interface
- Fast: How fast your website will load
You can only have two and cannot have all three together.
Cheap & Easy But Not Fast: If you chose this option, then go with BlueHost. In fact, this is what we recommend to beginners who want to build a website in the cheapest possible way with a user-friendly interface. You will be sacrificing performance but it should not make a big difference to websites that are just getting started.
Cheap & Fast But Not Easy: If you have a little extra budget and you are not technically challenged, you can get top performance using Cloudways.
Fast & Easy But Not Cheap: If you want high performance along with a user-friendly interface you can use WP Engine but it will cost significantly more than the other options.
5. Set Up WordPress
For this guide, we will use BlueHost as our web host. It is a cheap hosting that is extremely easy for beginners to set up. If you use any other web host, the steps will be the same but the user interface may be slightly different.
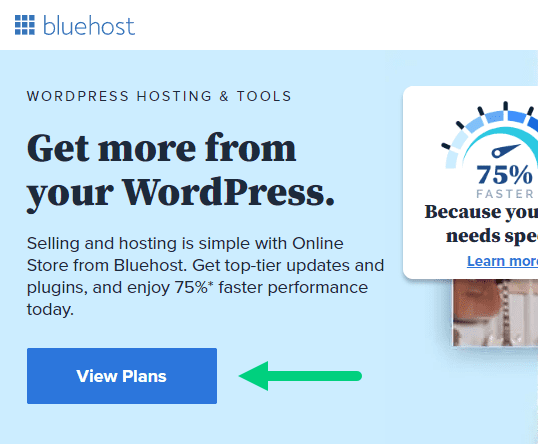
1. Go to BlueHost using this link to get a special discount. Select WordPress > WordPress Hosting from the top menu.
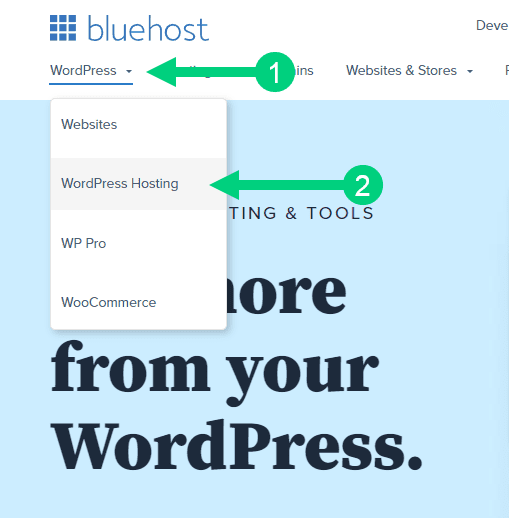
2. Click on the button you see on this page and you will be taken to the pricing section.
3. Select the Basic Plan. You can upgrade to a different hosting plan as you grow.
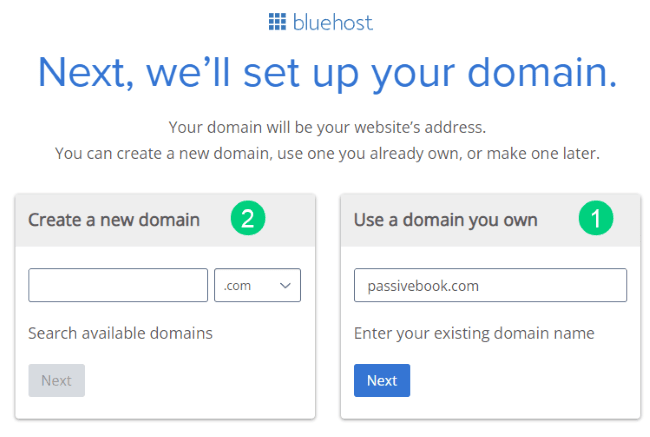
4. If you already have a domain name that you purchased with Namecheap you can put that in the “Use a domain you own” ❶ section. If you don’t have a domain name yet, choose the “Create a New Domain” ❷ to purchase a new domain.
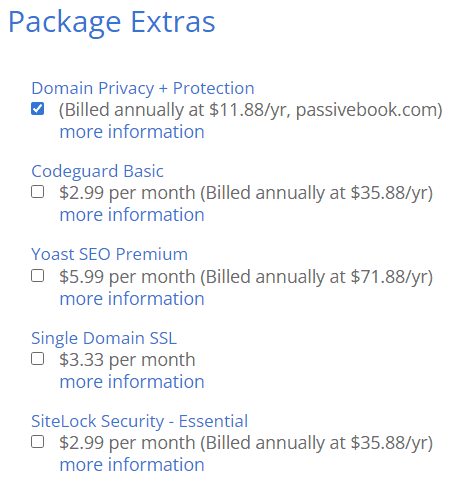
5. In the next screen, enter your information. Uncheck all package extras. If you purchase your domain through Bluehost instead of Namecheap, you may want to enable Domain Privacy. You won’t see the Domain Privacy option if you bought your domain through Namecheap. Namecheap will give you this Domain Privacy for free.
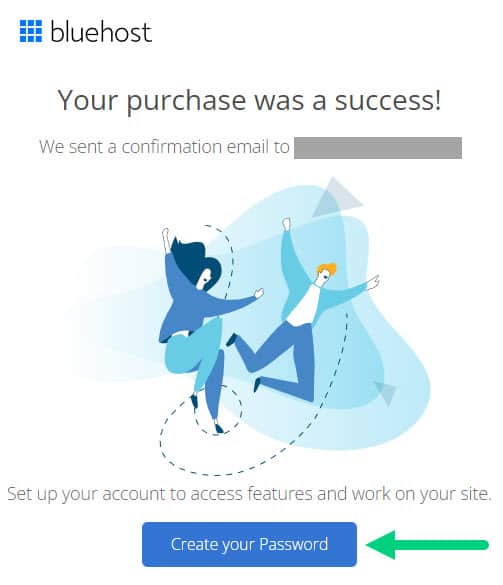
6. Once you have successfully paid, you will be prompted to set a password. Click on the “Create your Password” button.
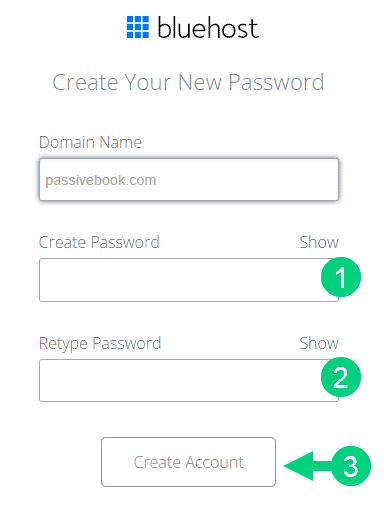
7. Enter your password and create your account. If you lose this password, you can reset it.
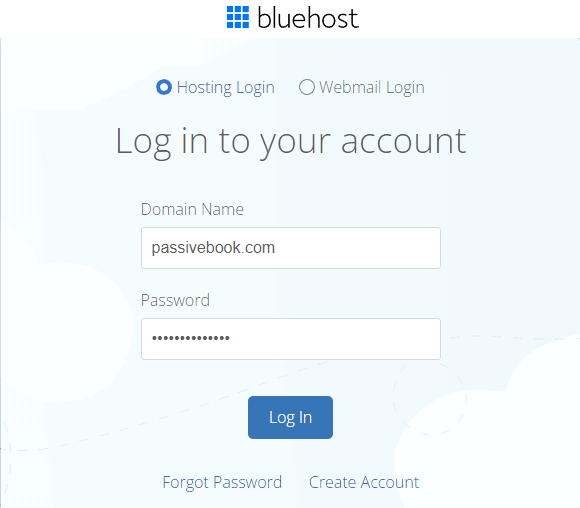
8. After you set your password, log in to Bluehost.
9. Click on the Create your website button on the following screen. This will start a Bluehost Wizard, just click Skip this step wherever possible.

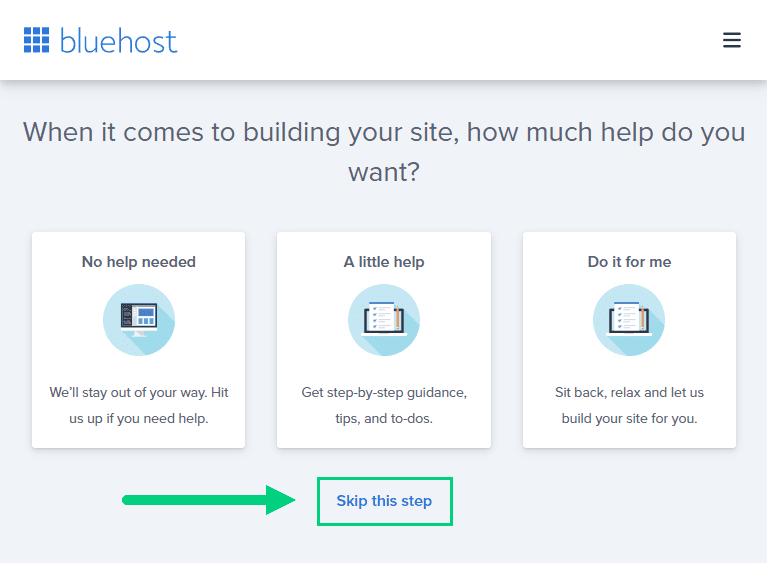
10. On the following page, click “No help needed” or “Skip this step”. We don’t want Bluehost to limit our customization options.
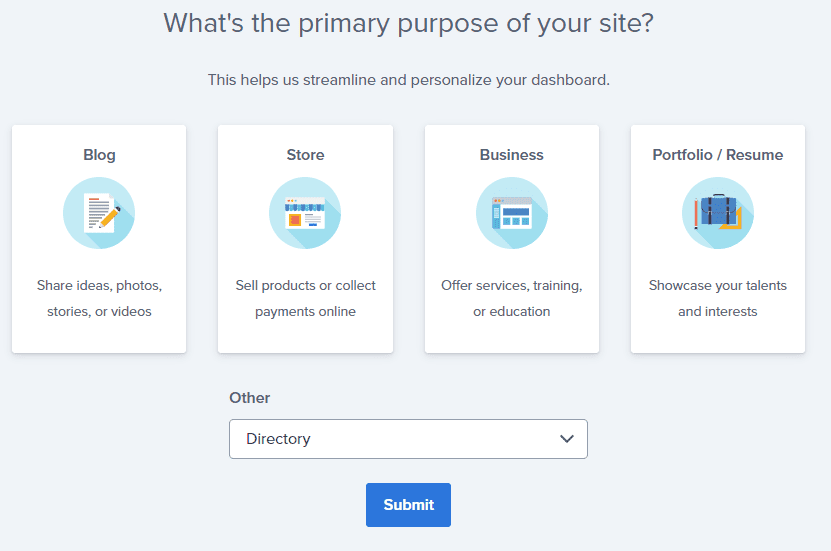
11. On the next page, you will be asked about the purpose of your website. You can choose from any of the available options.
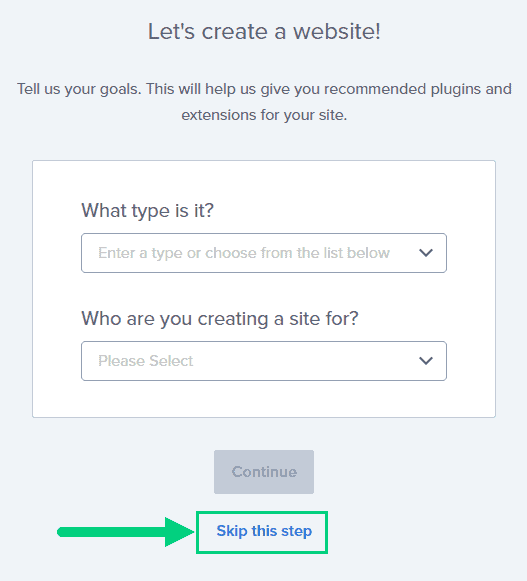
12. On the next page, click Skip this step.
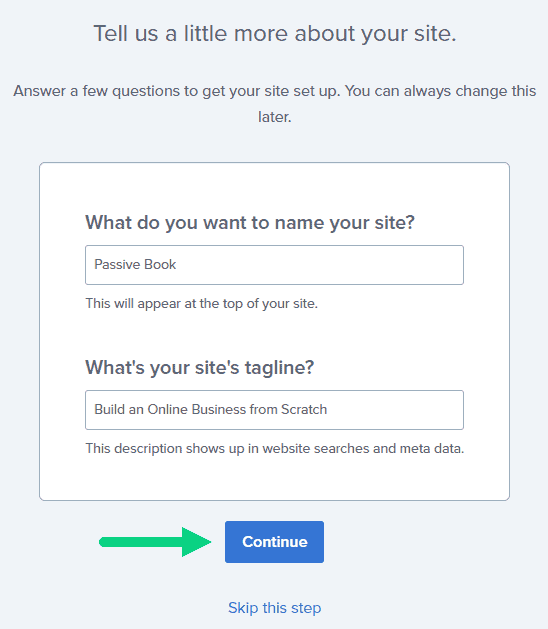
13. On the following page, enter the blog’s name and tagline. You can change this later so feel free to click “Skip this step” or enter something as a placeholder and click Continue.
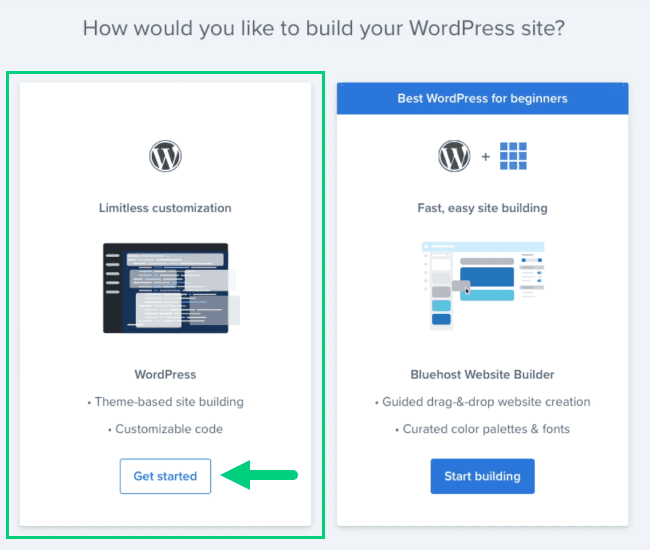
14. Finally you will be asked how you want to build your website. Choose “Limitless customization” to have all the options.
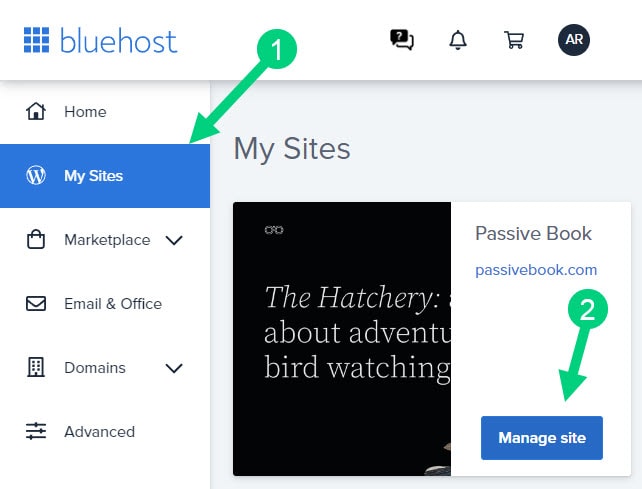
15. You can see your blog by going to yourdomain.com. Go to the Bluehost dashboard and click on the My Sites tab ❶ in the left sidebar and click on the “Manage site” button ❷.
16. Your WordPress site has separate login credentials different from the ones you use to log into Bluehost. You can use this to log in to the WordPress dashboard directly without logging into Bluehost. To get this:
❶ Click on Users on top.
❷ You will be able to see your username and email that you can use to log in to WordPress.
❸ If you click on the three dots you will see the option to Reset your password. ❹
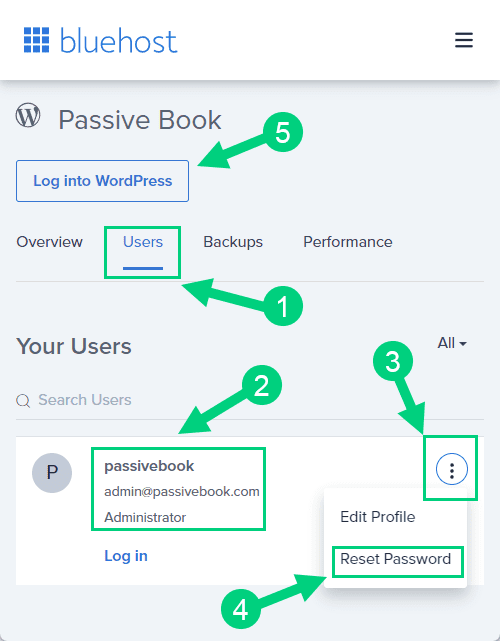
You can log into WordPress from the Bluehost dashboard by clicking the Log in to WordPress button ❺. But it is not recommended you rely on this as your primary login method because you will get locked out of your site if you ever change hosting providers.
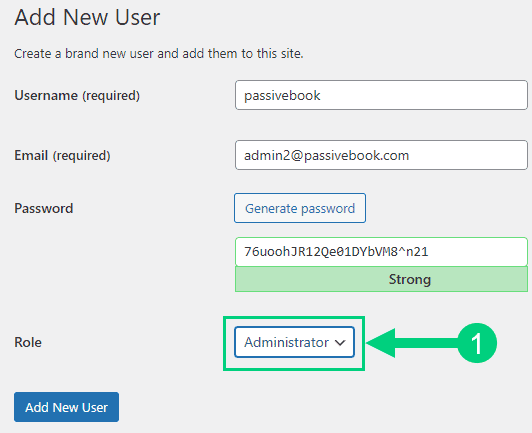
17. You will be taken to the WordPress dashboard where you can reset your password ❶. If you don’t like the username Bluehost created for you, you can Add a New User ❷.

18. If you are adding a new user make sure you specify the user role as Administrator ❶. You can log in as the new user and safely delete the default user created by Bluehost.
Congratulations! You have successfully set up WordPress.
6. Configure WordPress
Your WordPress website installation is barebones and comes with the default WordPress theme and plugins. In this section, we will set up your WordPress website and customize it so that it looks and functions the way you want.
Login to WordPress Dashboard
Once you have successfully set up WordPress, you will be able to see your website with the default WordPress theme at yourdomain.com.
Visit yourdomain.com/wp-admin to access the WordPress dashboard and admin area where you can install themes & plugins.
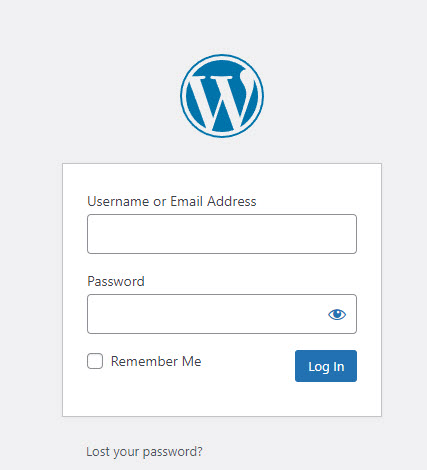
Use the Email and Password you provided during WordPress installation to log in. If you don’t have the password, use the “Lost your password?” to generate a new password.
WP Themes
A WordPress theme is a website template that makes it easy to customize how your site looks without learning web design.
There are thousands of themes available for free in the WordPress theme directory, accessible from the WordPress dashboard.
To install a new WordPress Theme:
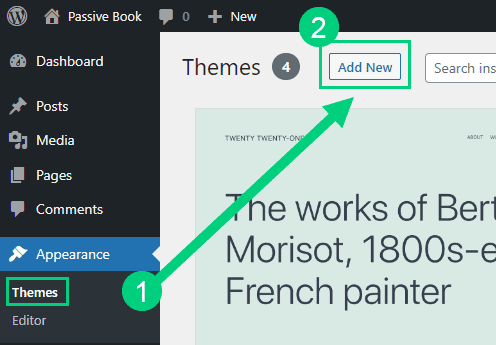
Go to Appearance > Themes > Add New in your WordPress dashboard.
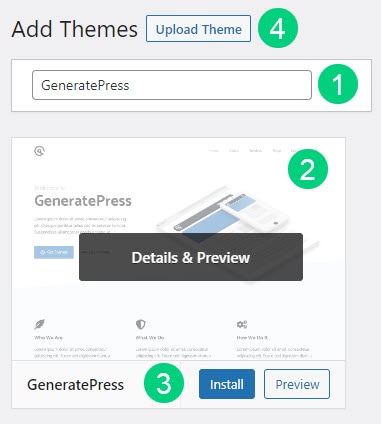
Use the search to find a theme that you like ❶. Before you install the theme, you can see a demo of the theme and learn about its features from the preview screen ❷. If you like the theme, you can install it by clicking the install button ❸. You can also upload a theme from a file on your computer ❹.
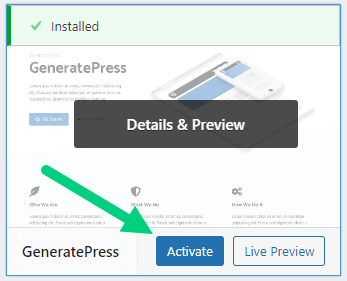
Once installed, click the Activate button to enable the theme.
Here are a few considerations when choosing your theme:
- Use mobile responsive themes so your website looks good on both a desktop & a mobile device.
- Don’t use feature-rich themes because they will slow down your site with bloat.
- Don’t use fonts that are difficult to read.
- Use the Theme Check plugin to see if your theme meets the latest standards.
Premium Themes for WP
Although free themes are great, they have a few problems:
- The theme author may abandon the project.
- The code is usually bloated slowing down your site.
- Limited or no support to customize the theme.
Premium themes have none of these problems & also make it easy to pass Core Web Vitals which is an SEO page speed metric. Passive Book is able to pass Core Web Vitals because we use the premium theme GeneratePress.
We recommend the following premium WordPress themes:
WP Plugins
A WordPress plugin expands the functionality of your site. For example, WordPress is not an ecommerce platform, but you can make it one using the WooCommerce plugin.
Too many wordpress plugins can slow down your blog site. So before you install new plugins, it will be worth clearing out any existing plugins that your hosting provider installed by default.
Plugins first need to be deactivated before they can be deleted.
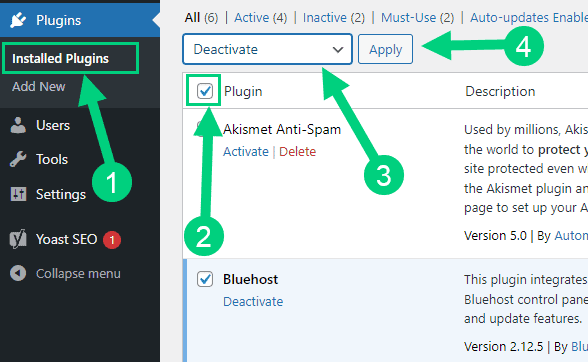
❶ Go to WP Admin > Plugins > Installed Plugins
❷ Click on the checkbox to select all plugins.
❸ Select Deactivate from the drop-down.
❹ Click Apply.
❺ Repeat the above steps but select “Delete” instead of “Deactivate” from the dropdown in ❸ to delete all the deactivated plugins.
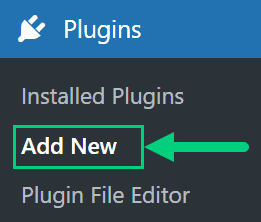
To install new plugins go to the WP Admin > Plugins > Add New.
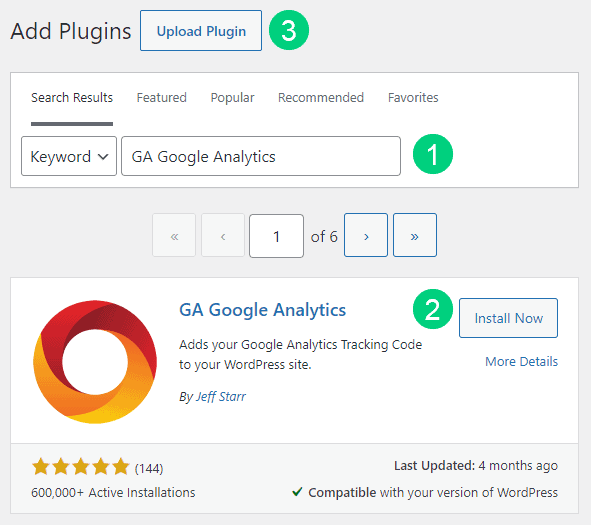
On the plugins page:
❶ Search for the plugin you want in the search bar
❷ Click Install Now. Once you install the plugin, you must also activate the plugin for it to be enabled.
❸ If you are installing a paid plugin you can upload the plugin instead.
Recommended Plugins
Here are the WP plugins you may want to consider. Just install the ones you need to avoid bloat:
Backup Plugins help restore your website in case of a hack or a crash. Recommended Plugin: WPVivid (paid) or UpdraftPlus (free).
SEO Plugins let you do Search Engine Optimization (SEO) for your website so you can get search engine traffic. Recommended Plugin: SEOPress (paid).
Analytics Plugins allow you to use Google Analytics to track your website traffic. Recommended Plugin: SEOPress (paid) or GA Google Analytics (free).
Cache Plugins reduce website load time improving user experience & also SEO. Recommended Plugin: WP Rocket (paid).
Image Optimizer Plugins compress your images to decrease web page load time. Recommended Plugin: ShortPixel (free).
SMTP Plugin eliminates all problems with sending emails from WordPress. Recommended Plugin: FluentSMTP (free).
Page Builder lets you visually create any type of web page or landing page imaginable with a drag-and-drop interface. Recommended Plugin: Thrive Architect (paid) part of Thrive Suite subscription.
Security Plugins help protect your website from hackers. Recommended Plugin: Wordfence (free).
Ecommerce Plugins help convert WordPress into an ecommerce & online store. You can sell both digital and physical products. Recommended Plugin: Woocommerce (free).
Forum Plugins let you create a community for online discussions. Recommended Plugin: bbPress (free).
Membership Plugins allow you to create a gated members area, where access can be sold for a recurring or one-time fee. Recommended Plugin: WishList Member (paid).
LMS Plugins lets you create a dedicated course area for students of your digital courses. Recommended Plugin: Thrive Apprentice (paid) part of Thrive Suite subscription.
Social Share Plugins lets you show social media buttons from different social networks like Facebook & Twitter. Recommended Plugin: Easy Social Share Buttons (paid).
Form Plugins allow you to create a contact page and other types of forms. Recommended Plugin: Thrive Architect (paid) or Fluent Forms (free).
Create Posts & Pages
It is difficult to customize a site with no content because you can’t see the changes you make reflected in the front end. Once you have installed your theme and plugins, start creating the essential pages, before customizing your site further.
The following are the important website pages to consider creating.
- Home Page
- About Page
- Contact Page (use page builder or a contact form plugin)
- Privacy Policy Page
- Terms & Conditions Page
- Blog Page
- Product/Pricing/Services Page
You can create content as pages or posts. If you want to make a static page, create pages by going to WP Admin > Pages > Add New. If you want to create a blog post instead, then create posts instead of pages by going to WP Admin > Posts > Add New.
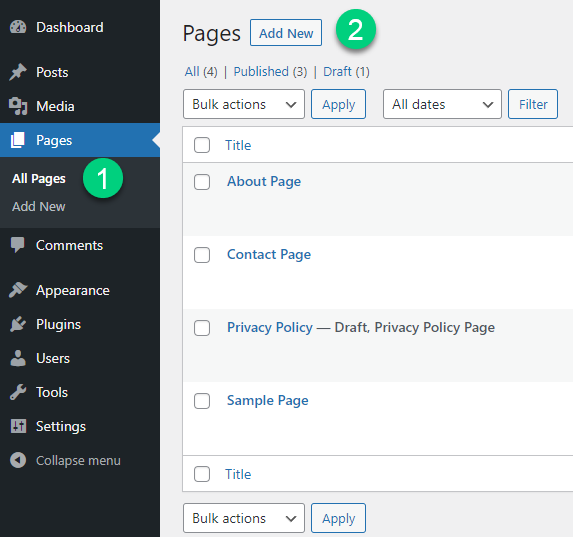
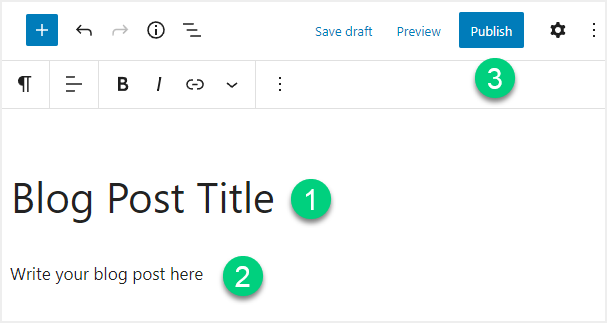
The interface is similar for both posts and pages:
❶ Write the headline
❷ Write body content
❸ Click the publish button.
Customize Branding & Design
After you create the essential pages, you can start customizing your site further. Get inspiration from other sites that you like and try to replicate the design on your own website.
Color, Fonts & Spacing
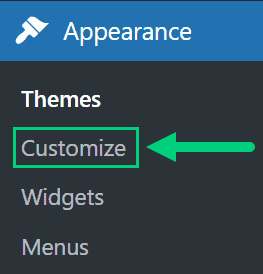
You can choose colors, set the font and adjust the spacing of your website by going to Appearance > Customize from the WordPress blog dashboard.
Logo
Get the logo for your website designed cheaply on Fiverr. Most themes let you set the site logo in Appearance > Customize in your WordPress blog dashboard.
Favicon
A favicon is an image that appears in the browser tab and bookmarks. In most themes, you can set the Favicon in the Appearance > Customize section in your WordPress dashboard.

Menus
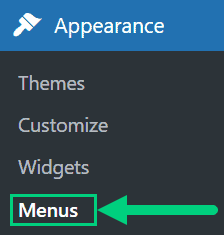
The header and the footer menu can be set from the Appearance > Menus in the WordPress admin dashboard.
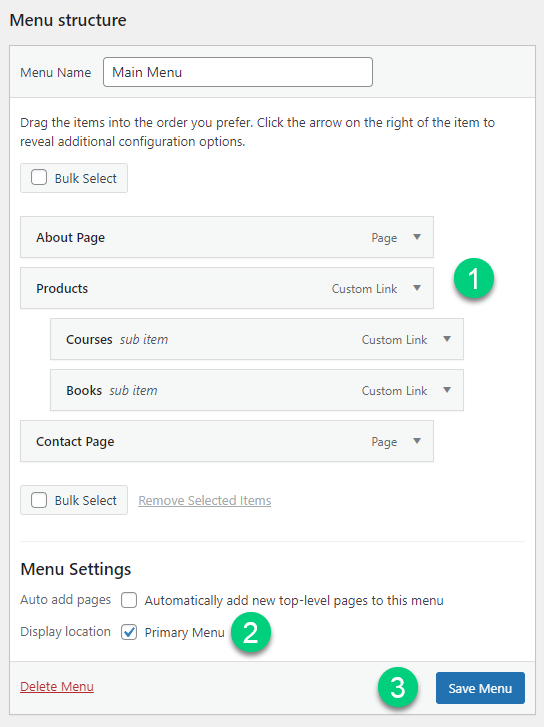
You can nest menu items so that it appears as a dropdown menu ❶. You can use the menu as your primary or secondary navigation menu ❷.
Widgets
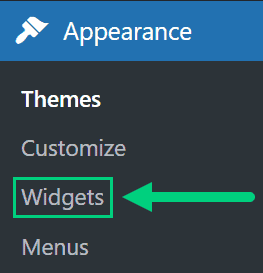
If you decide to have a sidebar or a large footer, you can create widgets from WP Admin > Appearance > Widgets in your WordPress admin area.
Title & Tag Line
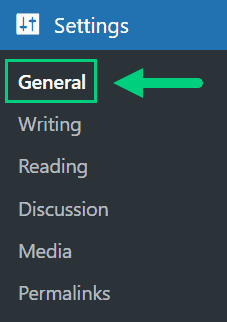
The next step is to change your General Settings. Go to Settings > General in the WordPress Admin area.
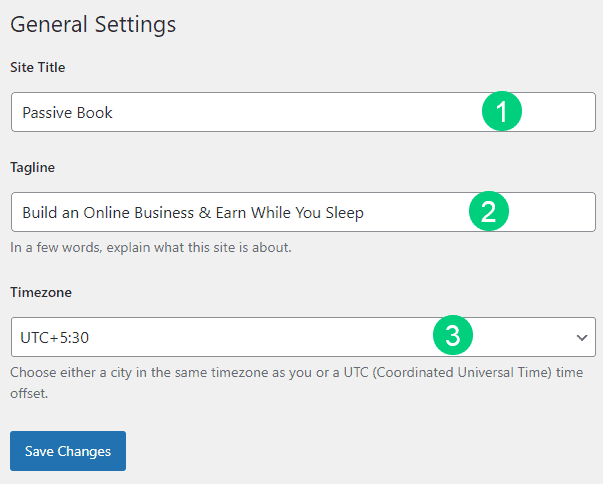
You can set your Site Title & Tagline and also set your Time Zone from this screen.
Permalinks
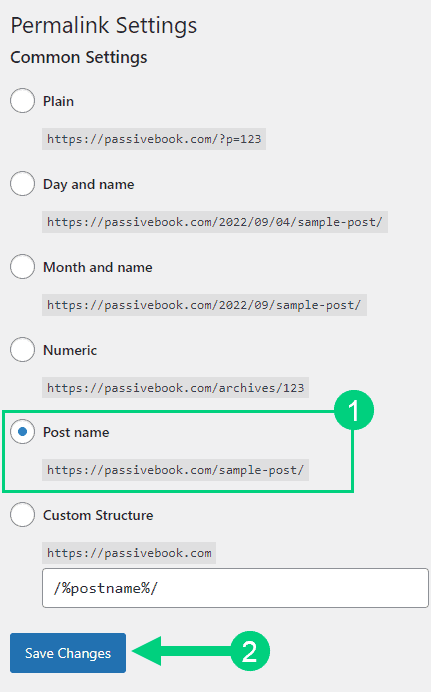
The most optimal URL structure for your website for SEO is domainname.com/post-name. You can set this in Settings > Permalinks in your WordPress blog dashboard area.
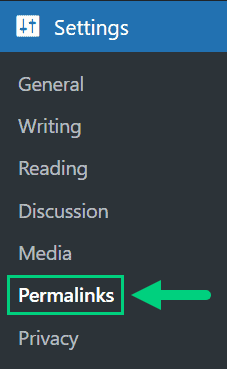
Select the “Post name” radio button and save changes.
Enable Search Visibility
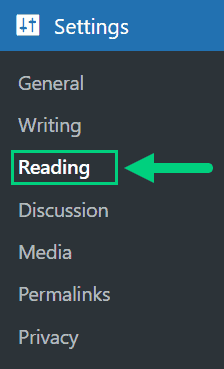
Chances are you want your site to show up in Google so people can find you. Go to Settings > Reading in your WordPress dashboard.
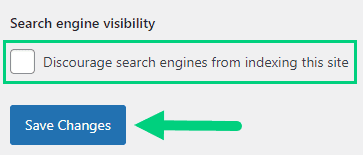
Make sure the “Disable search engines from indexing this site” is Unchecked if you want traffic from Google. Most of the time this should be unchecked by default but if it is not, then uncheck it to ensure your site gets traffic from search engines.
Comments
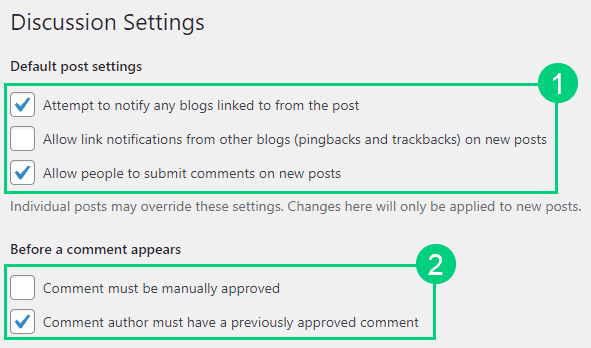
Next, you will want to change the Discussion Setting (aka Comments). Go to Settings > Discussion in your WordPress admin area.
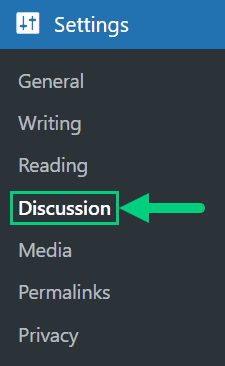
1. You may want to enable or disable comments on this page. You can also disable pingbacks and enable comment moderation.
2. You can also set comment approval settings.
Get Optional Add-Ons
You should now have a fully functional website. But some website owners may want a few things extra.
Custom Domain Emails
Instead of abhi@gmail.com, creating an email under my domain like abhi@passivebook.com makes my business communication more professional.
Some hosting companies allow you to create a domain email, but they tend to have deliverability issues. Use Google Workspace or Yandex instead to create your professional emails.
Content Delivery Network (CDN)
CDN compliments caching in speeding up your site. When you use a CDN your website files are replicated on multiple servers across the world.
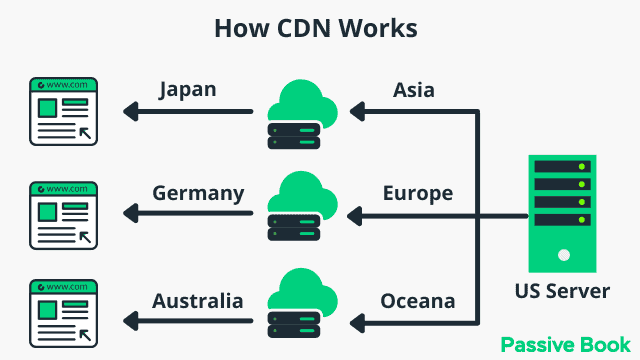
If a visitor is in Germany and wanted to view a website hosted in New York, the data has to travel across the Atlantic Ocean. A CDN will load a cached version of the New York website from a CDN server located in Europe, making the website load faster.
Our recommendation is BunnyCDN which is dirt cheap. Your CDN can be configured in the WP Rocket plugin.
7. Drive Traffic
Congratulations on making your new website. Making a website might seem hard but is actually simple when you know how all the pieces fit together.
If you are having trouble anywhere along the way as you make your website, drop a comment below and we will help you out.
Once you have a website it is time to get traffic to it. The best way to get traffic to your website is through blogging and SEO and converting them into email subscribers so that you can do email marketing.
What is the goal of your new website? Let us know in the comments below.
Share this post with your friends & followers:
