Are you looking to improve your blog writing skills?
Here’s a step-by-step guide to learn how to write a blog post that will engage and inform your readers.
You will be able to write a great blog post that your target audience will actually want to read.
This process can be used for both new and experienced bloggers alike.
Let’s get started!

This guide assumes you already have a blog. If you don’t have a blog, check out our guide on how to start a blog where we will take you through the steps to create a blog.
What is a blog post?
A blog post is an article or a piece of writing on a particular topic that is published on a website or blog. It can be anything from a short opinionated piece to a long in-depth article. Readers can comment on the blog post and share their thoughts or ask questions.
How to Write a Blog Post in 14 Steps
There are 14 steps to write a blog post starting from choosing a topic to promoting the blog post. We will look at each step in detail.
1. Choose a topic
Before you can write your first blog post you must choose a blog topic. We have created a massive guide on blog post ideas you can check out for topic ideas. In this guide, we will look at how to choose a topic that gets traffic from Google through Search Engine Optimization (SEO).
You should choose a topic within a topic cluster in a particular sub-niche within your main niche. Let us break that down.
What is a Topic Cluster?
A niche is a specific area that your blog focuses on. It can be a topic, industry, or demographic. For example, pets might seem like a niche, but it is actually an industry, not a niche because pets is too broad. Pets can be further niched down like cats, dogs, birds, etc.
A sub-niche is an even smaller and more specific area within the main niche. For example, the niche dogs can be further niched down. You could write about different types of dogs, dog breeds, training dogs, dog food, taking care of dogs, and so on. These are the different sub-niches.
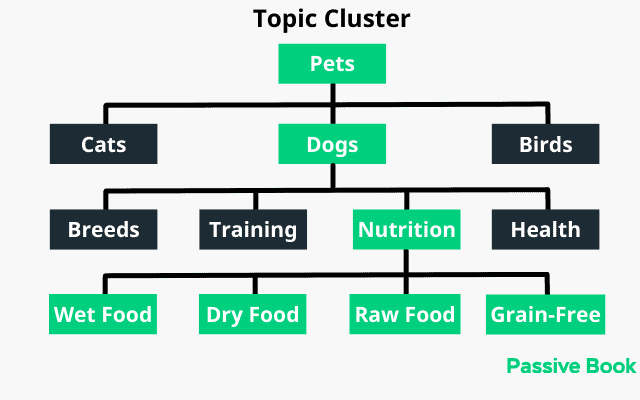
Each sub-niche can be broken down into different topic clusters. For example, the sub-niche dog food can be broken down into different topic clusters like dog food by breeds, dog food by ingredients, dog food brands, and dog food recipes.
Why Create Topic Clusters?
You should pick a topic cluster and cover all topics you possibly can within the topic cluster before you move on to the next topic cluster or sub-niche.
Doing this will help you build topical authority with Google and help your blog grow faster because your blog will be viewed as an authority in a particular area by Google.
Your blog will also attract visitors who are interested in a particular topic cluster and it will become easy to monetize your content with affiliate and digital products.
Do Keyword Research
Most people who read your post will find your content through a search engine like Google. So it is important to optimize every piece of content you write around a keyword people are searching for. This will help drive traffic to your website.
Keyword research is the process of finding these keywords before you start blogging.
You can find topics, topic clusters, and sub-niches within your niche by doing keyword research.
There are many ways to do keyword research but the fastest and the best way to get a lot of keyword ideas is to use a keyword research tool.
Just plug in the main keyword inside a keyword research tool to find all keywords around that topic. There are a few keyword research tools that you can use. Here are a few free and paid options for you to consider:
- KeywordTool.io (Free)
- Answer The Public (Free)
- Keyworddit (Free)
- Ubersuggest (Paid)
- Ahrefs (Paid)
- Moz (Paid)
- SEMRush (Paid)
The paid tools have richer keyword data than the free tools. The best keyword research tool and the one we recommend is Ahrefs because of the quantity and the quality of the keyword data.
Ahrefs pricing might seem high especially when you are starting out. So it is recommended you get one month of subscription, do all your keyword research, and then cancel your plan.
In Ahrefs, you can put your main keyword into the keyword explorer ❶. You should use both the singular and plural versions of your keyword. For example enter “dog, dogs” to get all keywords around the topic of dogs. In the below example, we are using the seed keyword paleo ❷.
Click on Matching terms ❸ and the list of related keywords for the seed keyword will appear as shown ❹.
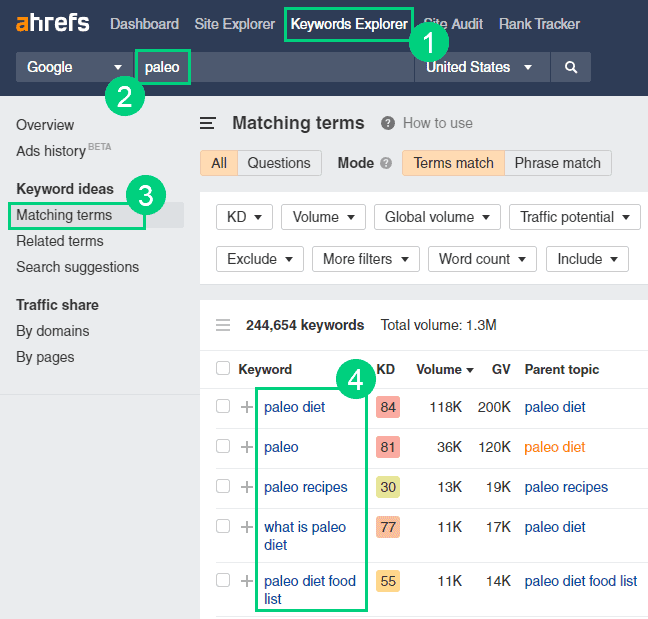
Ahrefs will return millions of results. You can narrow this down using the filters on top.
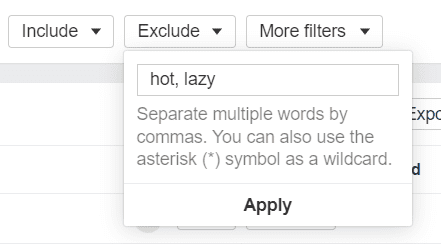
Add words that you want to exclude. For example, you may want to exclude the word “hot” to remove keywords that correspond to “hot dog”.
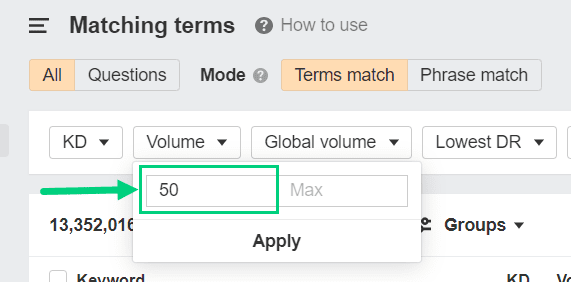
You can also limit search volume so that the keyword has at least 50 monthly searches.
You can change your seed keyword and repeat the process. For example, if you initially put in “dog” & “dogs” as your seed keyword. You can replace this with other seed keywords like breeds of dogs like Pitbull, German Shepherds, and Great Dane and you will get a different set of results.
Once you have a list of keywords, you can group them into topic clusters. You can do this in Google Sheets or Excel. You can also use a tool like Keyword Cupid or Keyword Insights to do this. It will greatly speed up the process.
2. Research your Topic
Once you create a topic cluster, it is time to pick a keyword or topic to write about and research about it. Proper research is essential to write a good blog post.
Create a Working Headline
You should start by creating a working headline also known as a rough headline. This is just the first version of your headline. You can come up with your final blog title later.
You can google your keyword and look at the post headlines of the top 10 search results to get some inspiration.
It will also help you decide the angle you should take for your article.
For example, let us say we are planning to write an article for the keyword “dog food for German shepherds”. When we google this keyword we see the top search results are “Best Dog Food for German Shepherds”. We will use this as our working title.

Create Outline
You should always create an outline before you start writing your blog post. This will help you organize your thoughts and write a great post.
Your outline should have the main points that you want to cover in your article. These main points could be H2 or H3 tags in your article.
When you create an outline it is important to satisfy search intent. Search intent is the reason why a user is searching for a particular topic on Google. You can write thousands of articles and blog posts but if your blog posts chose a different angle from the search intent, it will simply not rank even if you write like a pro.
For example, when a user searches for “Dog Food for German Shepherds” are they looking for a recipe to make their own dog food or are they looking for something they can buy from the store?
You can create an outline that satisfies search intent by looking at the top five search results. Find the main points that are covered in those articles. Your article should be similar to or better than the top search results to satisfy the search intent.
You can either use a Word Doc or a tool like Dynalist to create your outline. I prefer using Dynalist as it is very easy to use and you can create nested points.
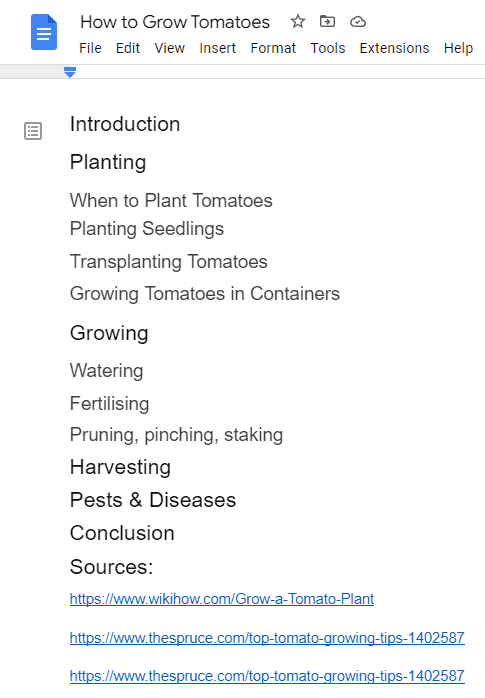
You should also include sub-points under each main point. These sub-points will be the details that you want to cover under each main point.
You can save links to the blogs and websites that cover a particular section well in your outline. You can refer to these links when you write a post.
Find FAQs
You can enrich your content outline by trying to answer common questions that your audience might have.
You can use a tool like Answer the Public to find these questions. Just type in your keyword and the tool will generate a list of common questions around that topic.
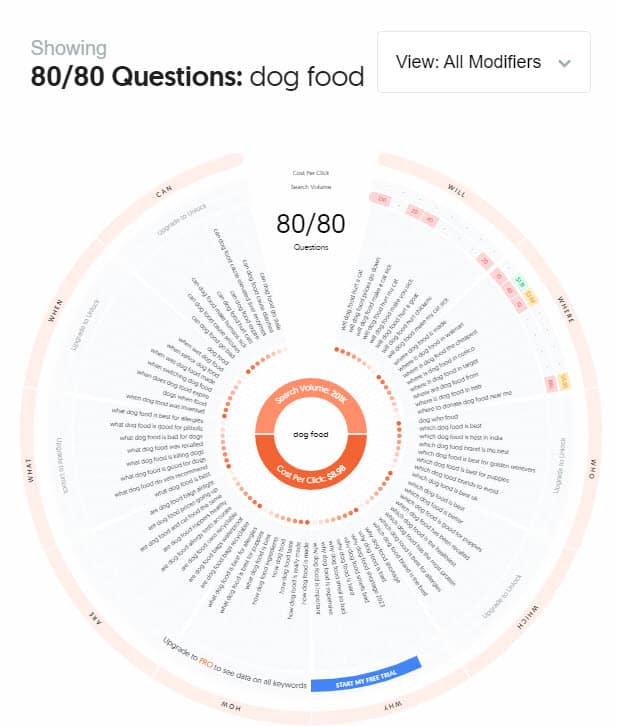
These questions could be turned into H2 or H3 tags in your article which will help you cover more ground and write better blog content.
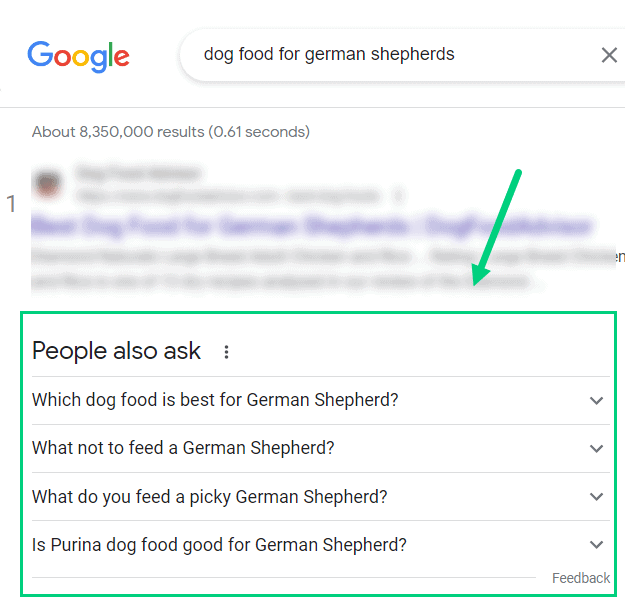
You can also look at the People also ask section on the search results page. This will give you more ideas of questions to answer in your article.
3. Write Your Article
Once you create your outline, it is time to start writing your article.
Expand Your Outline
If you did a good job of outlining your article, then writing the actual article will be much easier.
Start by expanding each point in your outline. Write a few sentences or a paragraph to cover each point. Refer to the links you saved while you were researching your article.
It is important to keep your sentences short and concise. No one likes reading huge blocks of text.
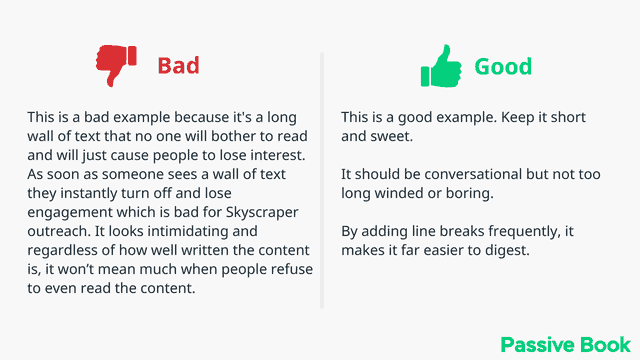
A good rule of thumb is to keep your sentences under 20 words. If you can say something in fewer words, then do so.
Your article should also be scannable. This means that the reader should be able to skim through your article and still get the main points.
You can make your article scannable by using short paragraphs and sub-headings.
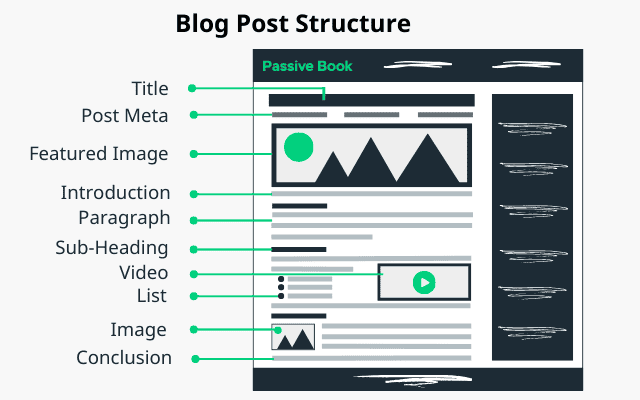
You should also use bullet points to make your article easier to read. Bullet points help break up the text and make it easier for the reader to scan through the article.
As you write your article, make sure to link to other relevant blog posts on your blog. The perfect blog post links to other quality blog posts. This will help keep the reader engaged with your content and it will also help with your SEO.
When you write your article, make sure to write like you are talking to a friend. It should not sound like a college essay.
Write Your Introduction
The introduction of your article is important because it is what will either make or break the reader’s decision to stay on your page.
It’s recommended you write an introduction after you write your post. You are more likely to write an effective introduction if you already have the blog content written. This will help you summarize everything you cover in your blog post’s body.
Your introduction should be short and to the point. It should give the reader an idea of what the article is about without giving away too much information.
A good rule of thumb is to keep your introduction under 100 words. Here are the elements of a great introduction:
❶ Keyword: Include the exact keyword you are trying to rank for preferably in the first sentence of your article in every post.
❷ Question: Start the article by asking questions the article helps answer. It will help grab your readers’ attention.
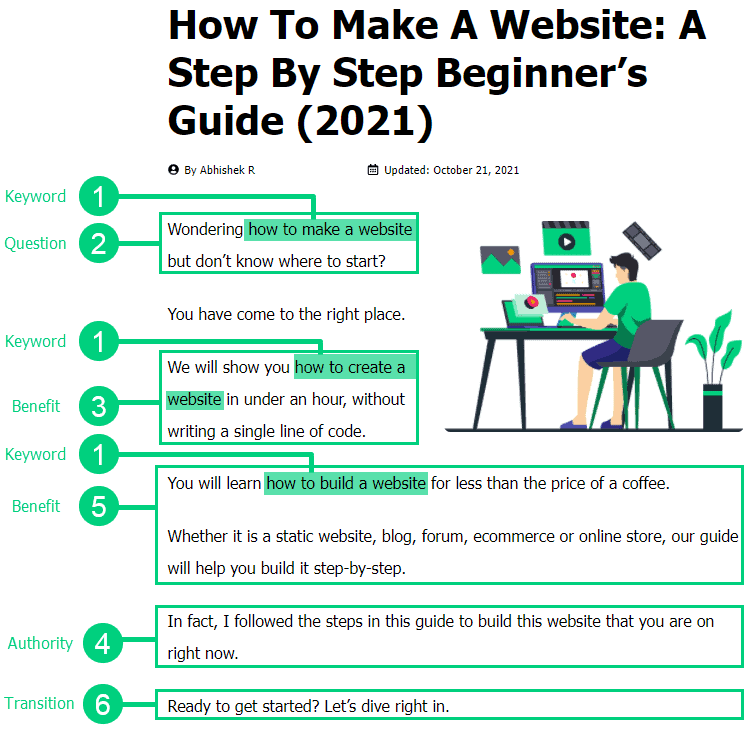
❸ Outcome/Benefit: Tell the reader what benefit or outcome they will get by reading this article. An effective blog post introduction communicates the “so what?” to the reader.
❹ Authority: Show people why you are the right person to write this article or why you wrote this together.
❺ Outcome/Benefit: Mention the outcome or benefit again.
❻ Transition: Transition into your article again.
The introduction shown below has all the six elements:
Write Your Conclusion
Your conclusion is just as important as your introduction. The conclusion is what will leave the reader with a lasting impression of your article. So it is worth restating the benefit of the article ❶.
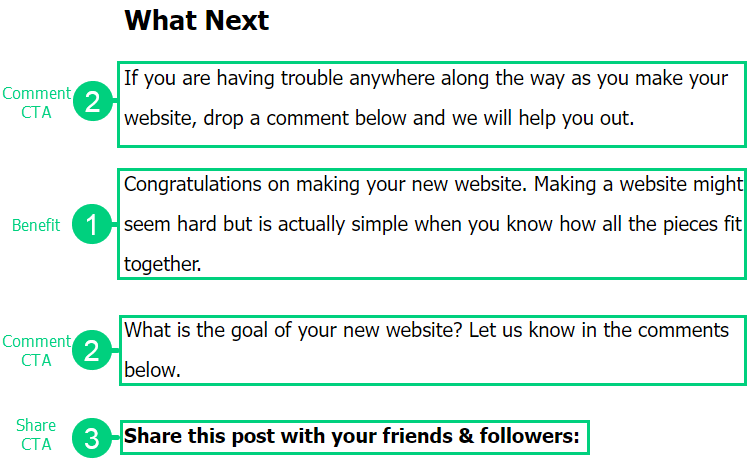
Make sure to include a CTA in your conclusion as well. You can ask your readers to leave a comment ❷, share your post ❸, download a lead magnet, or read another article in your conclusion.
Write 5x Faster with AI
AI writing tools have advanced so much that you can write high-quality blog posts entirely with AI.
You can write your new blog post at 5x speed using the AI writing software Jasper. I was able to write over a hundred blog articles in 3 months using Jasper. This blog article you are reading right now was written with the help of Jasper. AI will not only help you write blog posts fast but also with higher quality.
Jasper can write plagiarism-free blog content, articles, social media content, emails, and ad copy. All you have to do is provide a few inputs on what you want and Jasper will do all the hard work of creating the blog content for you. No more writer’s block.
Check out the video below to see Jasper in action:
Try Jasper for free using the links on this page and get 10,000 bonus credits you can use to start writing your first articles.
Once you sign up for Jasper I recommend you spend some time going through the tutorial videos in the Jasper Bootcamp to truly unlock the power of this amazing software.
Check out our guide on How to Write a Blog Post Fast in 15 mins Without Losing Quality for more tips to write fast.
4. Edit your Blog Post
After you finish writing your article, it is important to go back and edit your work. Proofread your post and look for any grammar or spelling mistakes.
You should also make sure that your article flows well and that all of your points are covered. If you find any points that are missing, then go back and add them in.
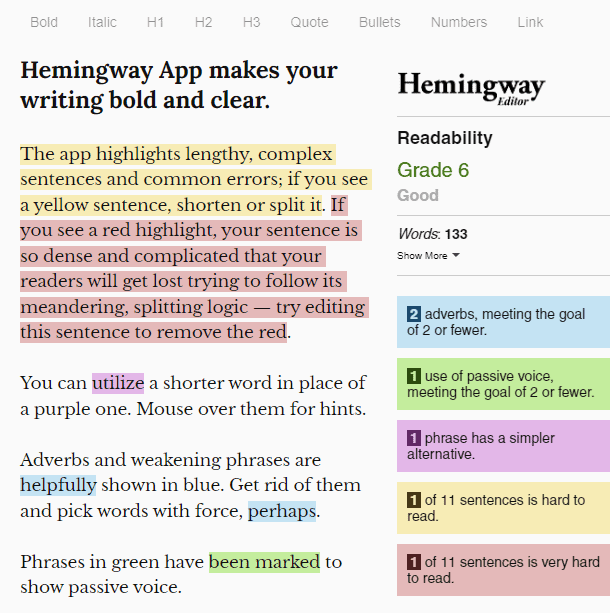
Use Hemmingway Editor to break down complex sentences into simpler alternatives. You want to aim to achieve a 5th or 6th-grade reading level. Doing this will ensure that your writing is simple and easy to consume without complex sentences.
Another way to make sure your article sounds natural is to read it out loud after you write it. If it sounds awkward when you read it out loud, then it probably needs to be rewritten.
Use a grammar checker like Grammarly to fix spelling, punctuation, and grammar.
Now is also the time to perfect your blog post title if you haven’t already done so.
5. Add Images & Videos
Images are a great way to break up a wall of text and make your article more visually appealing.
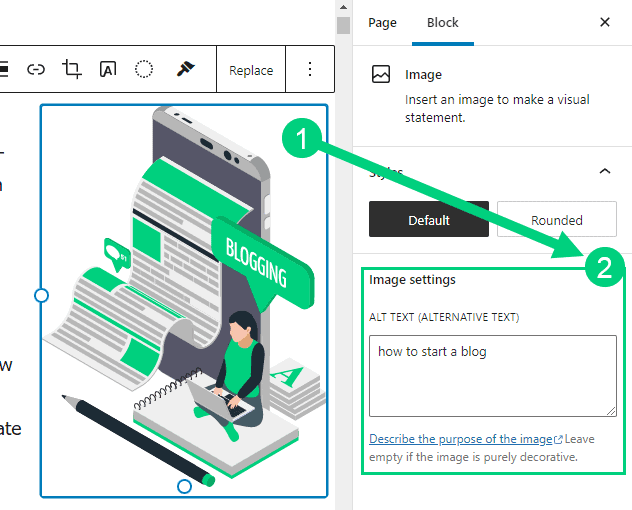
When you add images to your article, make sure to include alt text. Alt text is the text that appears when you hover over an image. Alt text is important because it helps with your SEO. You can click on the image ❶ and you will find the option to set the alt tag on the right sidebar ❷.
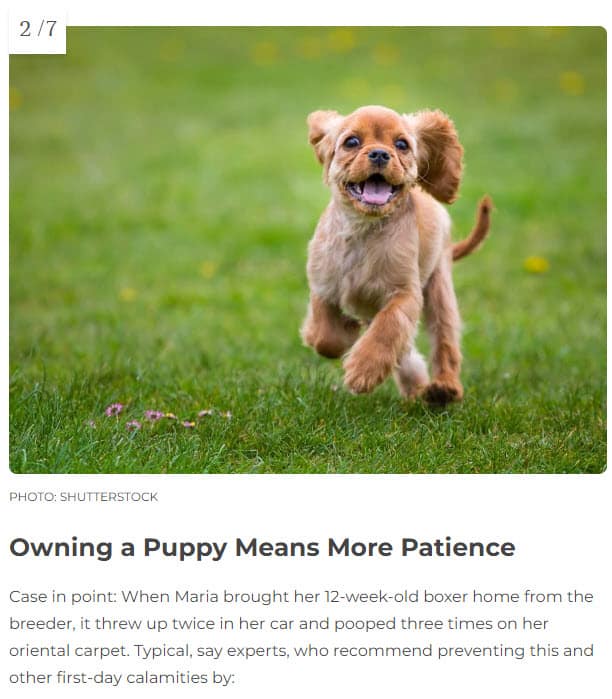
Make sure to only use images that are relevant to your article and that add value to your content. Don’t include images for the sake of adding them. Your images should only be used to explain a concept in the article.
In the below example, the image of the puppy adds no value to describe the text below it.
The best images are the ones you take yourself with a camera. You can use your smartphone camera to get started.
If you cannot take your own images, then the next best thing is to use stock photos. There are both free and paid stock photography websites to source your images from like:
Free Options: Pixabay, Pexels, Upsplash
Paid Options: Deposit Photos, Shutterstock, iStock, Getty Images, 123rf.
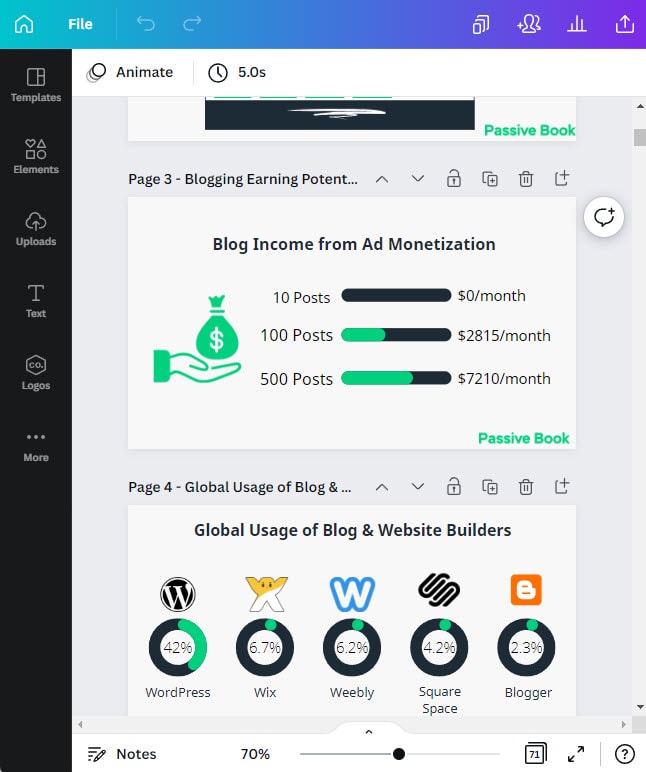
You can also illustrate your blog post by creating graphics and images on Canva. If you get Canva Pro, you will have unlimited access to their library of stock photos and graphics that you can use to create your own unique images for your blog posts.
You can also include videos in your blog post by embedding them from YouTube. Videos are a great way to engage your readers and they can also help break up your text. It also increases the time on the page.
If you want to prevent users from leaving your blog to watch the video on YouTube, you can use the WordPress plugin called Presto Player to embed the videos. It will remove all YouTube branding ensuring that your readers stay on your blog to watch the Video.
6. Publish Your Blog Post
Once you have edited your blog post and added all of the relevant images and videos, it is time to publish.
Optimize SEO
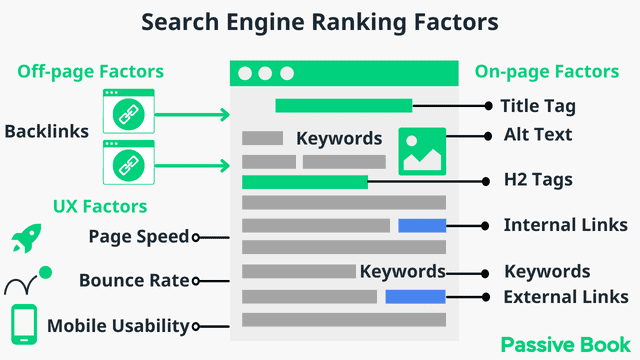
The final step is to optimize your blog post for SEO. You want to make sure that your blog post is ranking high in Google searches.
To do this, you need to make sure that you are using the right keywords throughout your article. Try to use 1-2 keyword phrases per blog post and use them throughout your article.
You should also use these keywords in your title, meta description, and permalink.
Many factors go into SEO, and it can be a bit confusing to figure out where to start. You can master the more advanced SEO tactics by checking out our SEO Resources.
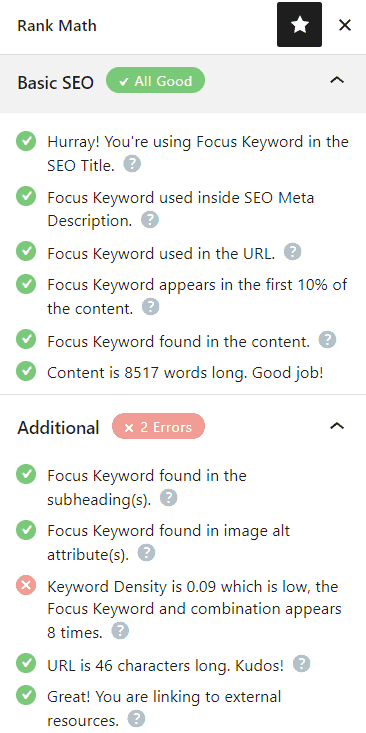
You can ensure you get the basics of SEO right, by completing the recommendations given by the RankMath plugin.
Create Social Media Graphics
Creating social media graphics is a great way to promote your blog post to get more traffic to your website.
When you create social media graphics, make sure to use attractive visuals and include the title of your blog post. You should also include a call-to-action (CTA) telling people to click on the link to read your article.
If you want to save time, you can use Canva to create your social media graphics. They have pre-made templates that you can use for all of the major social media platforms.
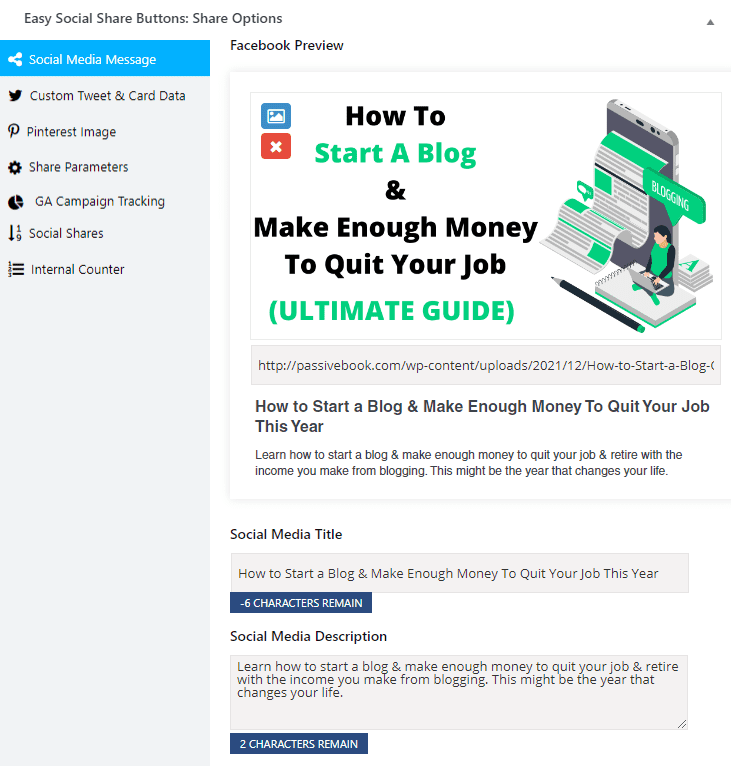
You can use a WordPress plugin like Easy Social Share Buttons to set the Facebook, Twitter, and Pinterest images that appear when someone shares your content. Your SEO plugin might also have the option to set this.
Hit Publish
You have now written a blog post and you are ready to hit publish.
You can also schedule your blog post to get published at a specific date and time.
7. Promote Your Blog Post
The final step is to promote your blog post. You want to make sure that as many people as possible see your article. There are a few ways to promote your blog post.
Share on Social Media
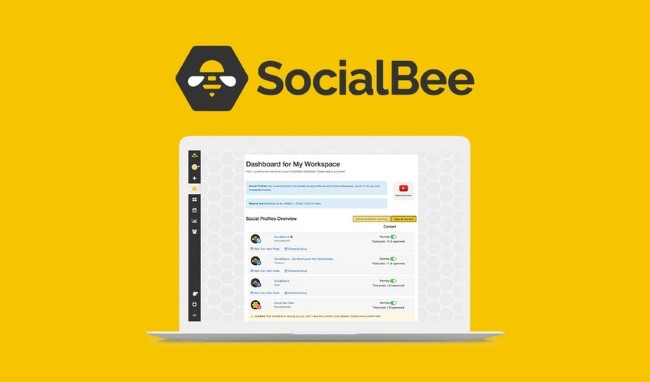
One of the best ways to do this is to share your blog post on social media. You can schedule your blog post to be shared on social media at regular intervals using software like SocialBee. You can turn on evergreen sharing so that the content is shared and reshared automatically at regular intervals.
Email Marketing
Another way to promote your blog post is to email your list. If you have an email list, you can let your subscribers know about your latest blog post.
To get started you need to build a list by offering a lead magnet in exchange for someone’s email address. Then you need to connect it to an email marketing software that automatically sends people emails.
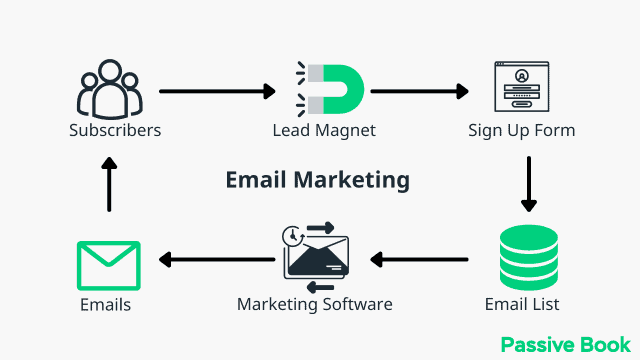
You can use the Thrive Leads plugin to build opt-in forms to collect email addresses. You can then connect the opt-in form to an email marketing service like Active Campaign to send out the emails.
Check out our Email Marketing resources to learn more.
Guest Blogging
Guest blogging is another great way to get exposure for your blog post. You can write a guest blog post on another website in your niche and include a link to your blog post in the author bio.

You can also reach out to other bloggers in your niche and ask them to link to your blog post on their blog or website.
Types of Blog Post With Examples
There are many types of blog posts that you can write. Let us look at some of the more popular ones with a few examples.
1. List Post
A list post is a blog post that is written in the form of a list.
The key to writing a good list post is to make sure that the items on your list are well-researched and that they are relevant to your niche.

There are a few tips to write a list post:
- Include the number of items in the list post in the title.
- Have the most interesting or unusual item in your list as the first item in your list post.
- Have the most obvious item as the last item of your list post.
- Have an odd number of items in your list post.
- Try to make your list as comprehensive as possible.
Here are a few examples of list posts:
2. How-to Post
A how-to post is a blog post that provides step-by-step instructions on how to do something. How-to posts are usually longer blog posts as they need to provide enough detail for the reader to be able to follow the steps.

There are a few tips to write a how-to post:
- Start with an introduction that tells the reader what they will learn from reading your blog post.
- Use subheadings to break down the process into steps and to make it easier for readers to follow the steps.
- Include images, infographics, or videos to help the reader follow the steps.
- Write clearly and concisely so that the reader can easily follow the steps.
Here are a few examples of how-to posts:
3. Question Post
A question post is a blog post that answers a question. The key to writing a good question post is to make sure that the question you are answering is relevant to your niche and that it is something that people are actually searching for.
You should also try to win the featured snippet placement. A featured snippet is a highlighted block of text that appears in the search results. The block of text is taken from a website and it usually contains the answer to the question that the person is asking.

The key to getting your content featured as a snippet is to make sure that your content answers the question in 40 to 50 words (300 characters).
Here are a couple of tips on how to write a question post:
- Use the question as your title and make sure to include the keyword in your title.
- To win the featured snippet spot, immediately answer the question in 40 to 50 words (300 characters) after the introduction.
- Answer the question in detail and provide evidence to support your answer.
- Expand on your answer and answer follow-up questions the reader might have.
Here are a few examples of question posts:
4. Review Post
A review post is a blog post that reviews a product or service. The key to writing a good review post is, to be honest about your opinion of the product or service and to provide enough detail for the reader to make an informed decision.

Let us look at some tips to write a review post:
- Be honest about your opinion of the product or service.
- Include information on what the product or service is, how it works, and what it is used for.
- Include both the positive and negative aspects of the product or service.
- Make sure to disclose any affiliate links in your review post.
- Include images of you using the product or service.
Here are a few examples of review posts:
5. Case Study Post
A case study post is a blog post that looks at a real-life example of how a product or service has been used to solve a problem. Case study posts are usually longer blog posts as they need to provide enough detail on the problem and the solution.
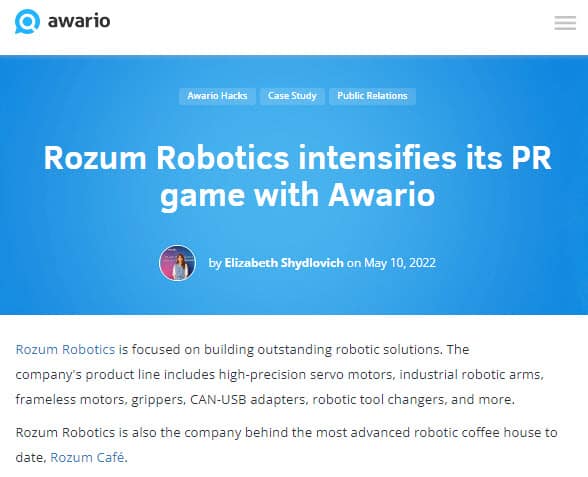
Let us look at tips to write a case study post:
- Start with an introduction that tells the reader what they will learn from reading your blog post.
- Include information on the problem that was solved and how the product or service was used to solve the problem.
- Include images, infographics, or videos to help illustrate the problem and solution.
- Write clearly and concisely so that the reader can easily understand the problem and solution.
Here are a few examples of case study posts:
What makes a good blog post
A good blog post is well-researched, well-written and provides value to the reader.
A good blog post will:
- Satisfy search intent
- Be quick and easy to read
- Be scannable
- Be optimized for SEO
- Will be interesting and useful
- Have a clear Call-To-Action (CTA)
What Next?
Writing blog posts shouldn’t be hard. We hope you found these tips for writing a blog post useful. These tips will help you write well so use them when you sit down to write a new blog post.
To have a successful blog, you need to write engaging and interesting posts that people will want to read.
But don’t worry, writing a blog post doesn’t have to be hard – it can be easy if you follow these simple steps.
Now it is your turn.
What tips and strategies do you apply when you write a blog?
Let us know in the comments below.
Share this post with your friends & followers:
