An expensive microphone can still leave you with a bad recording. The stand might hold it too far from your mouth, the cable might not fit your laptop, or the software might record the laptop’s built-in microphone instead.
A missing connection can mean another order and a postponed recording, even when you’ve bought good gear. This checklist covers complete setups for solo episodes, remote interviews, and conversations in the same room, so you can budget for the parts you need and check that they produce a clear recording.
What Equipment Do You Need for a Podcast?
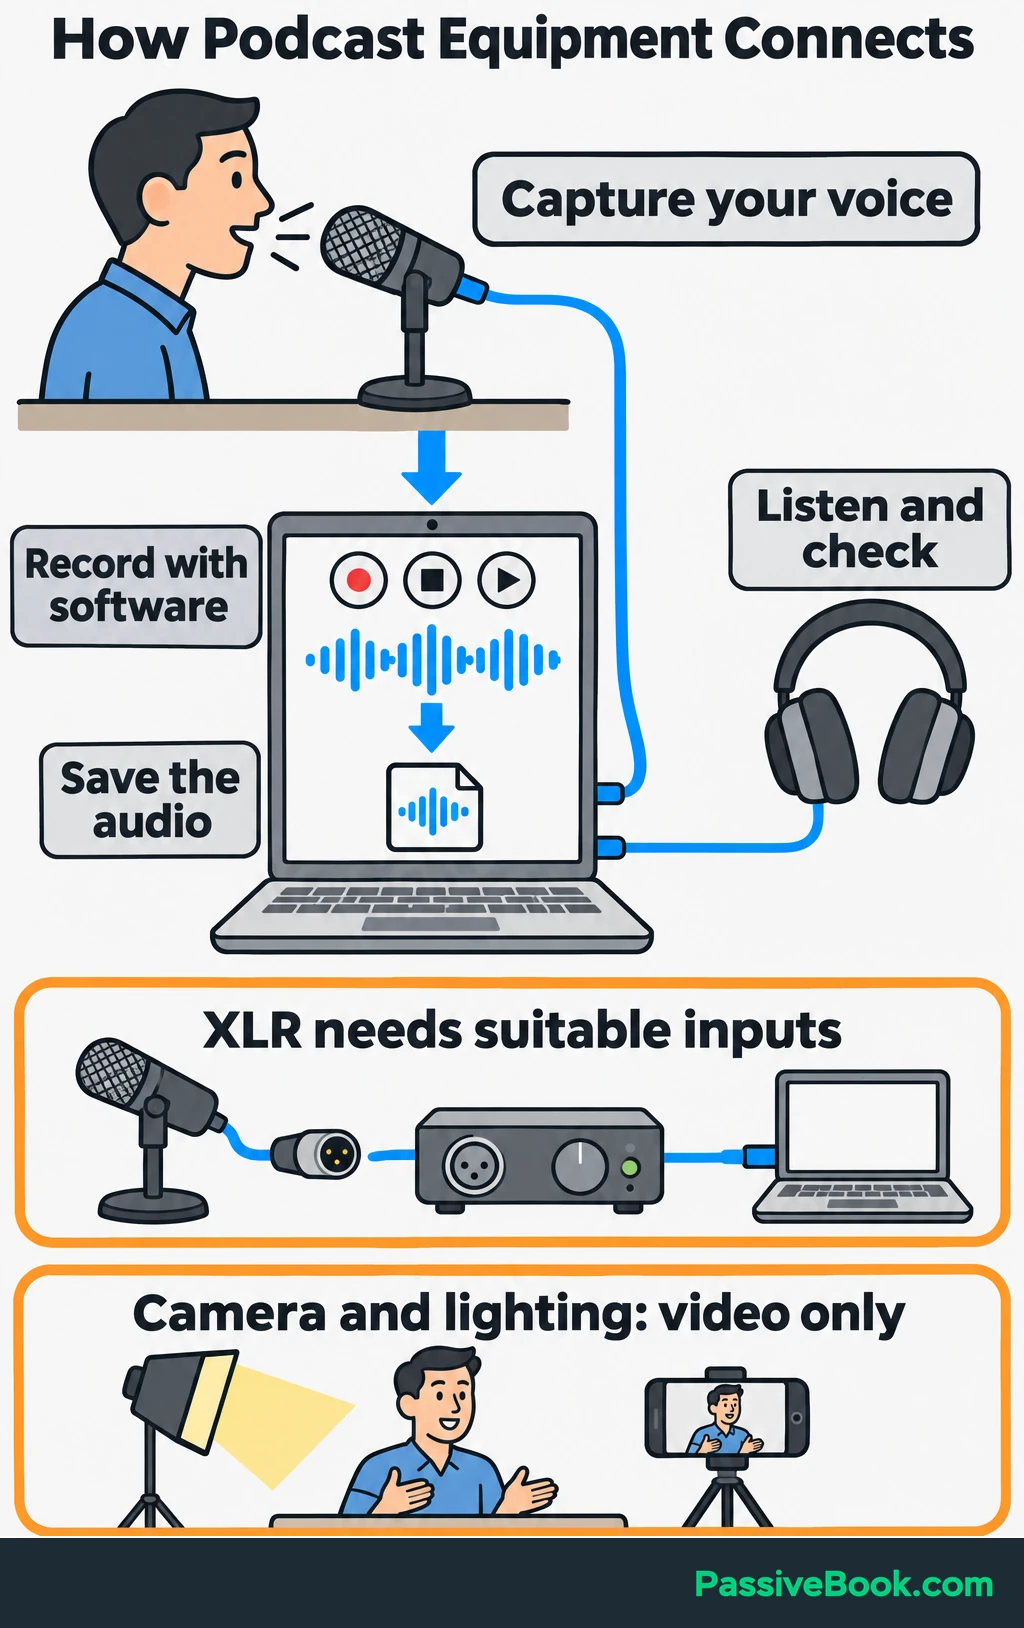
You need a microphone to capture your voice, software to record it, and a device to run that software and store the audio. A smartphone combines all three, so you can make a practice recording with what you already own.
For a practical setup with an external microphone, add wired headphones, stable microphone support, and the right cables.
| Item | Purpose | Quantity | When You Need It |
|---|---|---|---|
| Computer or smartphone | Runs recording software and stores audio | One per recording location | Essential unless a standalone recorder handles recording |
| Microphone | Captures your voice | One per speaker in the same room | Essential; a built-in microphone works for practice |
| Wired headphones | Let you hear guests, check sound, and review recordings | One pair per participant who needs to listen | Part of a practical starter setup |
| Stand or boom arm | Holds the microphone near your mouth | One per external microphone | Needed unless suitable support is built in |
| Cables and adapters | Connect microphones, headphones, and recording devices | Enough for every connection | Depends on the equipment |
| Recording and editing software | Captures speech, makes cuts, and exports audio | One compatible application or workflow | Essential |
| Audio interface | Connects microphones with round, three-pin XLR plugs to a computer | One with enough microphone inputs | Needed for XLR microphones unless another device provides suitable inputs |
| Standalone recorder | Saves audio without a computer | One with suitable inputs | An alternative recording route |
| Headphone distribution amplifier | Connects several headphones with volume controls | One with enough outputs | Needed when the existing outputs cannot serve everyone |
| Camera, support, and lighting | Capture a usable picture | Enough for the planned video setup | Video only |
I would postpone mixers, premium arms, acoustic panels, shock mounts, and paid audio plugins until a test reveals a problem they can solve. A shopping list is allowed to end.
For the running example, imagine you sell printable sewing project planners. You already own a laptop and want to record short episodes about finishing projects, with occasional remote guests. We’ll build that setup first and show what changes when another person joins you in the room.
Choose a Setup for Your Recording Format
Decide where the speakers will be before choosing equipment. Two people in different homes need a different setup from two people sitting at one table.
Solo Episodes
The simplest external-microphone setup is:
USB microphone → compatible computer → recording software
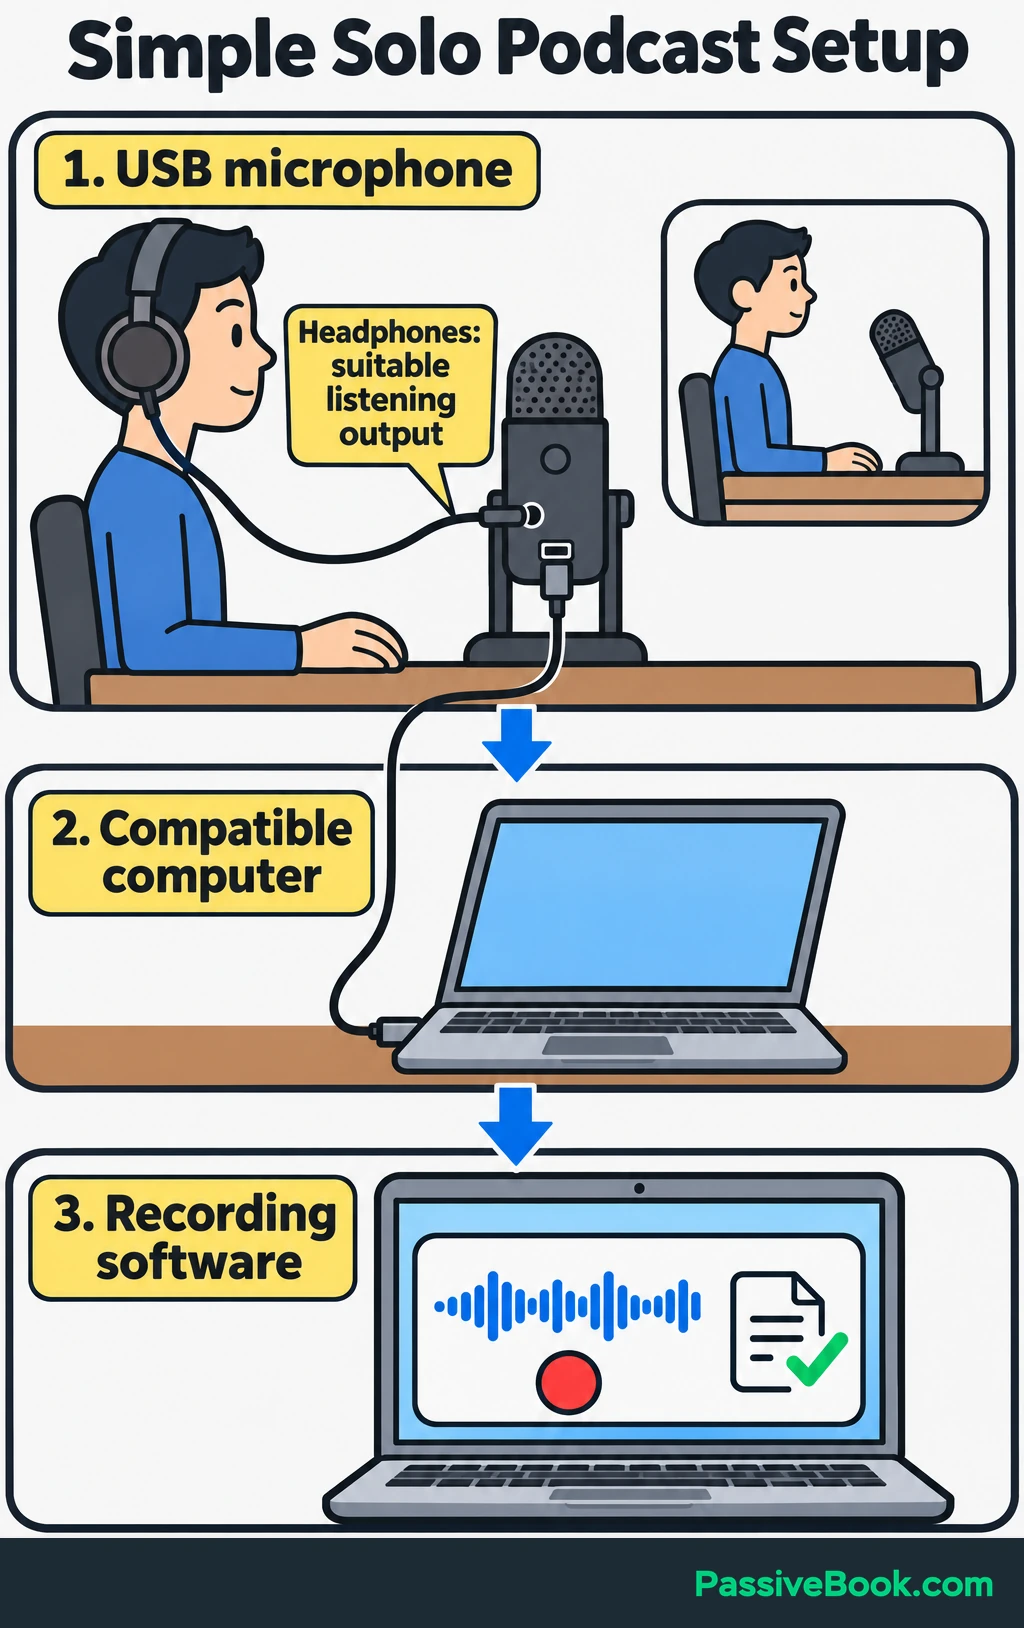
Connect wired headphones to the microphone’s headphone socket or another suitable listening output.
For the sewing show, I would reuse the laptop and choose a microphone that can stay comfortably near your mouth. A microphone that forces you to lean forward for half an hour is a poor purchase, however impressive its specifications look.
You can also record with a supported phone-and-microphone combination or a standalone recorder. Before buying accessories, check that you can power the equipment, save the whole session, and connect headphones when needed.
Remote Interviews
Keep your solo equipment. Your guest needs their own recording device, microphone or suitable headset, and headphones at their location.
A remote guest does not need another microphone input on your interface. Their voice reaches you through the call, and their recording can be captured on their own device.
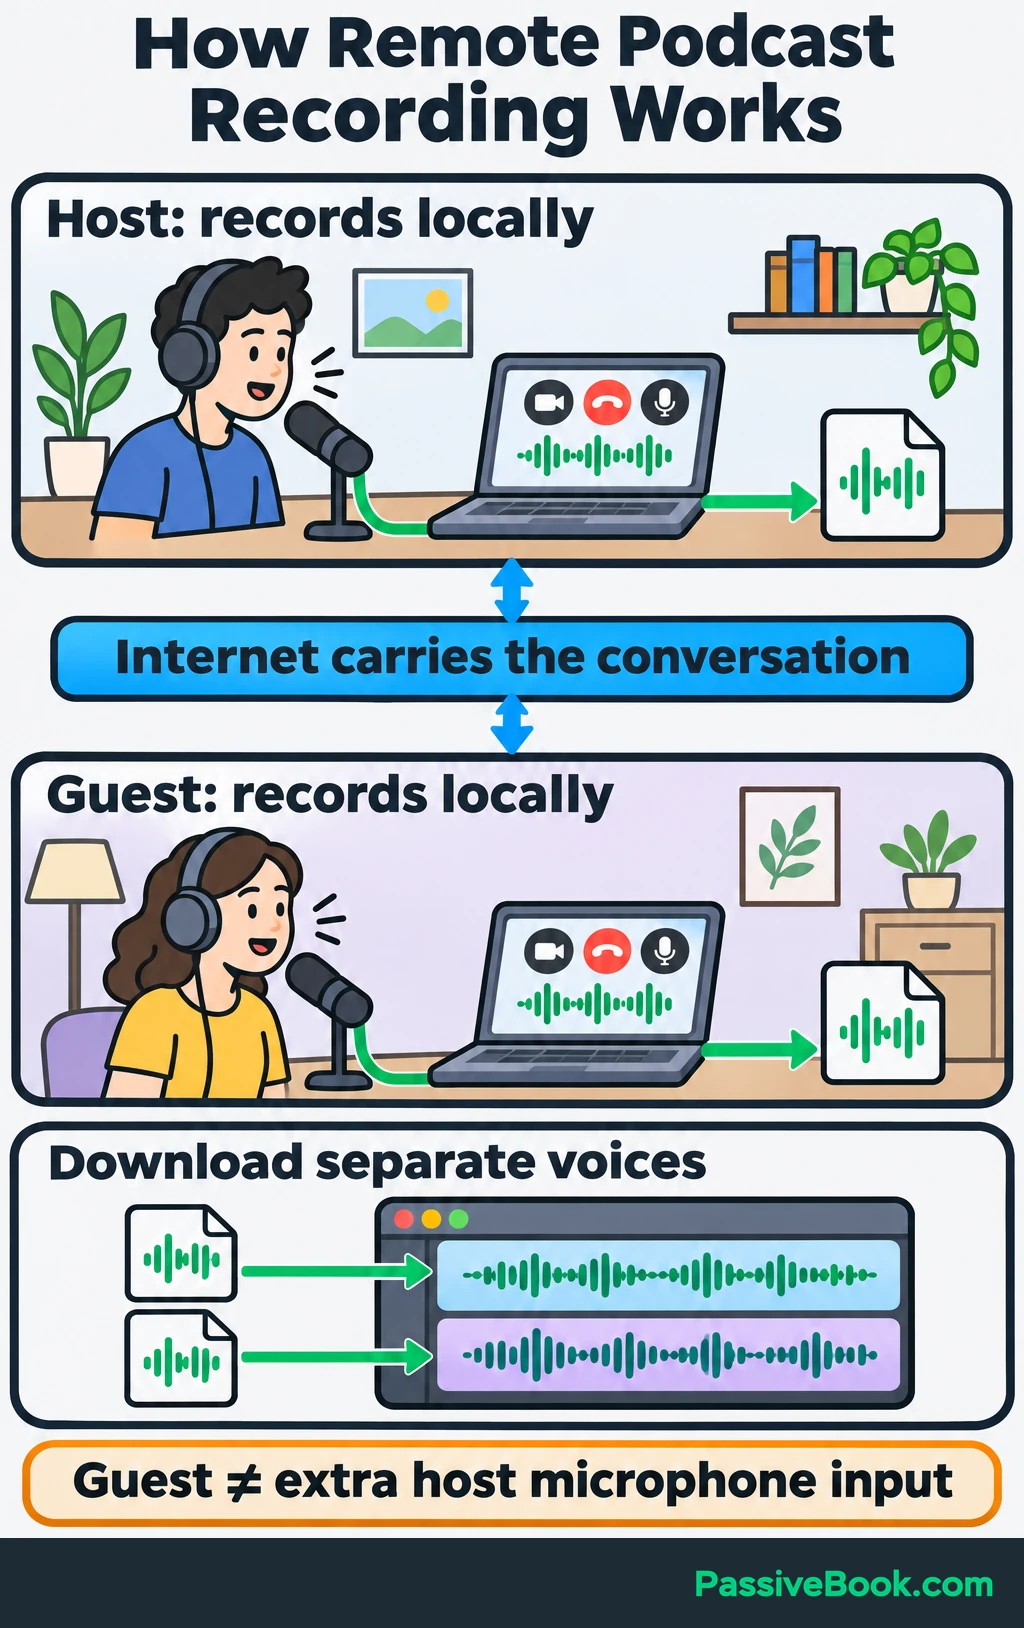
Look for a workflow that records each participant locally and lets you download their voices separately. Local recording captures the voice on that person’s device rather than relying entirely on the audio transmitted over the call. You still need a reliable internet connection for the conversation and uploads.
Ask the guest to join from a quiet room, wear headphones, and complete a short sound check. For the sewing show, an occasional guest interview changes the recording workflow, not the host’s microphone shopping list.
Two or More People in the Same Room
Give each speaker a microphone, stand, and cable. Connect the microphones to one shared interface or recorder with enough microphone inputs.
Count headphone outputs separately. For example, the Focusrite Scarlett 2i2 4th Gen specifications list two microphone inputs but one headphone output. Two people who both need headphones require another connection solution, such as a headphone distribution amplifier.
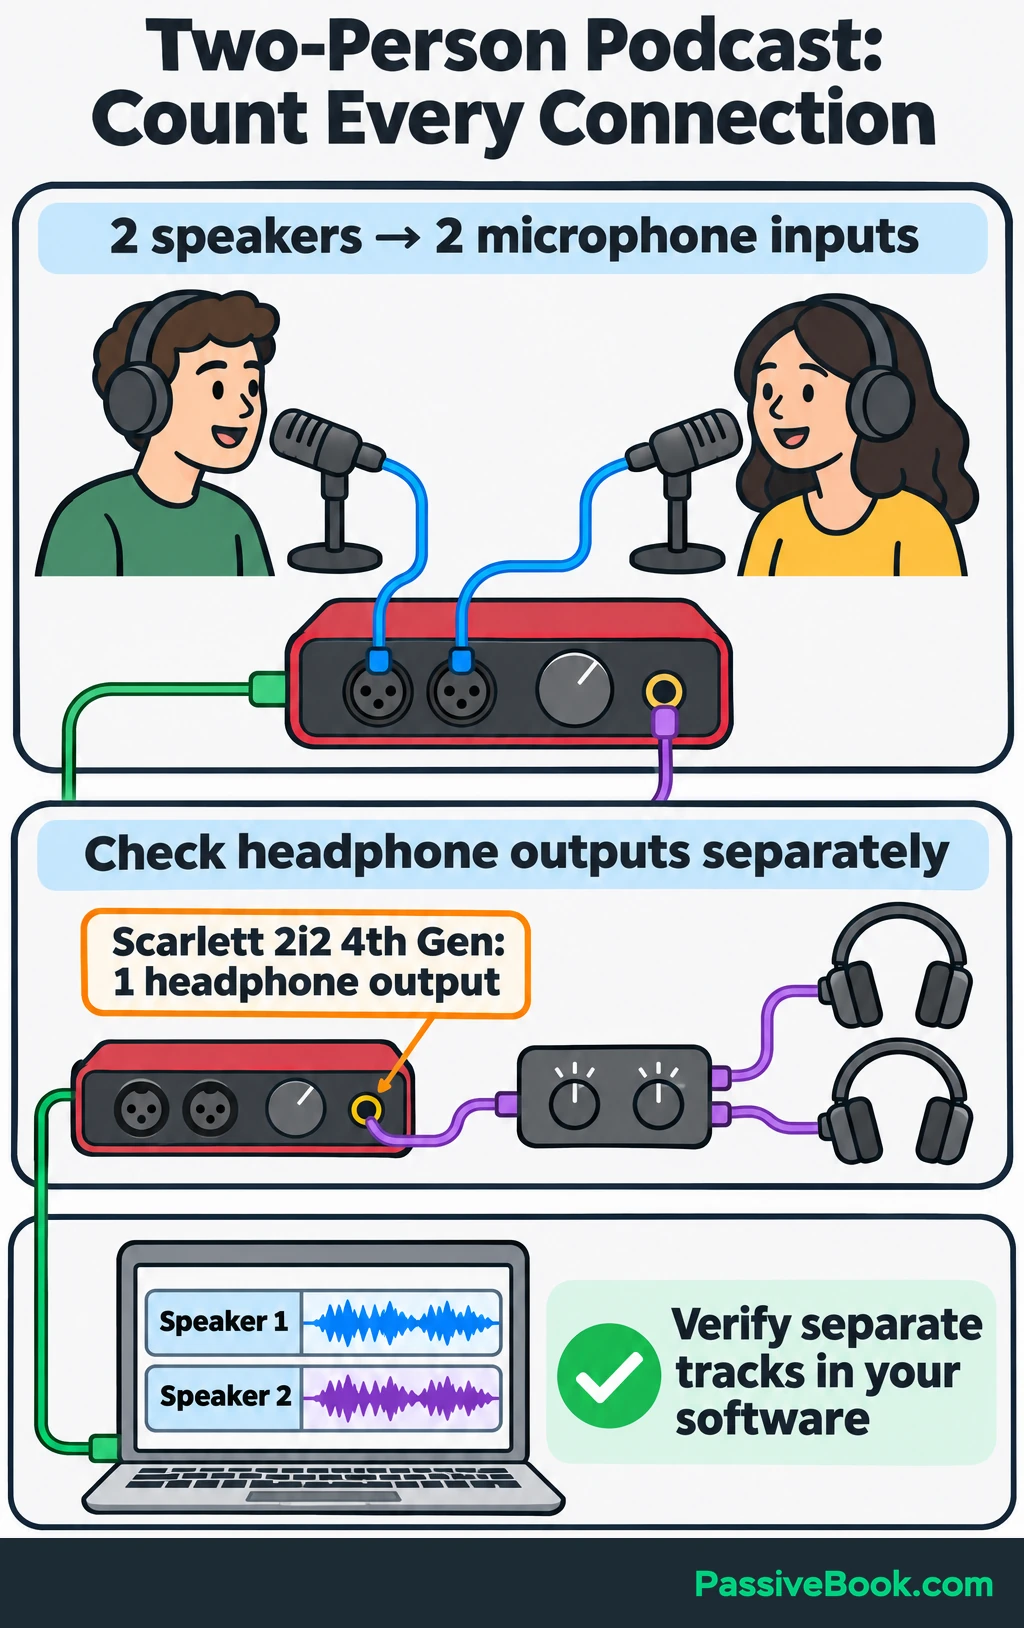
Also check that the hardware sends each microphone separately to your recording software. Several inputs do not automatically mean several separate tracks over USB.
I would choose one shared interface or recorder over several independent USB microphones for a beginner setup. Then verify that the exact hardware, computer, and software can record all the microphones simultaneously.
A mixer or podcast console earns its place when you need live mixing, physical controls, or integrated recording. A basic recorded conversation can use an interface.
Choose a Compatible Microphone
Start with how the microphone connects, then consider how it suits your room and speaking position. These are separate decisions.
USB or XLR: Choose the Connection
USB microphones connect directly to compatible computers. XLR microphones connect to suitable microphone inputs on an interface, mixer, or recorder.
An audio interface boosts the microphone’s signal and converts it into audio your computer can record. A simple connector adapter does not replace that job.
| Connection | I Would Choose It For | What Else You Need |
|---|---|---|
| USB | One speaker recording directly into a computer | Compatible data cable and recording software |
| XLR | Several microphones sharing one recording device | One XLR cable per microphone and enough microphone inputs |
| USB and XLR | Starting with USB while keeping an XLR option | Accessories for whichever connection you use |
The Samson Q2U is one example of the dual-output option. Samson lists USB and XLR connections, headphone monitoring, and a package with a desktop stand, clip, windscreen, and both cables.
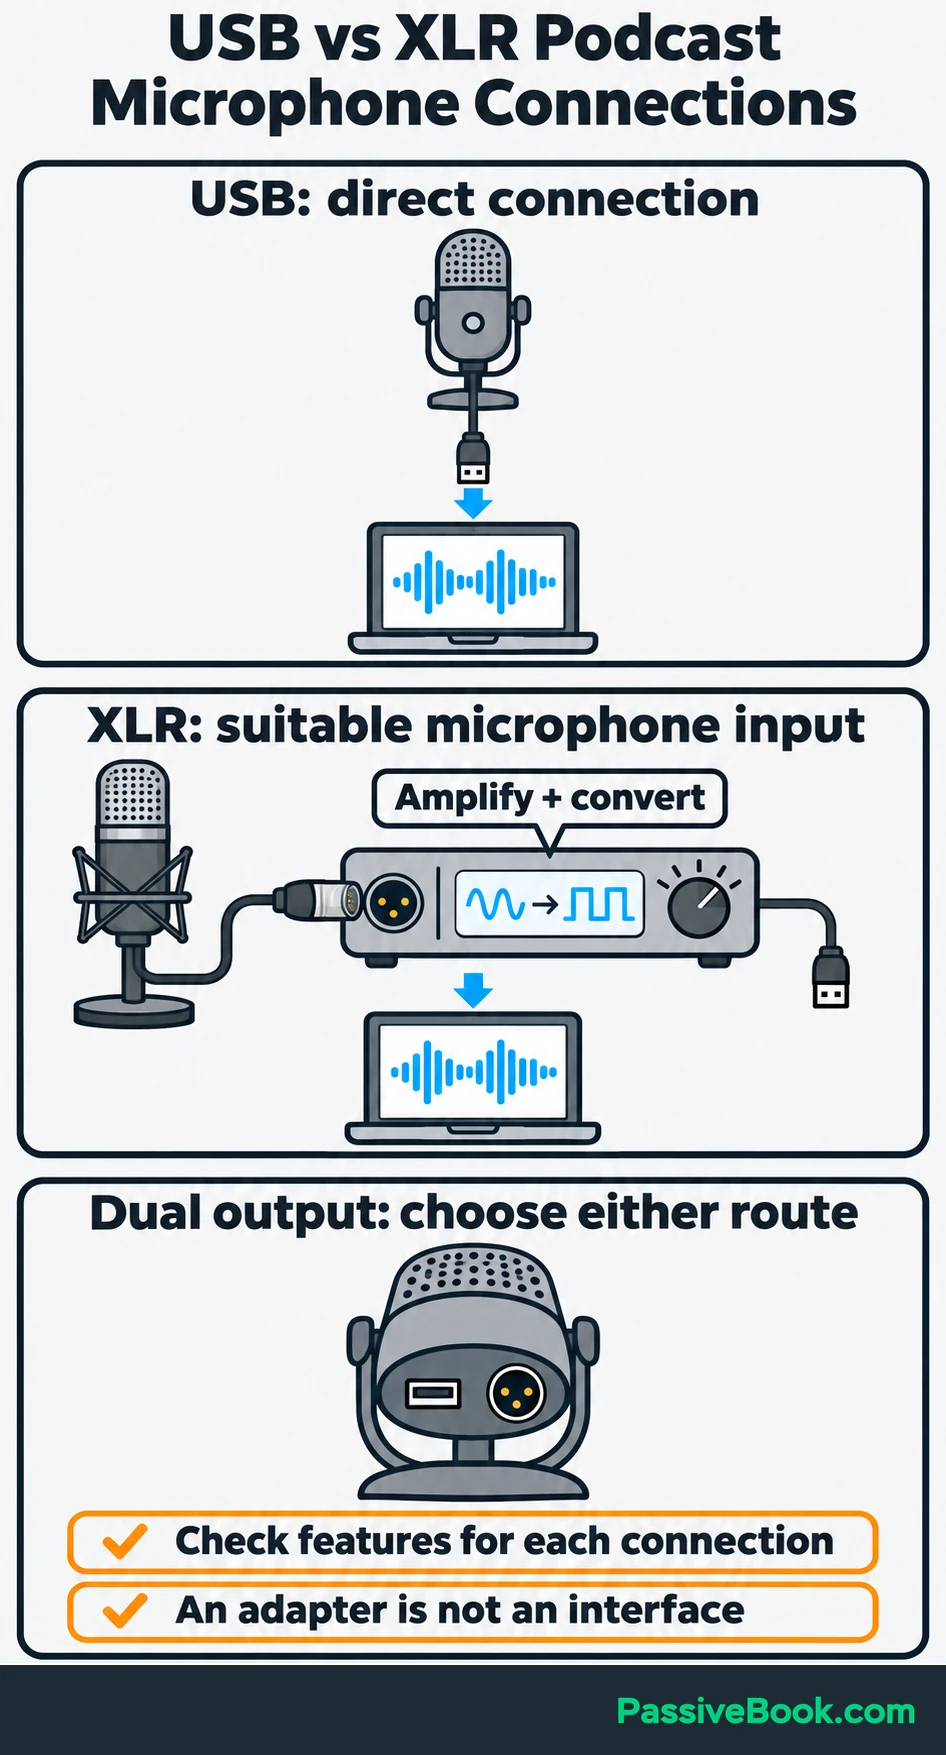
I haven’t tested it, but those connections and included accessories make it worth comparing. USB and XLR describe connections; neither label alone ranks sound quality.
Before ordering any microphone, check:
- Device Compatibility: Your computer or phone and its operating system support the microphone.
- USB Connection: The cable fits both devices and carries data.
- Power: The device can supply the required power, including through any adapter.
- Included Accessories: The seller’s exact bundle contains the support and cables you need.
- Controls and Monitoring: The functions you want work through your chosen connection.
A dual-output microphone’s USB features do not automatically work through XLR. Check the manual before relying on its headphone socket or onboard controls.
Dynamic or Condenser: Choose for Close Speech Recording
Listen to your quietest available room before buying. Notice fans, traffic, appliances, and the hollow sound of your voice reflecting from bare surfaces.
Dynamic and condenser describe microphone designs. Cardioid describes a directional pickup pattern that favors sound arriving from the front.
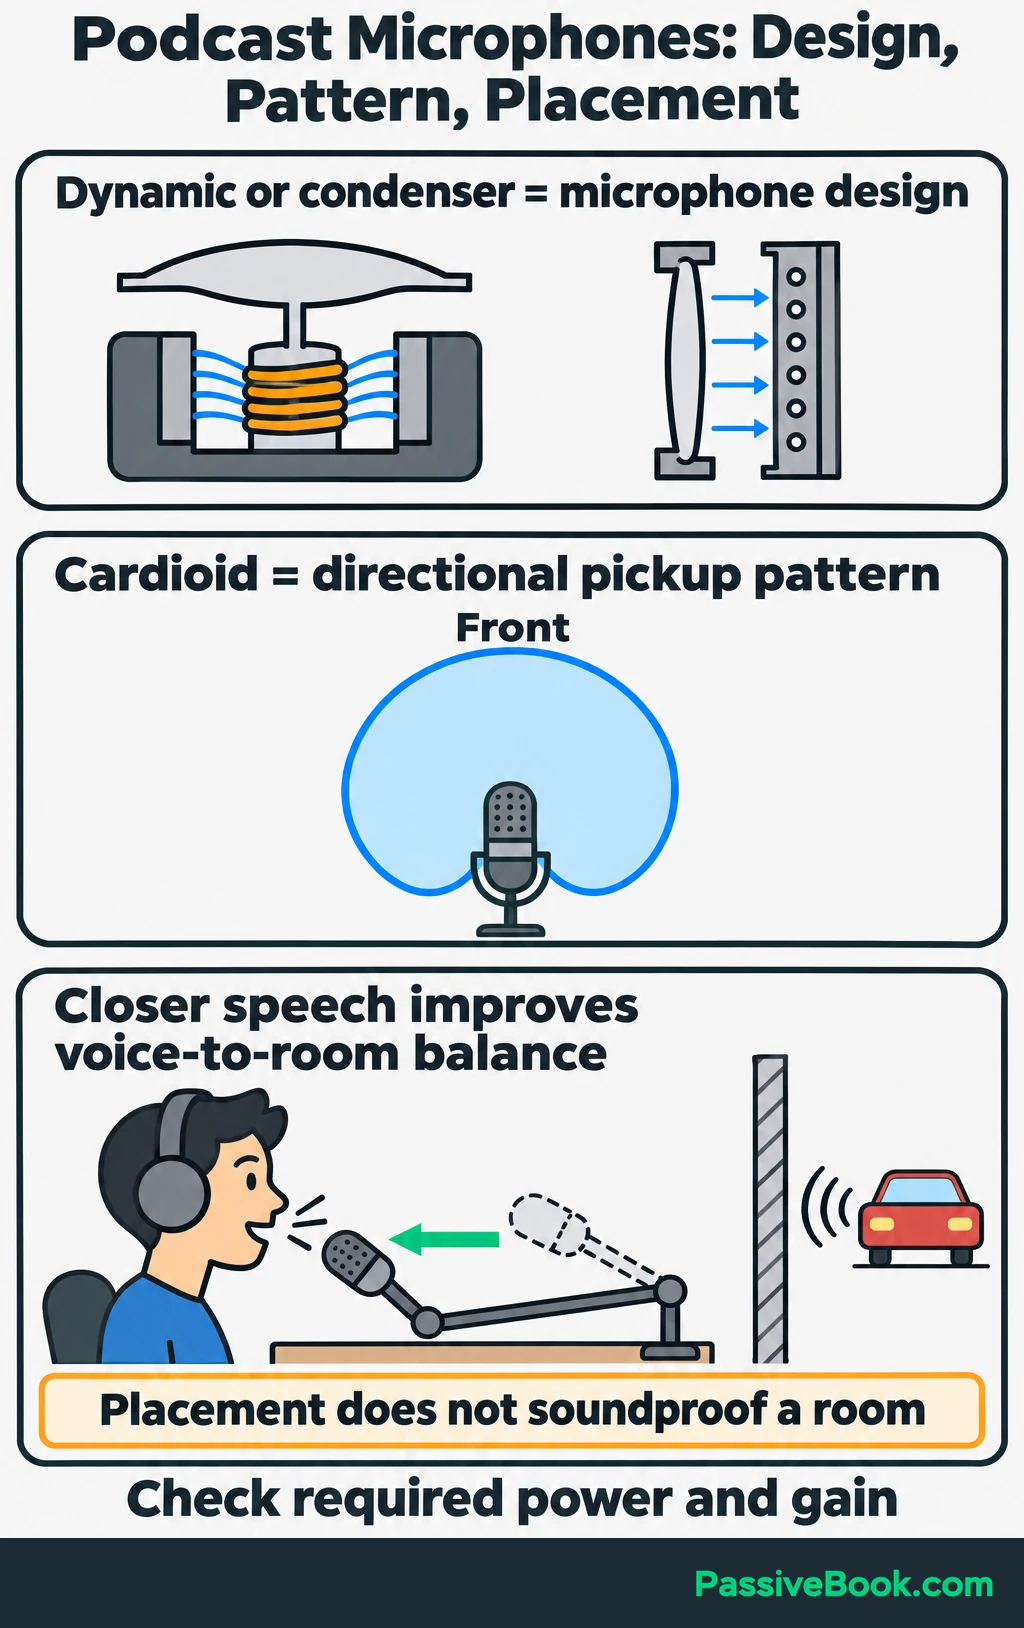
For a simple desk setup, I would start by comparing cardioid dynamic speech microphones. But if you already own a condenser microphone, test it first. A clear recording is a better reason to keep equipment than a category label is to replace it.
Placement matters with either design. Moving closer makes your voice louder relative to room noise and reflections, as Shure explains in its podcast microphone guidance. A dynamic microphone does not make traffic, barking, or an echoing room disappear.
Check power and gain requirements too. Gain is the amount of amplification applied to the microphone’s signal. Some XLR microphones need phantom power: electricity supplied through the microphone cable by an interface or recorder. Enable it when the microphone’s manual requires it. Do not buy a separate gain booster until you have checked whether the microphone-and-interface combination needs one.
Complete the Setup With Headphones, Support, and Cables
Reuse comfortable wired headphones first. If buying a pair, I would favor closed-back headphones because their enclosed ear cups help reduce playback leaking into the microphone.
Check the plug and the listening output together. A small headphone plug may need an adapter for a larger socket. For remote interviews, confirm that the chosen output lets you hear the guest and, when wanted, your own microphone.
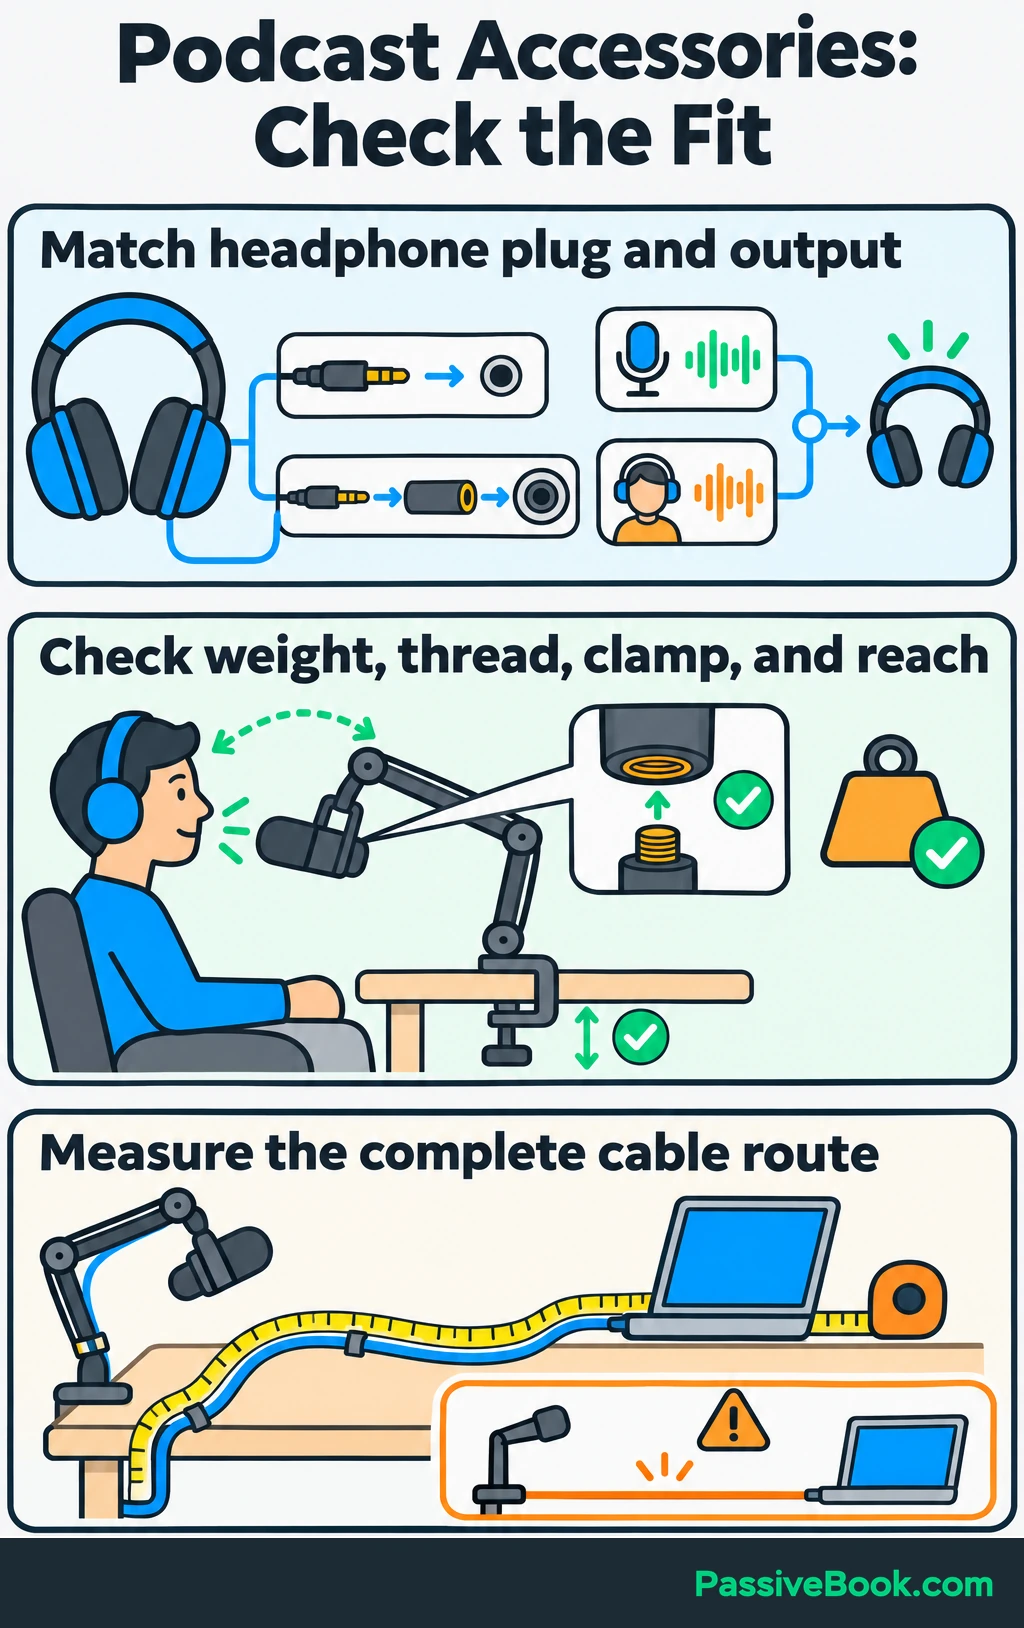
The stand matters because it determines where the microphone can sit. Check microphone weight, mounting threads, and desk-clamp clearance before choosing an arm.
For the sewing show, use the microphone’s included stand if it reaches a comfortable speaking position. Upgrade the support when it cannot do that.
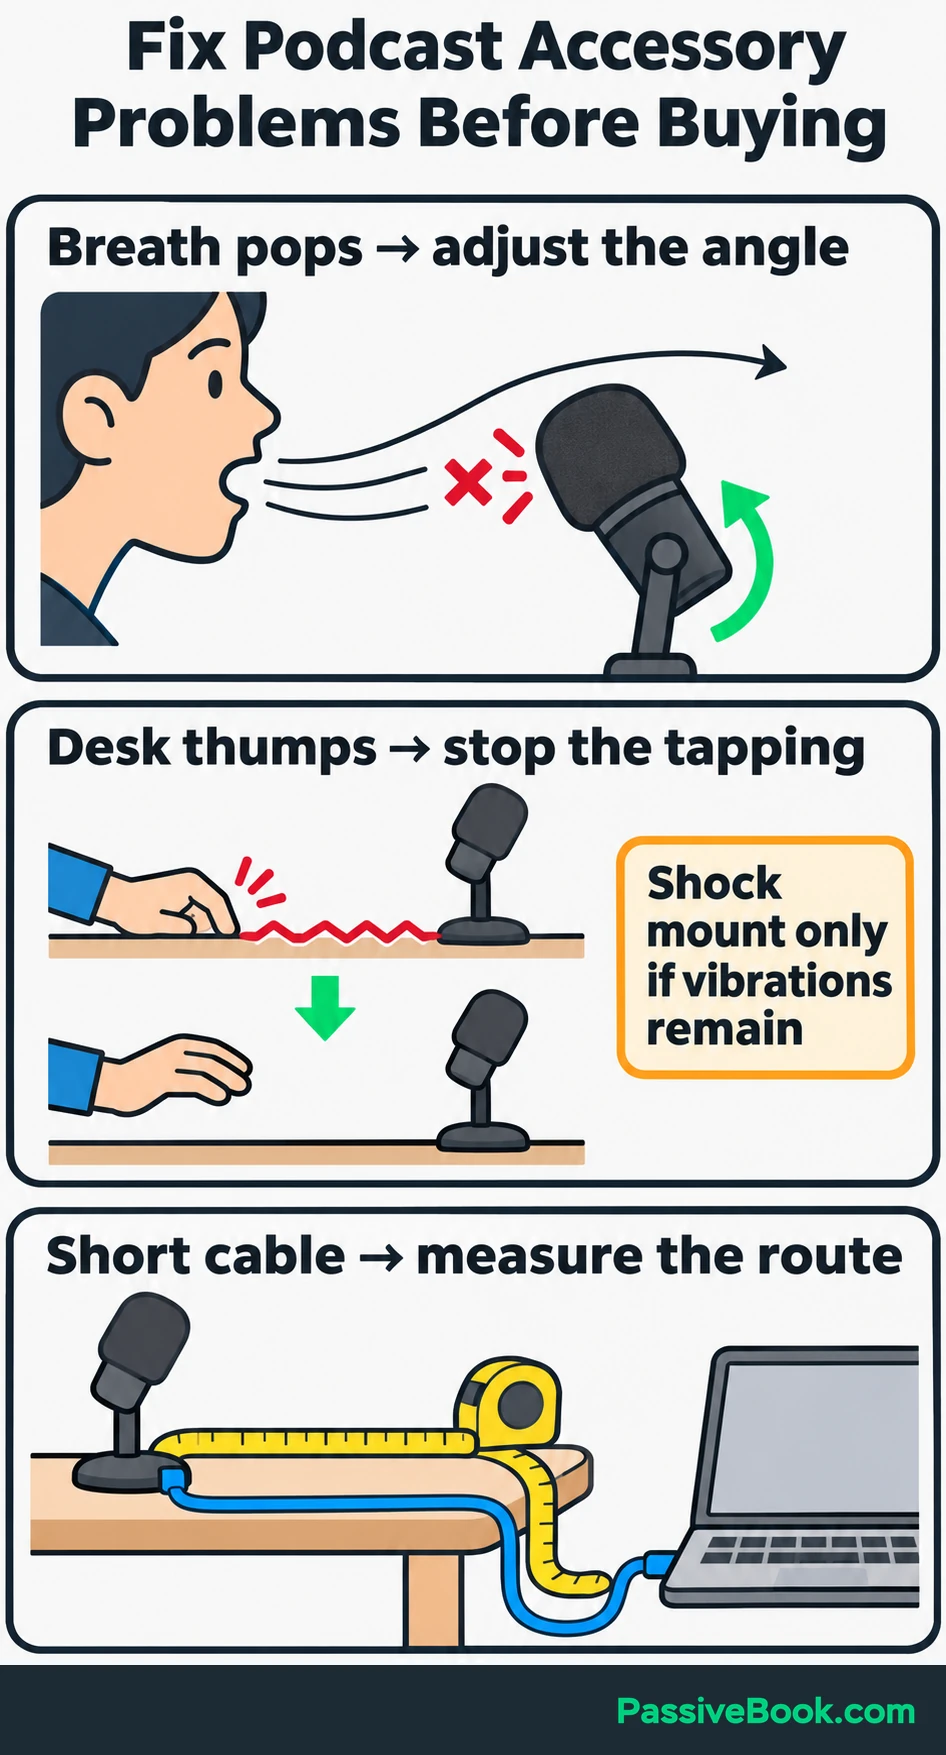
I once heard repeated thumps while reviewing a lesson I had recorded for a digital product. I was tapping the desk as I spoke. I stopped tapping and recorded another sample, which removed the reason to buy a shock mount. Sometimes the faulty accessory is your hand.
Use the same approach elsewhere:
- Breath Pops: Adjust the microphone’s angle, then use the included windscreen or add a pop filter if needed.
- Desk Bumps: Avoid touching the support surface and consider a shock mount if vibrations remain.
- Short Cables: Measure the actual route before ordering replacements.
Check the box contents before buying extras. Two identical cables are useful only when you need two.
Choose Software That Records the Voices You Need
Recording, editing, and connecting remote guests are different jobs, although one application may cover several.
For solo episodes, I would begin with Audacity, a free recording and editing application for Windows, macOS, and Linux. It lets you capture speech, cut mistakes, and export the result.
For multiple local microphones, verify simultaneous recording with your exact interface, operating system, and application. Aim to keep each microphone on its own track so you can adjust one speaker without changing everyone else.
For remote interviews, compare services on the parts you will actually use:
- Guest Access: Guests can join from devices they already own.
- Separate Tracks: Your chosen plan lets you download each participant’s audio.
- Recording Allowance: It covers your planned sessions, including retakes.
- Storage and Exports: You can keep and download the files you need.
- Recurring Cost: The subscription fits the show’s ongoing budget.
Riverside is one option to compare: its high-quality tracks documentation describes locally recorded participant tracks. Check the current plan’s download allowance before choosing it.
Run a short trial and listen to every participant’s saved track. Keep the session open until all uploads finish.
Podcast hosting is a separate expense. It stores published episodes and supplies the feed podcast apps use to distribute them. You do not need hosting for your first equipment test.
What Extra Equipment Does a Video Podcast Need?
Add video when seeing the speakers or a demonstration helps the episode. Audio-only recording needs no camera or lighting kit.
Start a video test with an existing phone or webcam, stable support, and light facing you. Keep the dedicated microphone setup as your main audio source.
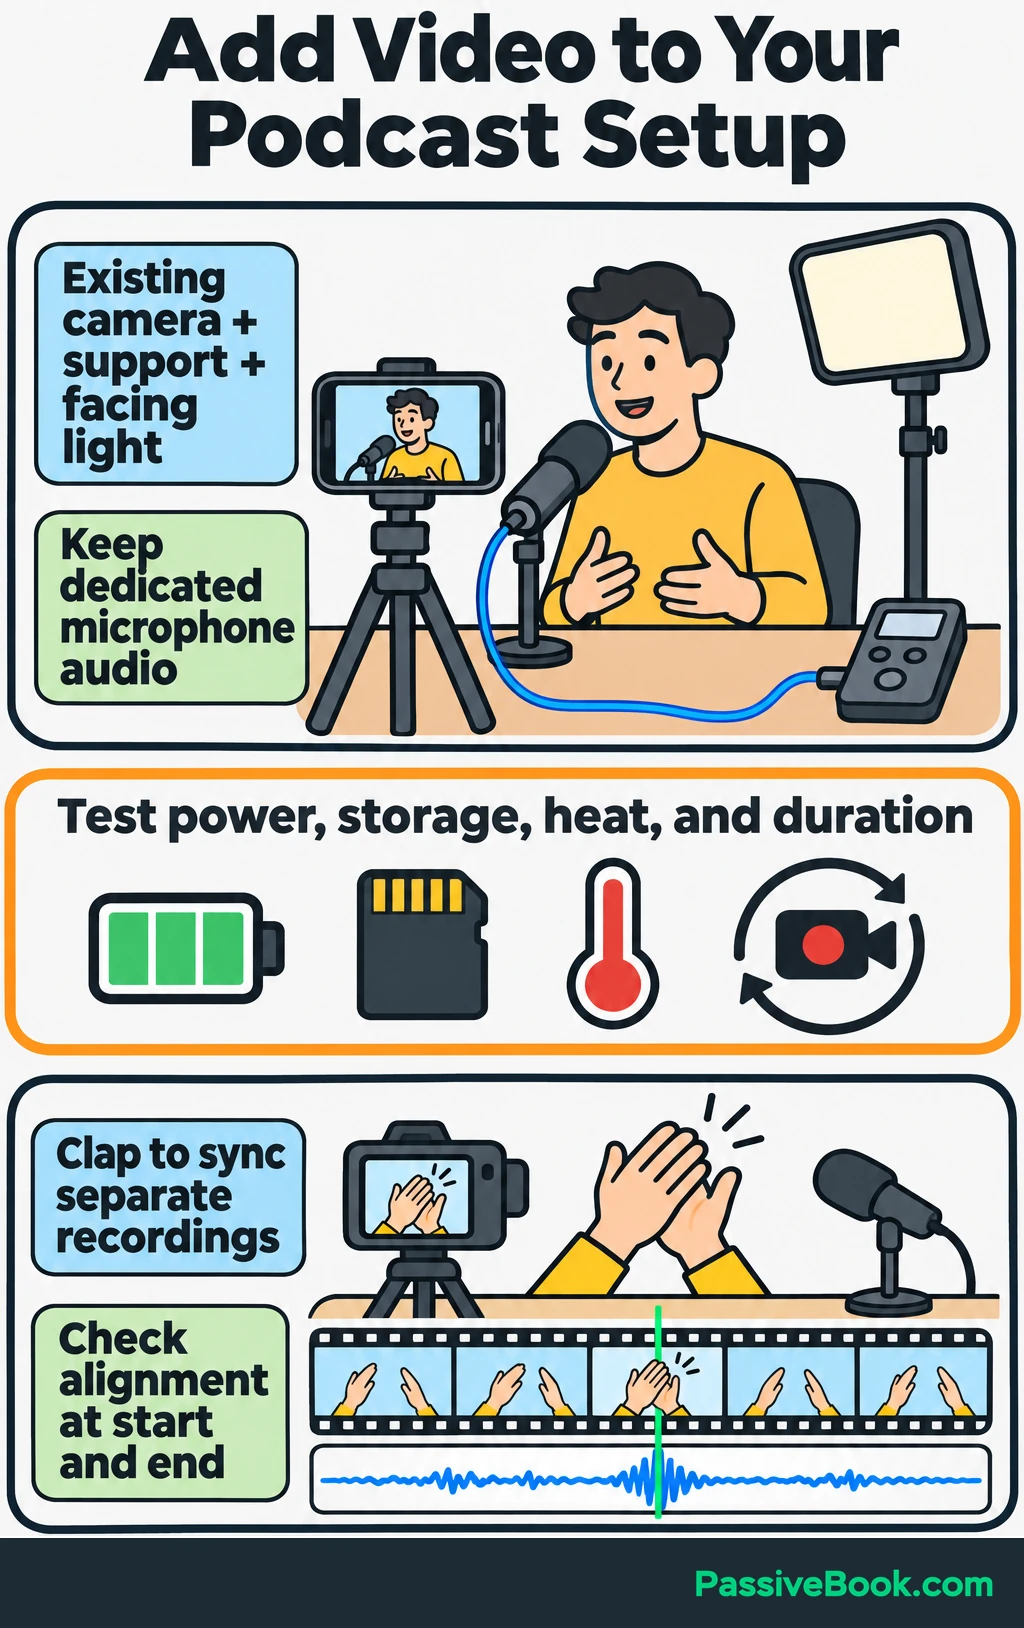
Before a full session, check:
- Power and Storage: The device can record the planned length.
- Recording Reliability: It does not stop because of duration limits or heat.
- Computer Connection: A dedicated camera supports the intended connection, with a capture device if required.
- Framing and Light: Your face is visible and the camera stays steady.
When audio and video are recorded separately, make a visible clap that both recordings capture. Use that point to line them up during editing, then check alignment near the beginning and end.
I would keep the sewing show audio-only initially. Use your existing phone for a video test when an episode needs to show a sewing technique. Add a soft light if the available light leaves your face dark or uneven, and leave extra cameras until the format needs them.
How Much Should You Budget for Podcast Equipment?
Inventory what you can reuse, choose the recording format, and price the whole setup. The microphone’s price alone does not tell you what getting started will cost.
Use a shopping list that includes the connections and accessories. Here is an illustrative solo budget in USD, excluding an existing computer, tax, and shipping. These are planning allowances, not current product quotations.
| Item | Quantity | Compatibility Requirement | Included Accessories | Purchase Cost | Recurring Cost |
|---|---|---|---|---|---|
| USB microphone kit | 1 | Works with your laptop and software | Stand, windscreen, required data cable | $80 allowance | None |
| Wired headphones | 1 pair | Plug fits the chosen listening output | Adapter not assumed | $30 allowance | None |
| Existing laptop | 1 | Supports the hardware and application | Existing charger | $0 additional | None added |
| Audacity | 1 installation | Supports the computer’s operating system | Recording and editing tools | $0 | None |
The new purchases counted here are one microphone kit and one pair of headphones:
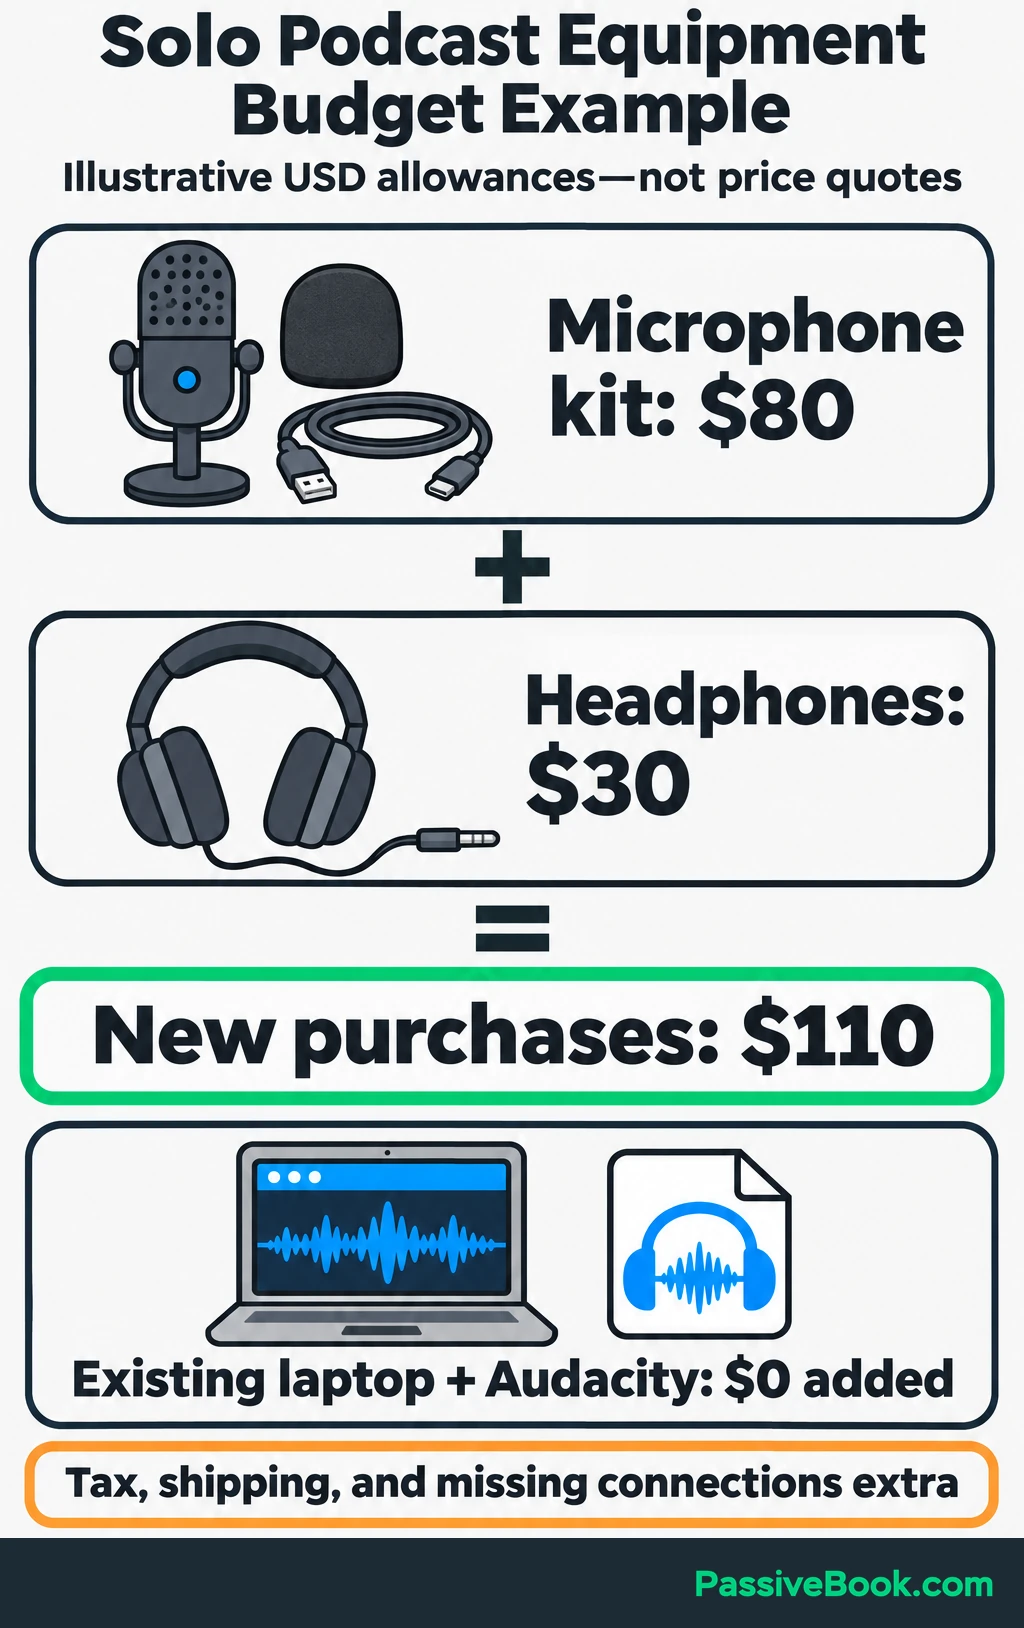
$80 + $30 = $110
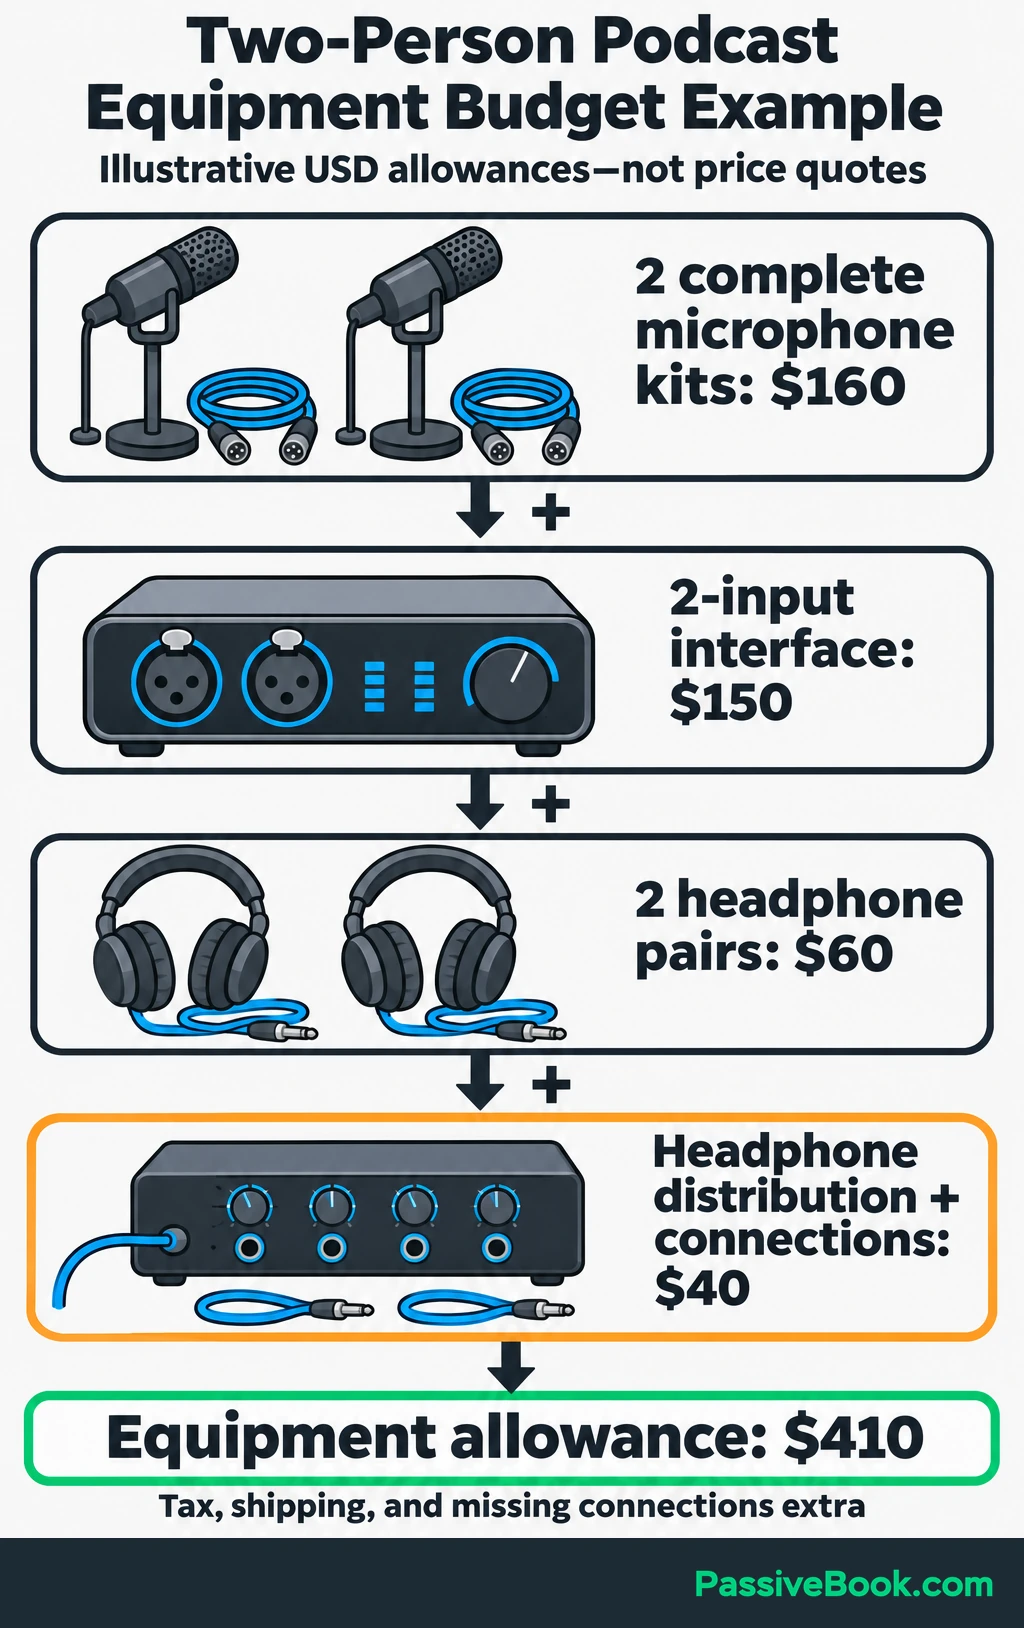
For two people in the same room, count two complete microphone kits, an interface with two microphone inputs, two headphones, and a way to connect both headphones:
| Item | Illustrative Allowance |
|---|---|
| Two XLR-capable microphone kits, including stands and required cables | $160 |
| Interface with two microphone inputs | $150 |
| Two pairs of wired headphones | $60 |
| Headphone distribution and its required connections | $40 |
| Total | $410 |
Replace these allowances with actual checkout prices for compatible equipment, then add tax, shipping, and missing connections.
Track remote recording subscriptions and podcast hosting separately from equipment costs.
Put those ongoing costs beside your equipment purchases and the cash you have available. You can then decide what to buy now and what to postpone.

Free Business Cash Planner


For the sewing show, I would buy the solo setup first. Occasional remote guests do not justify a second local microphone channel. Add that channel when you plan to interview someone in the room.
Assemble the Setup and Make a Clear Test Recording
Your first goal is a short recording that saves correctly and sounds clear on playback. Do that before committing an entire episode to the setup.
Prepare the Room and Microphone
Reduce controllable noise and interruptions. Close a window if traffic is audible, pause noisy appliances when practical, and silence notifications.
Curtains, rugs, and blankets can soften reflections, but they do not soundproof a room against barking or traffic. If pets are nearby, choose a time when they are comfortably settled away from the microphone.
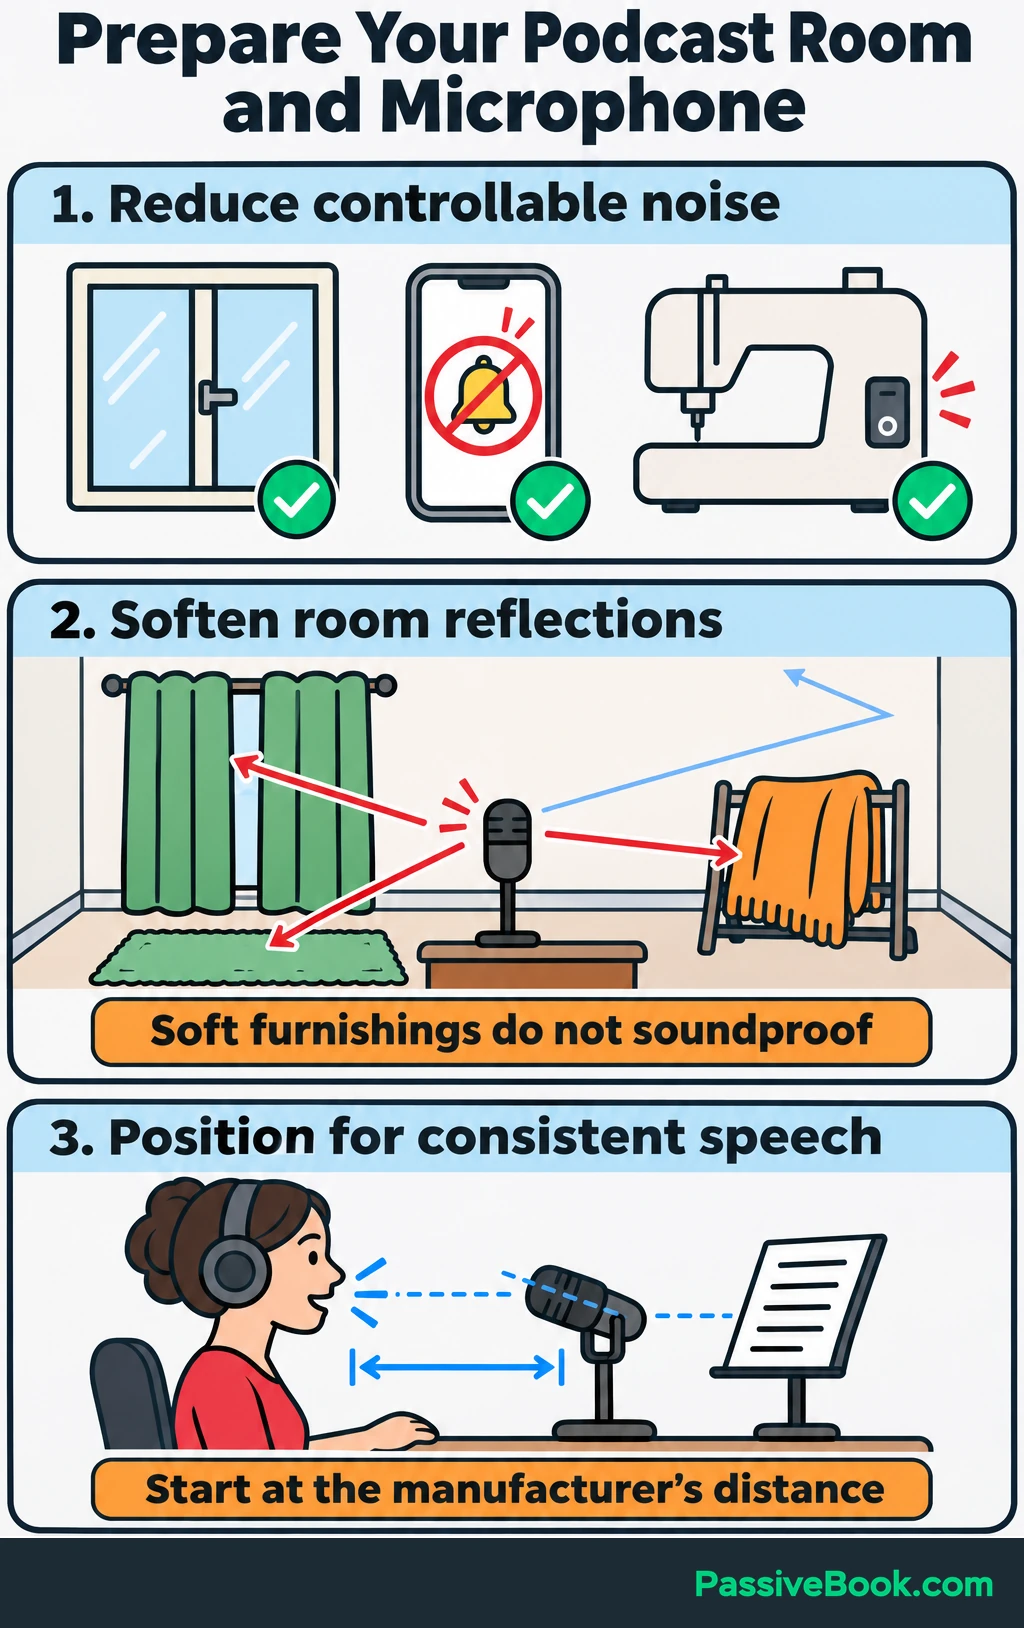
Secure the microphone at speaking height and check which end or side you should speak into. Start at the manufacturer’s recommended distance, angle it slightly away from direct breath, and keep your position consistent.
For the sewing show, place episode notes beside the microphone so reading them does not make you turn away. Record the spoken section while the sewing machine is off.
Connect and Check Every Input
Connect the equipment and select the intended microphone or interface in the recording software. Do not assume plugging it in changed the selected input.
Check that your headphones receive the audio you need. With several microphones, assign and label separate tracks, then have each person speak alone. Confirm that the intended track responds.
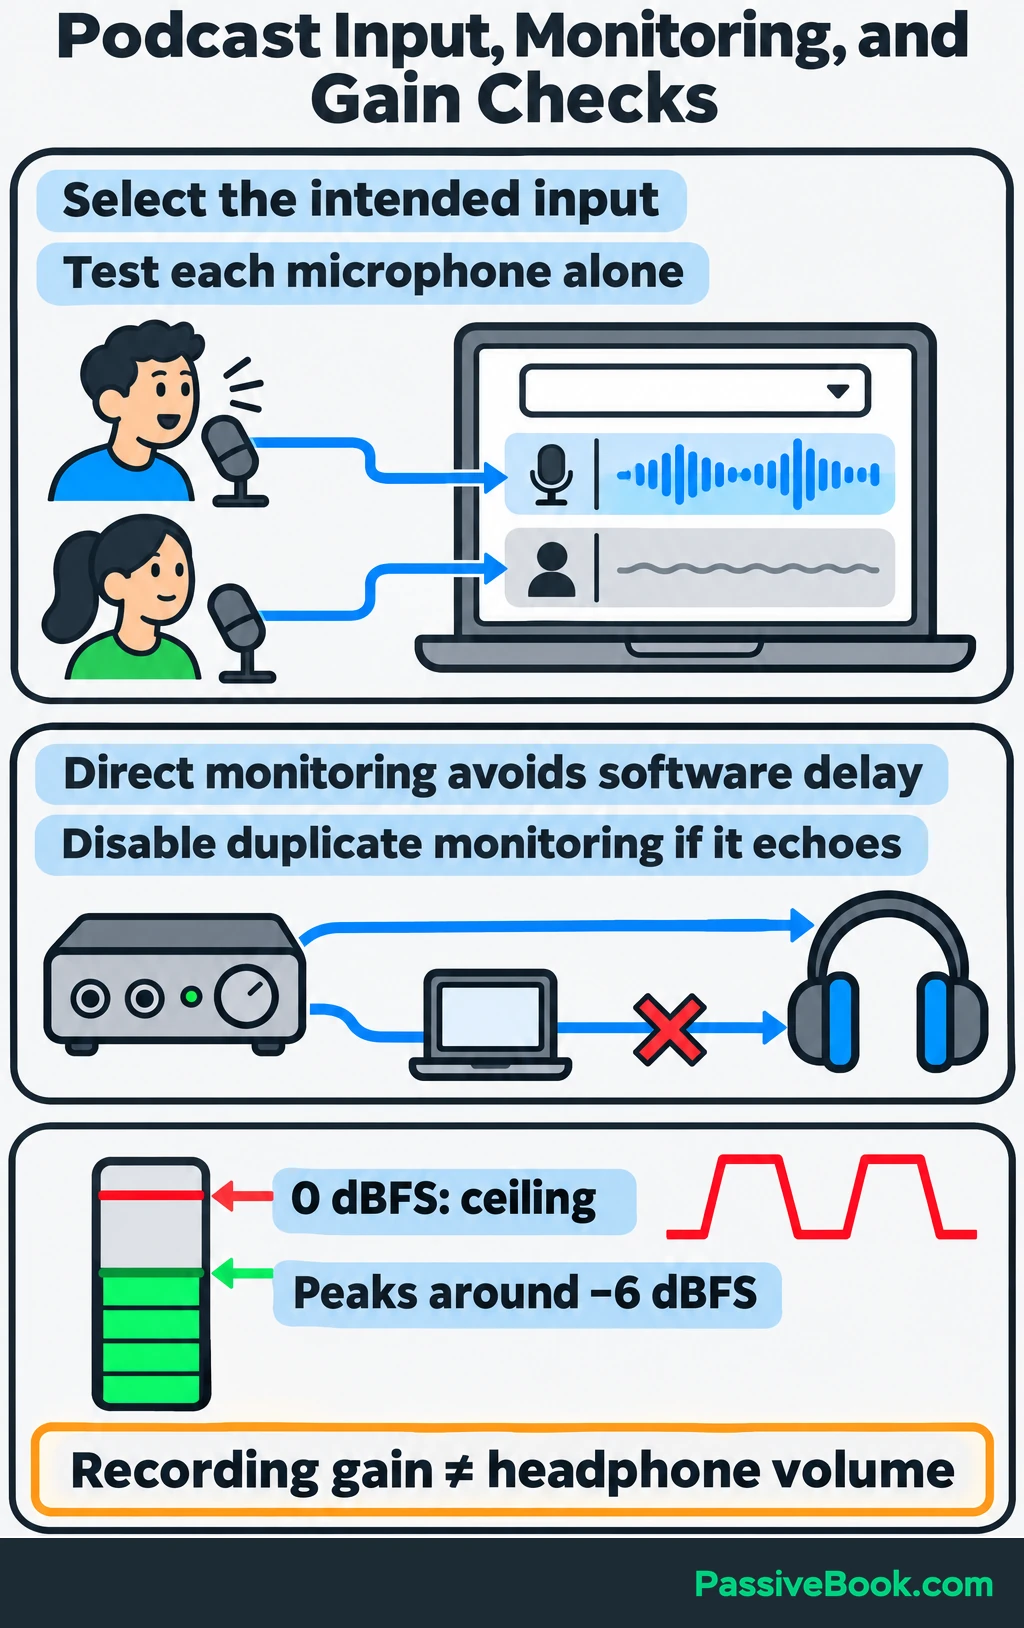
If your hardware offers direct monitoring, use it to hear your microphone without the distracting delay that software monitoring can introduce. Turn off duplicate software monitoring if you hear an echo.
Next, set recording gain while speaking normally and saying a realistically louder phrase. On a conventional digital recording meter, 0 dBFS is the ceiling. Aim for peaks around −6 dBFS, as Audacity’s recording-level guidance recommends, to leave room for louder words. If the signal overloads, it clips and becomes distorted.
Headphone volume changes how loudly you listen. It does not set recording gain.
Record, Listen Back, and Save
Record about a minute containing normal speech, a louder sentence, pauses, and ordinary movement. Include every participant and check that every intended track contains audio.
Play back the saved recording through headphones. Listen for missing voices, distortion, echo, hum, breath pops, cable crackle, and sound leaking from headphones.
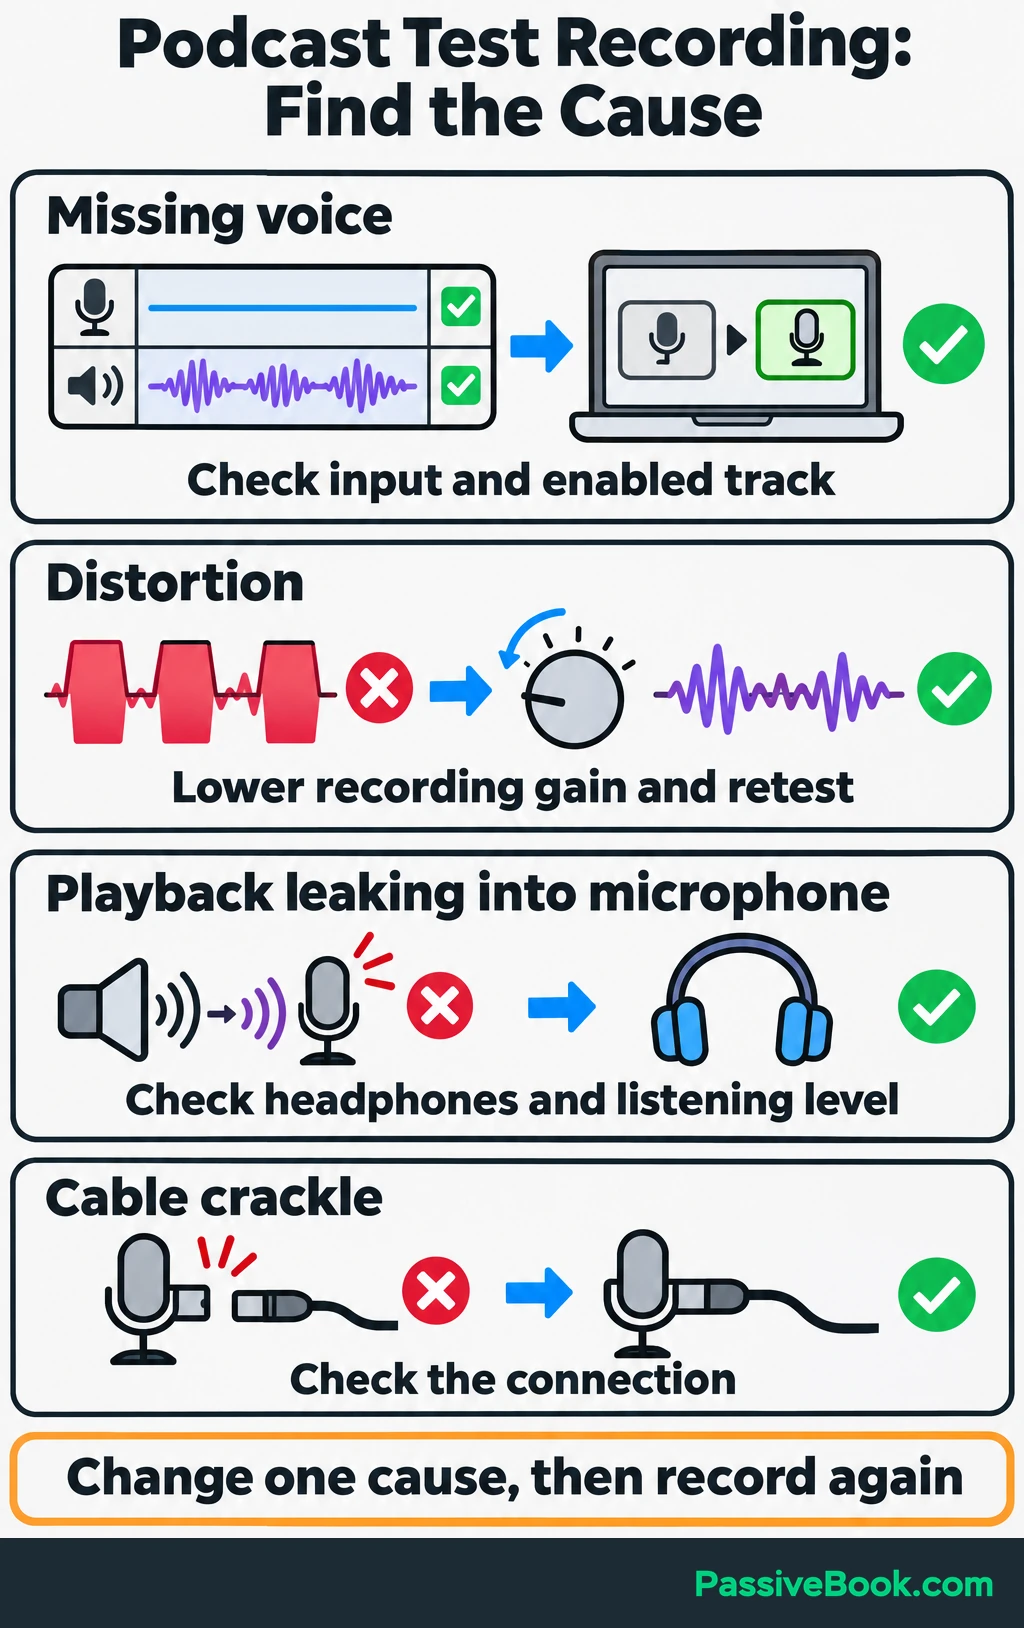
Fix the cause and repeat the sample. Move the microphone, quiet the room, correct the selected input, or check a connection before shopping for an upgrade.
For the sewing show, a test excerpt might be:
“This week, I’m choosing one unfinished project and planning the next small step.”
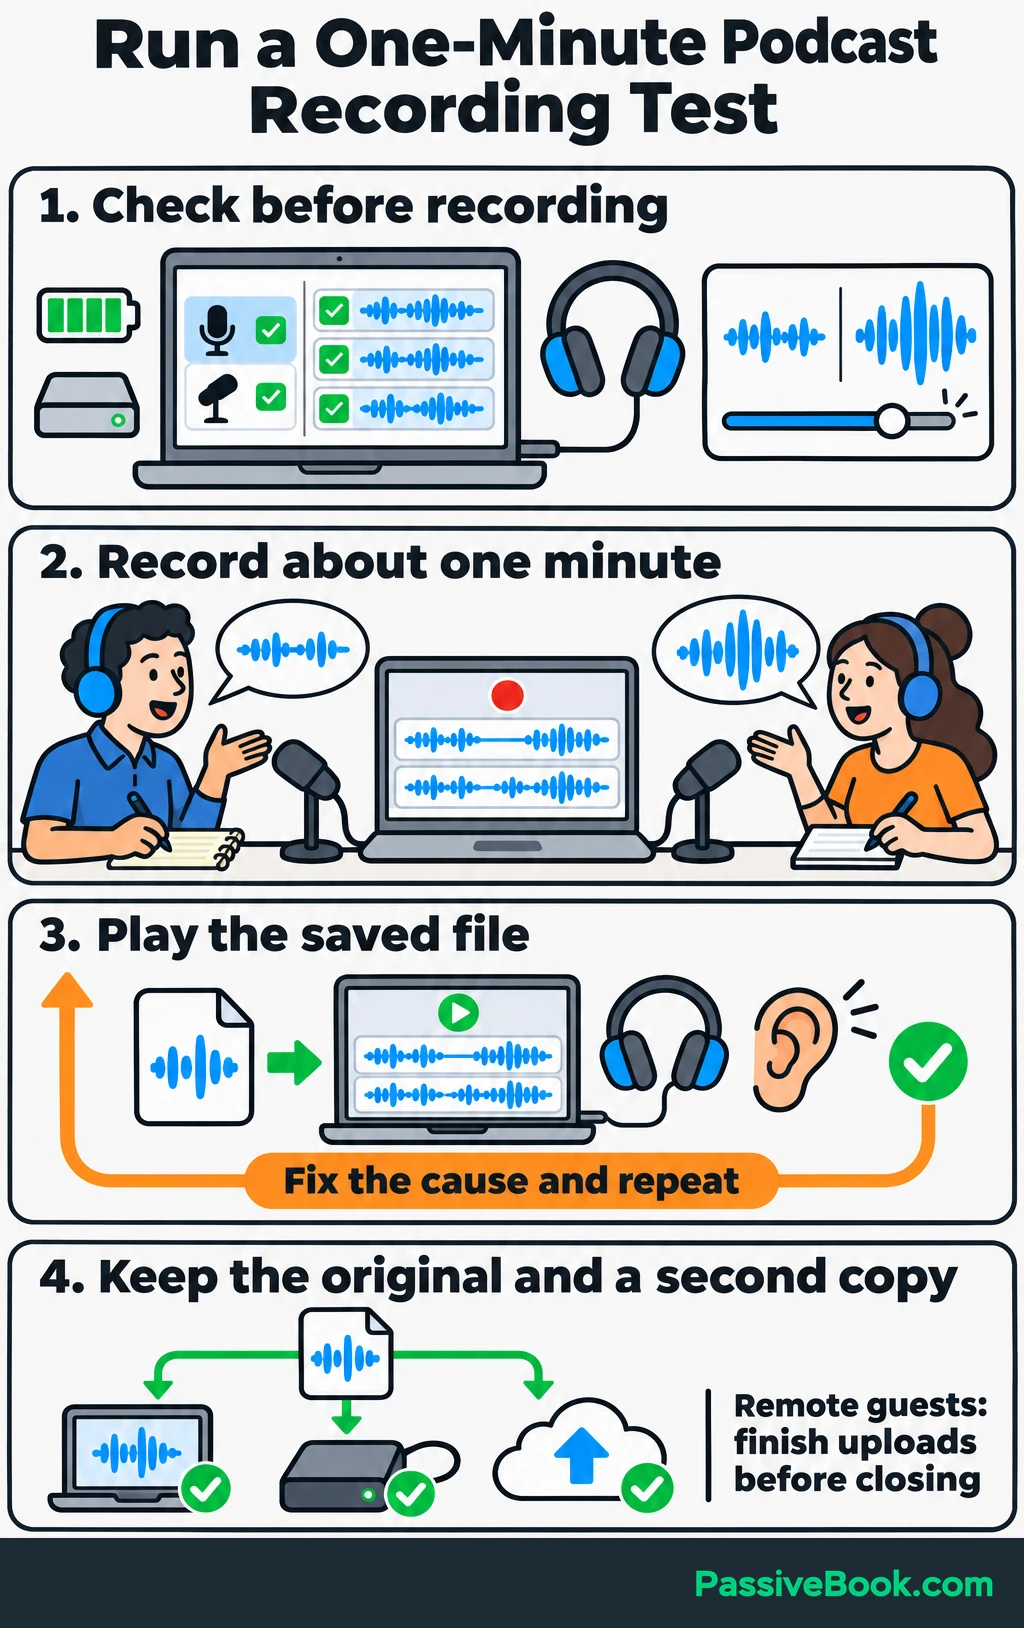
Read it at your normal pace, glance at your notes, and leave a pause. That gives you voice, movement, and room sound to review without recording a whole episode.
Save the original recording and keep a second copy. For remote sessions, confirm that everyone’s uploads have finished before they close the app.
Before each episode, run this compact check:
- Correct microphones and inputs selected.
- Headphones receiving the necessary audio.
- Every intended track enabled.
- Gain checked with normal and louder speech.
- Power and storage ready.
- Saved test played back successfully.
- Recording indicator visibly running.
What Next?
Make a one-minute recording with the device you already own, then use this checklist to identify what your chosen format still needs. Let the test decide the next purchase.
Use the social buttons to share this guide and help another starter build a complete setup without buying a studio’s worth of gear.
Which part of your planned setup still feels uncertain? Leave it in the comments, and bring any other questions too.
Share this post with your friends & followers: