Someone reads your article, likes your product idea, and leaves. There’s no clear place to see what you sell, and nothing useful arrives afterward. You earned the visit, but the buying journey ended halfway through.
That gap is easy to miss when you’re fitting a business around other work. Publishing feels productive, while connecting pages, payments, and emails feels like plumbing.
But that plumbing gives interested visitors a way to become customers. This guide walks through one affordable funnel, from choosing an offer to testing delivery, so your next useful article has somewhere useful to send people.
Map the Stages of Your Funnel
A funnel connects the content, pages, and messages that help someone discover an offer, understand it, and buy. Marketing brings people in and helps them evaluate their options. Sales helps them decide and complete the purchase.
Start by mapping what the customer needs at each stage.
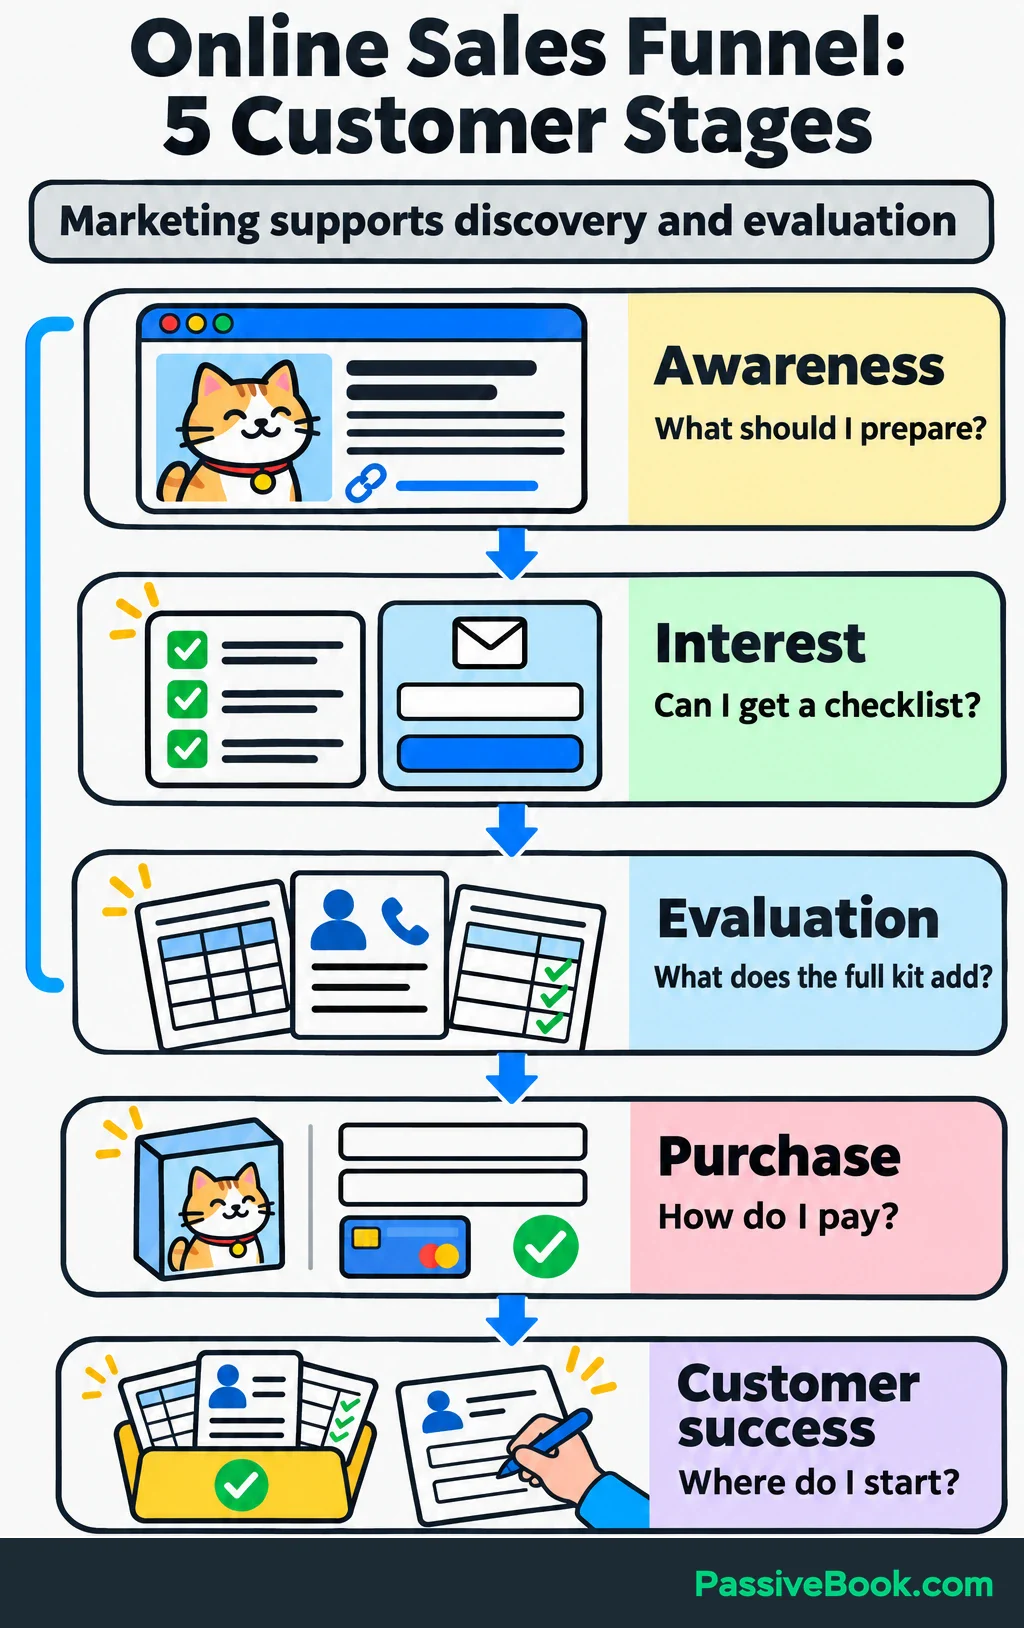
For the running example, imagine you sell a printable cat-sitter handover kit. A free weekend handover checklist introduces the paid bundle. The business, copy, $29 price, and figures below are illustrations.
| Stage | Customer Question | Supporting Asset | Measurable Action |
|---|---|---|---|
| Awareness | “What should I prepare before leaving my cat with a sitter?” | Article about organizing a weekend handover | Visit the article |
| Interest | “Can I get a checklist for this?” | Free checklist signup page | Request the checklist |
| Evaluation | “What does the full kit add?” | Sales page with labeled previews | Visit the offer |
| Purchase | “How do I pay and get the files?” | Checkout with clear delivery details | Complete payment |
| Customer success | “Where do I start?” | Download page and getting-started message | Access the files and complete the first sheet |
These are stages in the customer’s journey. The eight steps below explain how to build the system behind them.
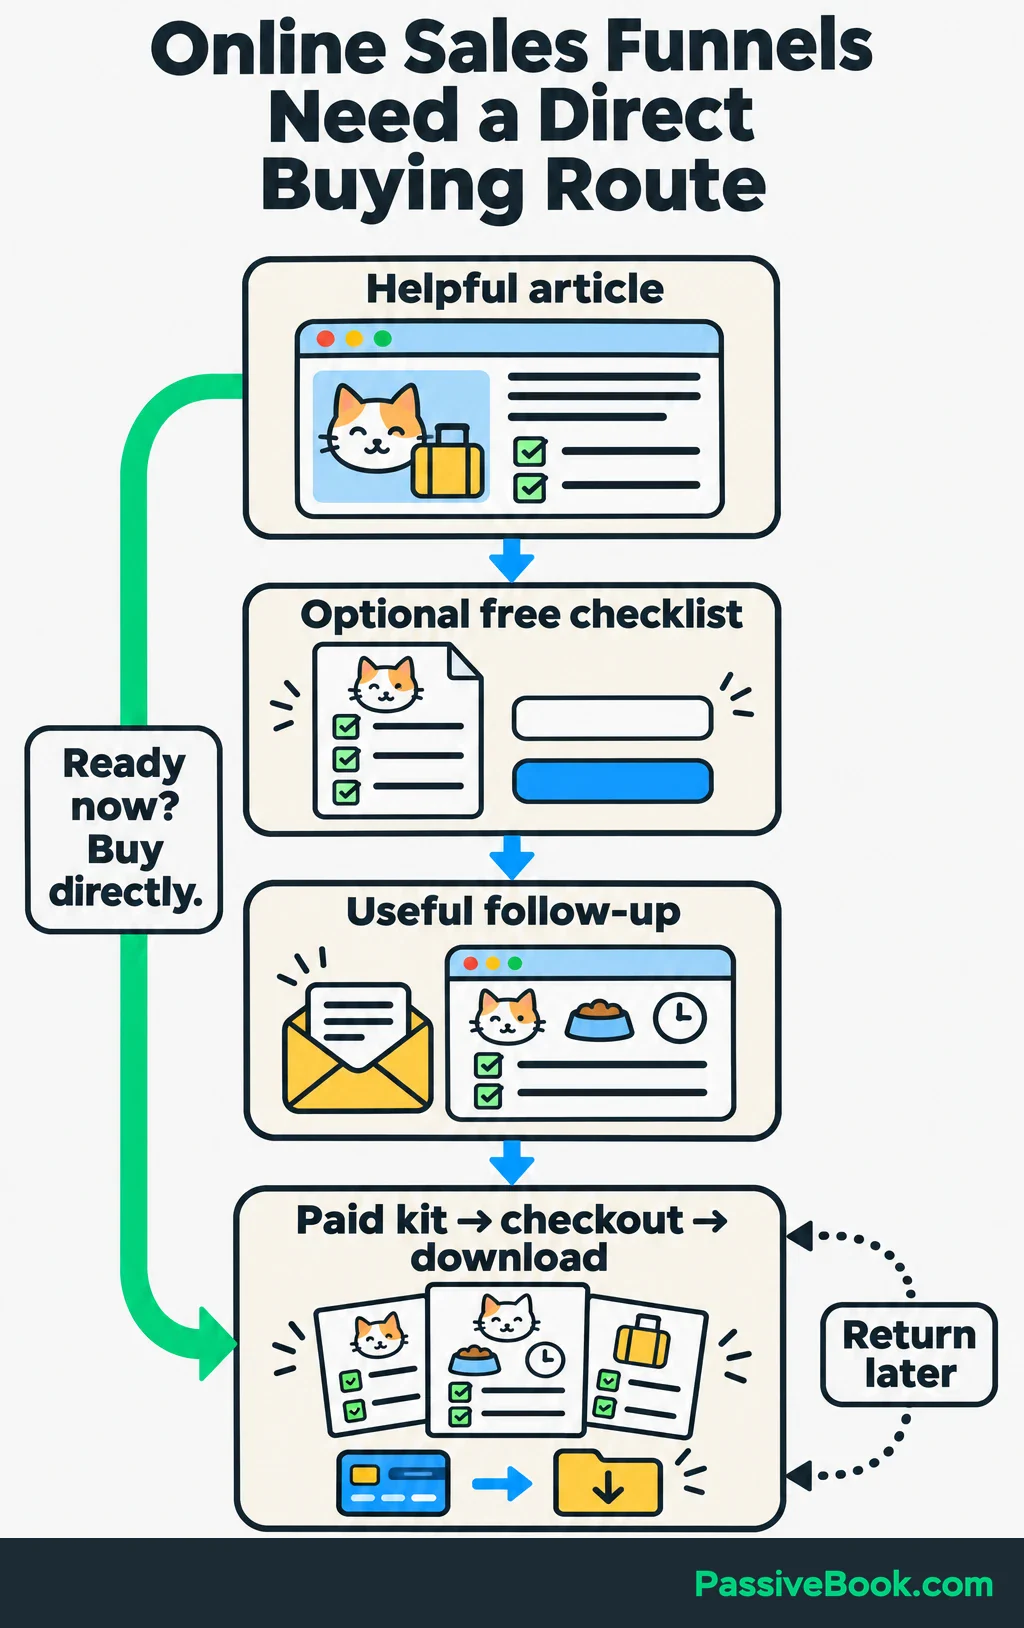
People won’t always follow your diagram. Some will buy immediately, others will return later, and some will never subscribe. Keep a direct purchase route available.
I would start with one offer and one traffic source. Automate delivery and follow-up, but keep reading customer replies. Those questions tell you what your carefully drawn diagram missed.
1. Define the Offer Before Building the Funnel
Choose one problem you can solve clearly. Look through customer inquiries, relevant product reviews, conversations, or feedback from existing sales.
Record three things:
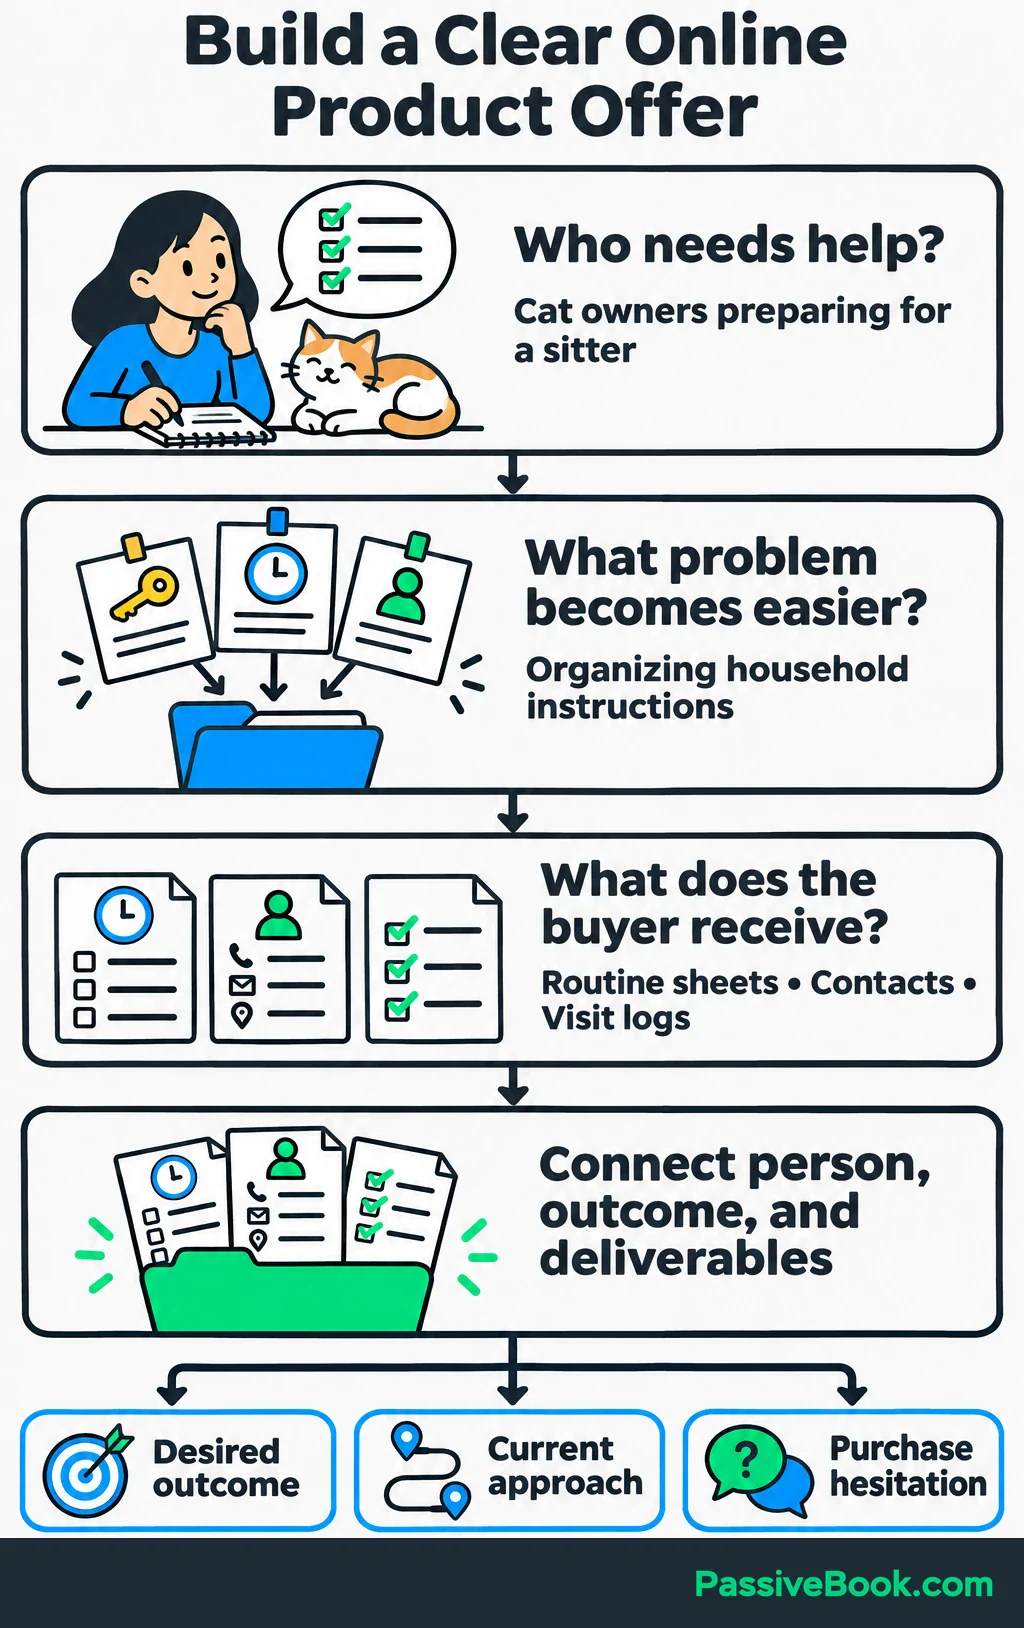
- Desired outcome: What does the person want to accomplish?
- Current approach: What have they tried, and where does it become awkward?
- Purchase hesitation: What would they need to know before paying?
Then write your offer in one sentence:
For [person facing a specific problem], [offer] helps them [useful outcome] through [deliverables].
For the example:
For cat owners preparing for a sitter’s visit, the Cat-Sitter Handover Kit helps organize household instructions through routine sheets, contact pages, and daily visit logs.
Define the contents, price, file format, delivery method, and support before building pages. “A useful bundle” leaves too many decisions unfinished.
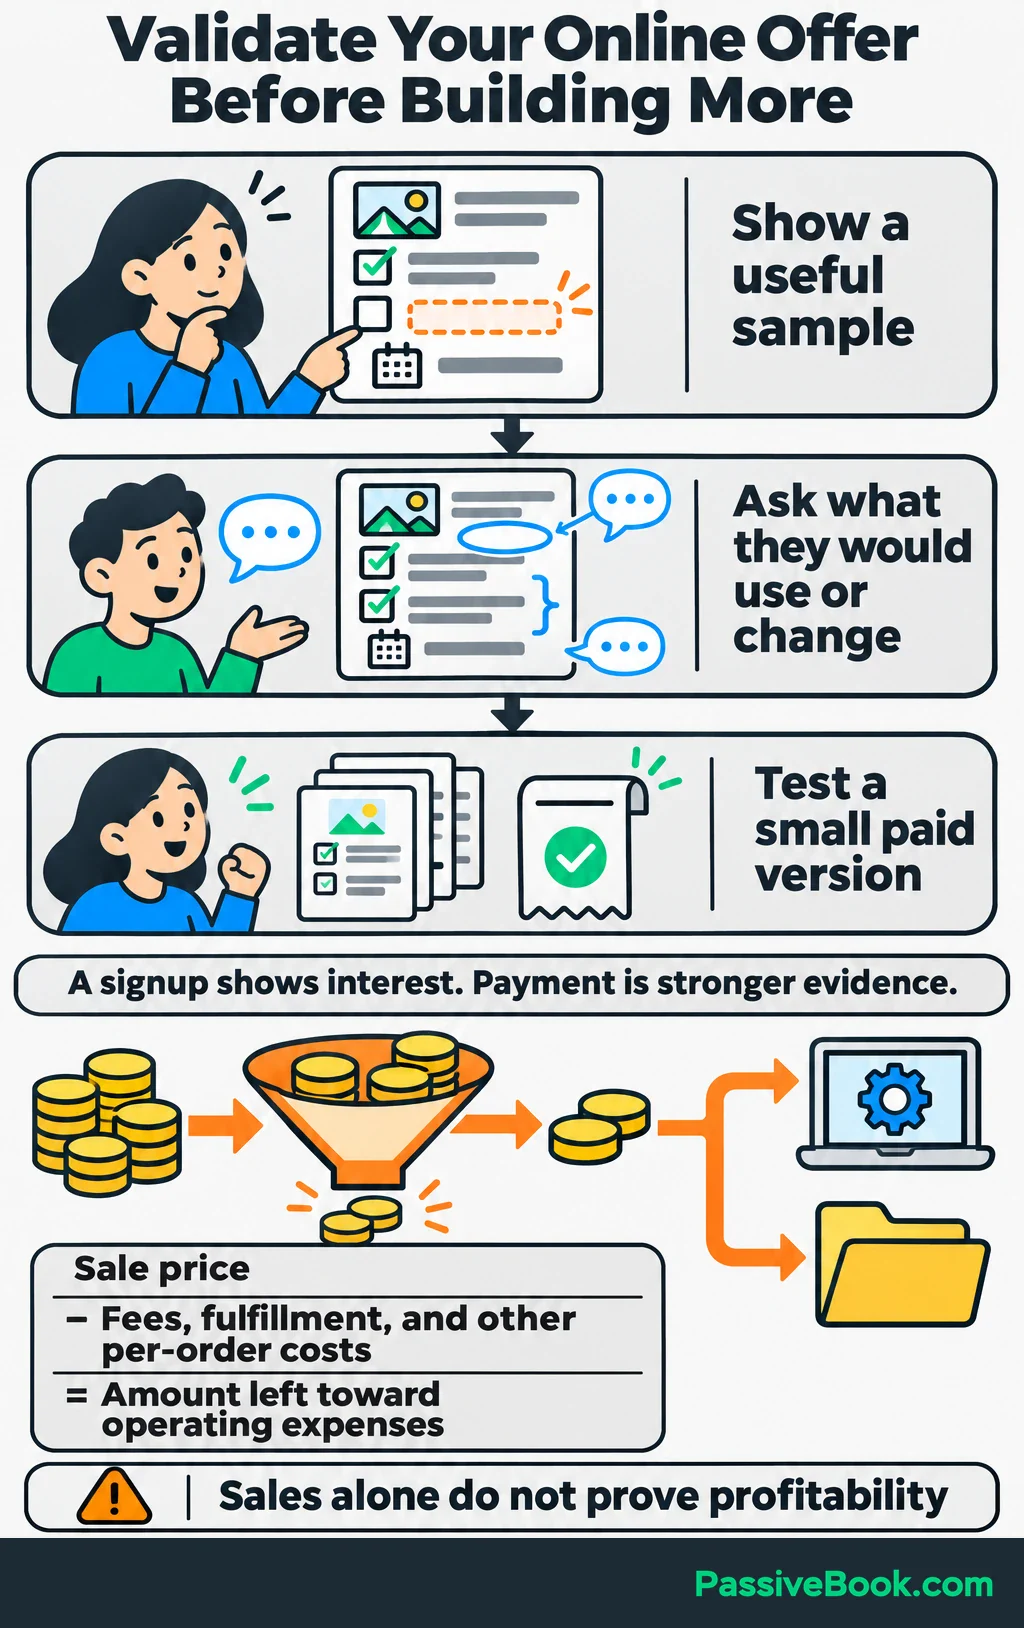
Next, show a sample page to potential buyers. Ask what they would use, what is missing, and whether they would purchase the small paid version. A free signup shows interest, but payment gives you stronger evidence that the offer is worth money.
I learned this with a course I rushed into production without validating the offer. It attracted few sales and a bad review, and I withdrew it. I had finished the lessons before finding out whether I had chosen the right promise.
Now I would test a small, useful version before building a large product around it.
Check the economics, too. Count what one sale leaves after payment fees, fulfillment, and other costs that rise with each order. That amount must help cover your software and operating expenses. A funnel that sells while losing money has automated the wrong thing.
Before choosing software, work out what your offer can leave after each sale. The calculator below turns your estimates into a monthly sales target and shows how that target changes when you add another expense.
Free Pricing Profit Calculator


2. Choose the Shortest Useful Funnel Path
Choose a path based on how much help someone needs before buying. Add a step when it answers a question or makes the purchase easier.
| Buying Situation | Funnel Template | Required Assets | Ongoing Work |
|---|---|---|---|
| The offer is easy to understand and assess | Content or referral → sales page → checkout → delivery | Sales page, checkout, delivery | Improve the offer and answer support questions |
| A useful sample helps people understand the approach | Content → resource signup → emails → sales page → checkout → delivery | Free resource, signup page, short email sequence, purchase route | Review replies, delivery, and buyer exclusions |
| Scope or suitability requires discussion | Content → service page → inquiry or booking → conversation → purchase | Service page, short form, booking or reply process | Assess inquiries and hold conversations |
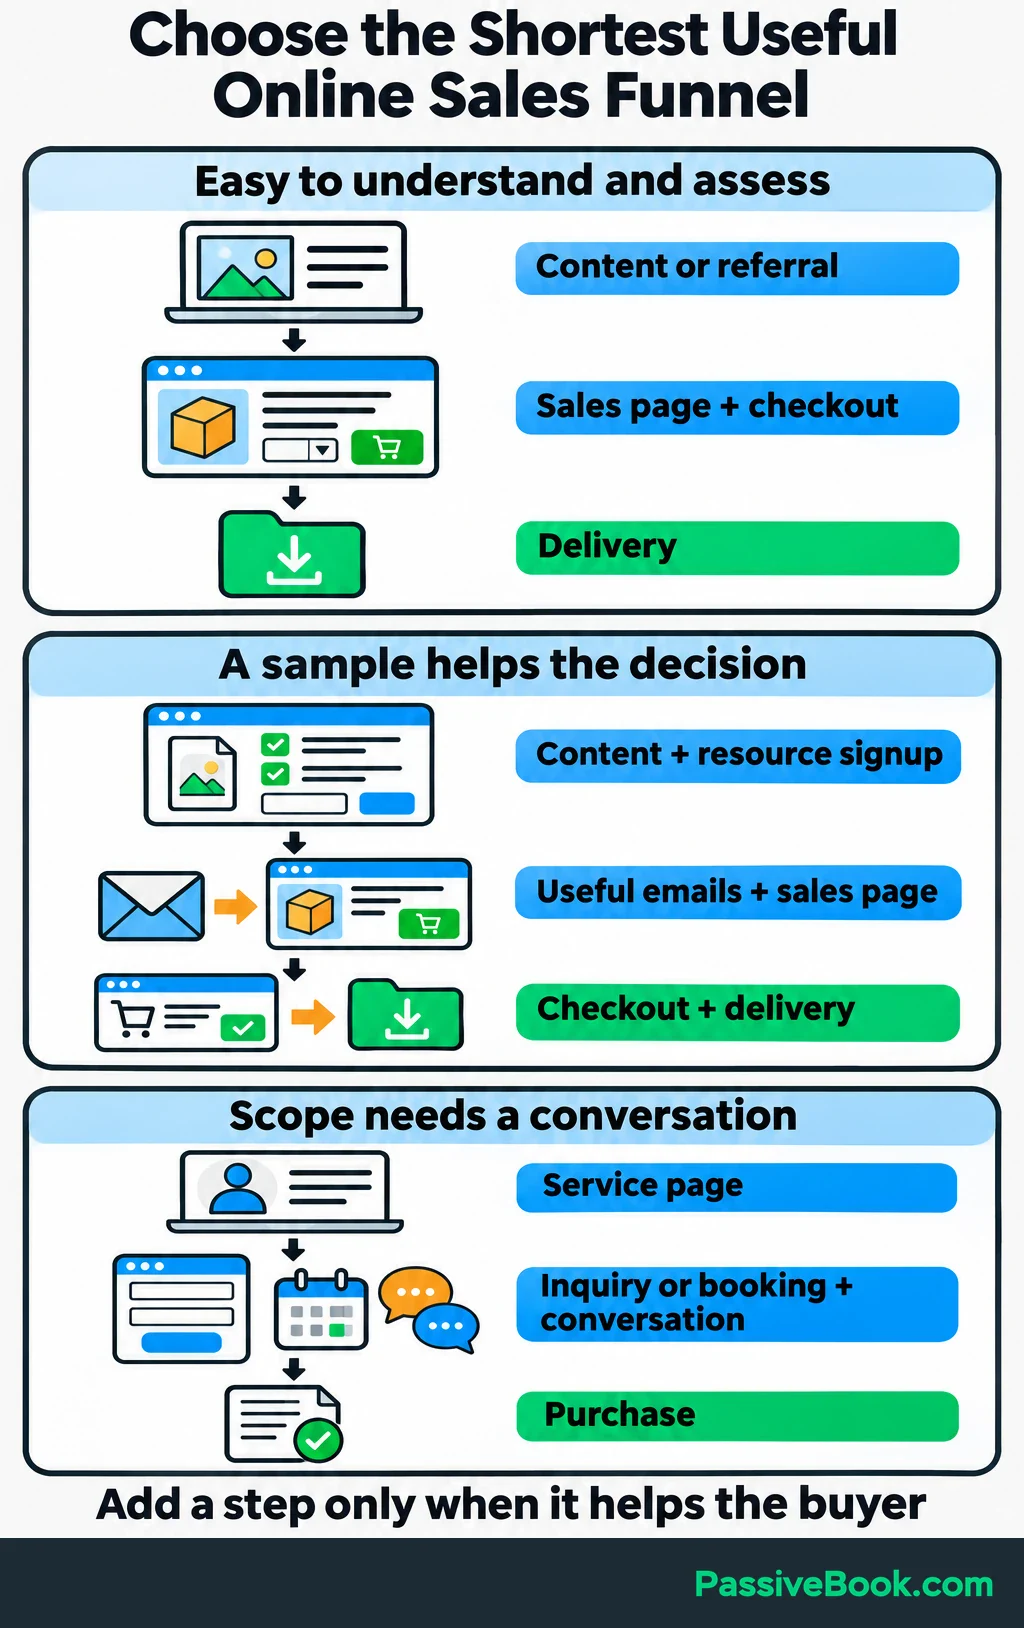
For the handover kit, I would choose the resource-and-email path:
Weekend handover article → free checklist → useful follow-up → full kit → payment → download
The checklist lets someone try organizing a handover before buying the full set of sheets. The emails can show how the pieces fit together.
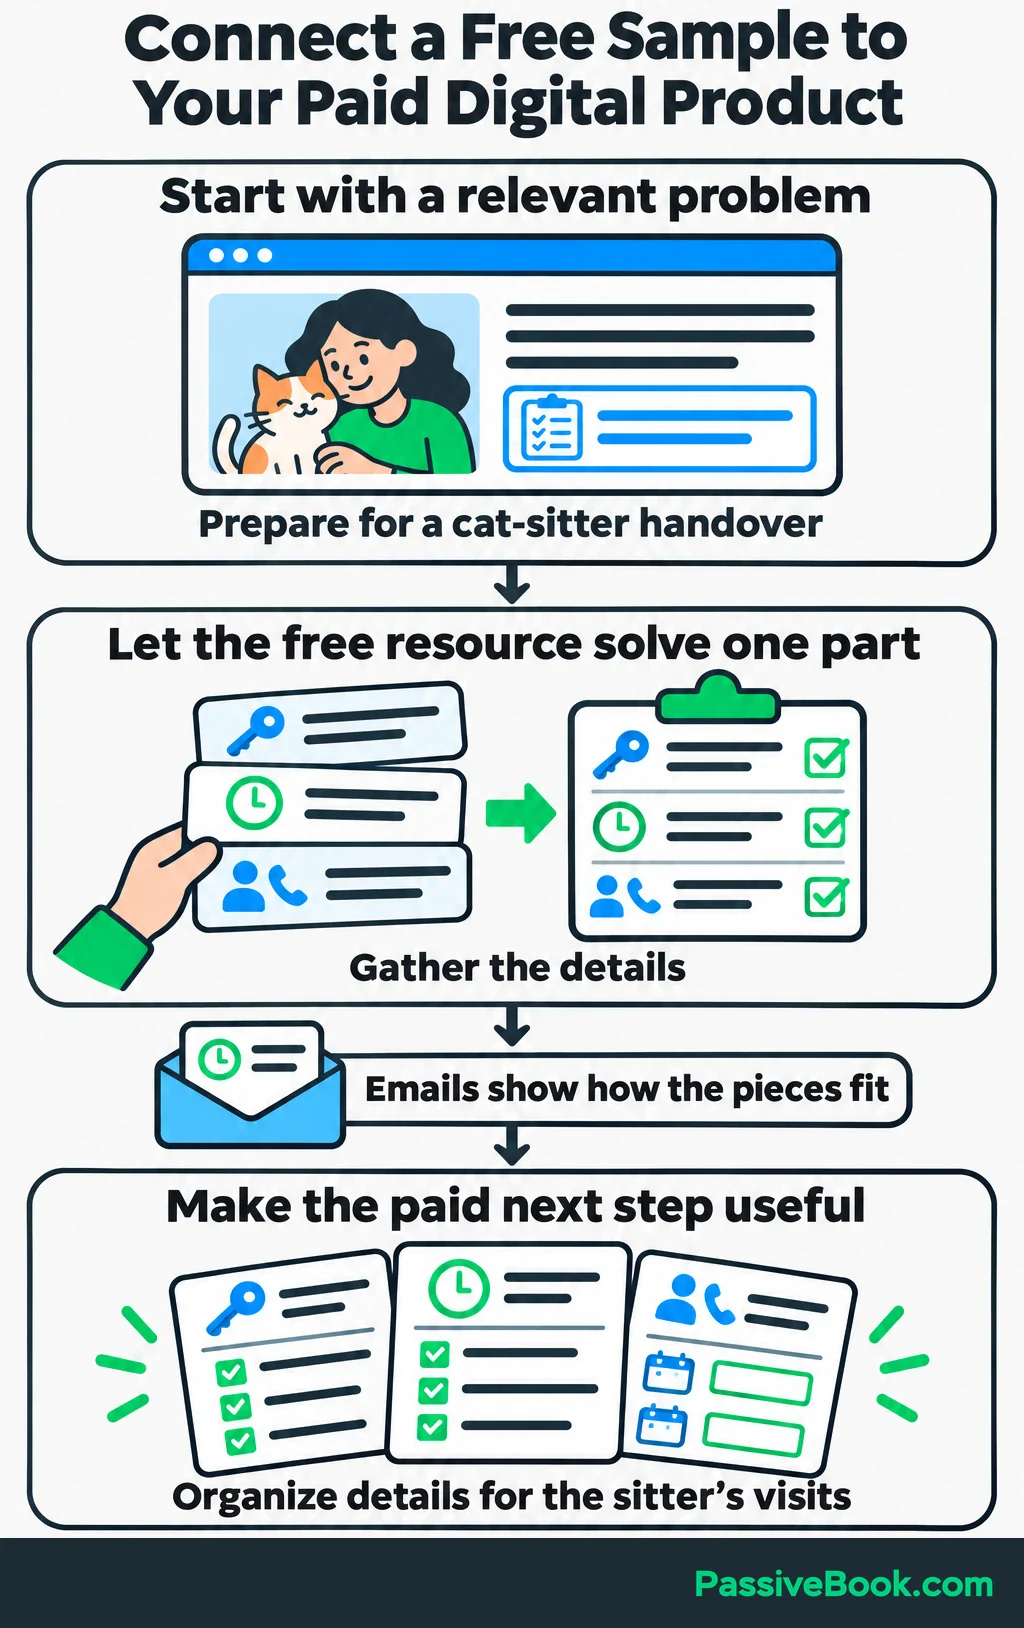
Still, include a link to the paid kit in the article. Someone already convinced doesn’t need to complete a small obstacle course involving their inbox.
For a service, keep the same principle but change the final action. Ask for the details you need to assess the request, then explain when and how you will respond.
3. Choose Tools That Cover the Complete Path
List the jobs first: pages, forms, email, checkout, delivery, and reporting. Then choose tools that cover those jobs together.
My preference is to reuse a suitable setup. Moving your business between platforms is work, even when the new dashboard has nicer buttons.
| Starting Situation | Tools and Jobs Covered | Recurring Costs | Transaction Costs | Maintenance Responsibility |
|---|---|---|---|---|
| No existing website | MailerLite for hosted pages, forms, emails, and downloadable-product sales; connected Stripe account for payment | Free entry plan within its limits; budget for a sending domain and later upgrades | Stripe processing; MailerLite lists no commission on native digital-product sales | Provider maintains the platform; you maintain content, records, and automation |
| Existing WordPress site | GenerateBlocks for pages, Fluent Forms for signup, FluentCRM Pro for follow-up, WooCommerce for checkout and downloads, FluentSMTP with an email delivery service | Hosting, domain, CRM license, email delivery, and any paid plugins | Payment processor fees and any chosen extension charges | You handle updates, backups, integrations, and delivery checks |
Use MailerLite’s landing page as a signup page with one action: requesting the checklist. Put the sales page on its hosted website. The free plan supports one digital product, up to 250 active subscribers, and 2,500 monthly emails. The three-email sequence below fills its five-step allowance: three emails and two delays. Check the current plan allowances before committing.
Its native product checkout requires a connected Stripe account, so confirm that you can open and use one in your country before building around it. Stripe’s availability page is the place to start.
MailerLite’s digital-product terms list no platform commission, but payment processing still costs money.
For WordPress, you need FluentCRM Pro to automate follow-up based on WooCommerce purchases. FluentCRM decides which messages to send, while FluentSMTP connects it to an email delivery service. I use Amazon SES for delivery; FluentCRM also recommends a dedicated service in its email delivery guidance.
Starting from zero, I would choose the hosted setup for this small funnel. With a working WordPress site, I would build there.
Set a spending ceiling before adding anything else. Include annual renewals and maintenance time, and judge the permanent plan rather than the trial. A separate automation service earns its place when an essential connection is missing.
4. Build the Pages That Lead to a Purchase
Create the Free Resource and Signup Page
Make the free resource solve one small part of the paid product’s problem. It should be useful on its own and lead naturally to the larger offer.
The handover checklist helps someone gather the details they need. The paid kit gives those details a home through routine sheets, contact pages, and visit logs.
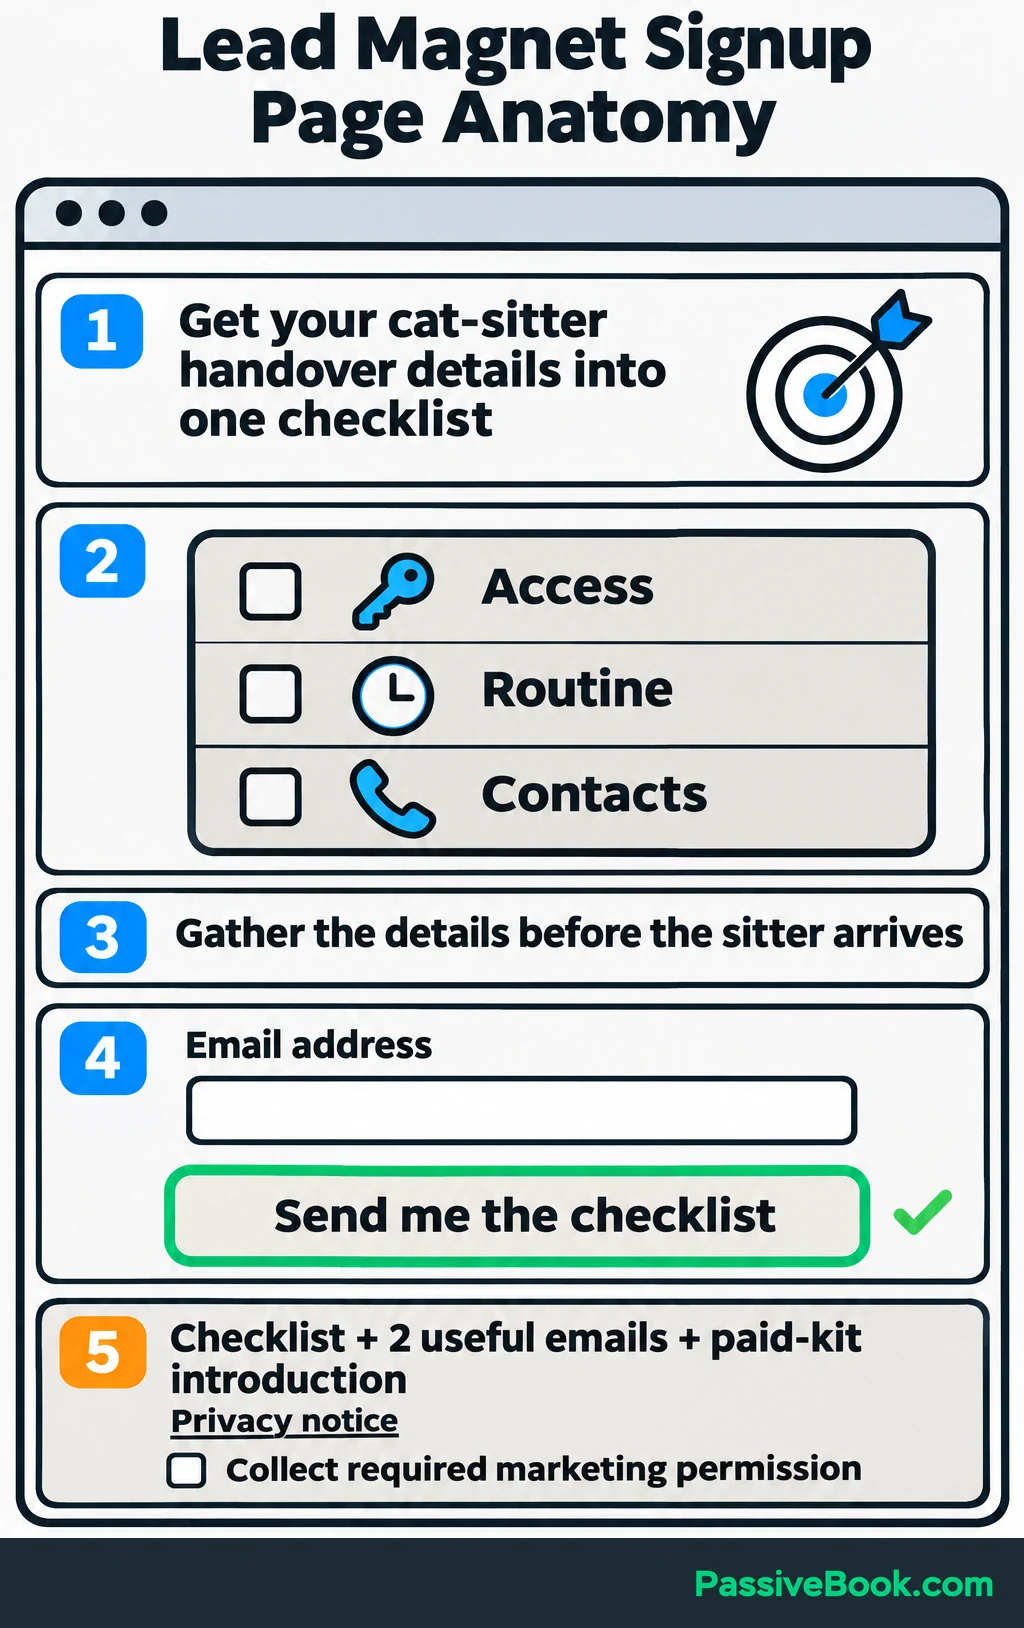
Build the signup page in this order:
- State the specific benefit.
- Show a readable preview.
- Explain what the resource helps someone do.
- Add a short form and one clear action.
- Describe what arrives afterward.
A headline could be:
Get your cat-sitter handover details into one checklist.
Then explain the practical use:
Gather access instructions, routine details, and contact information before the sitter arrives.
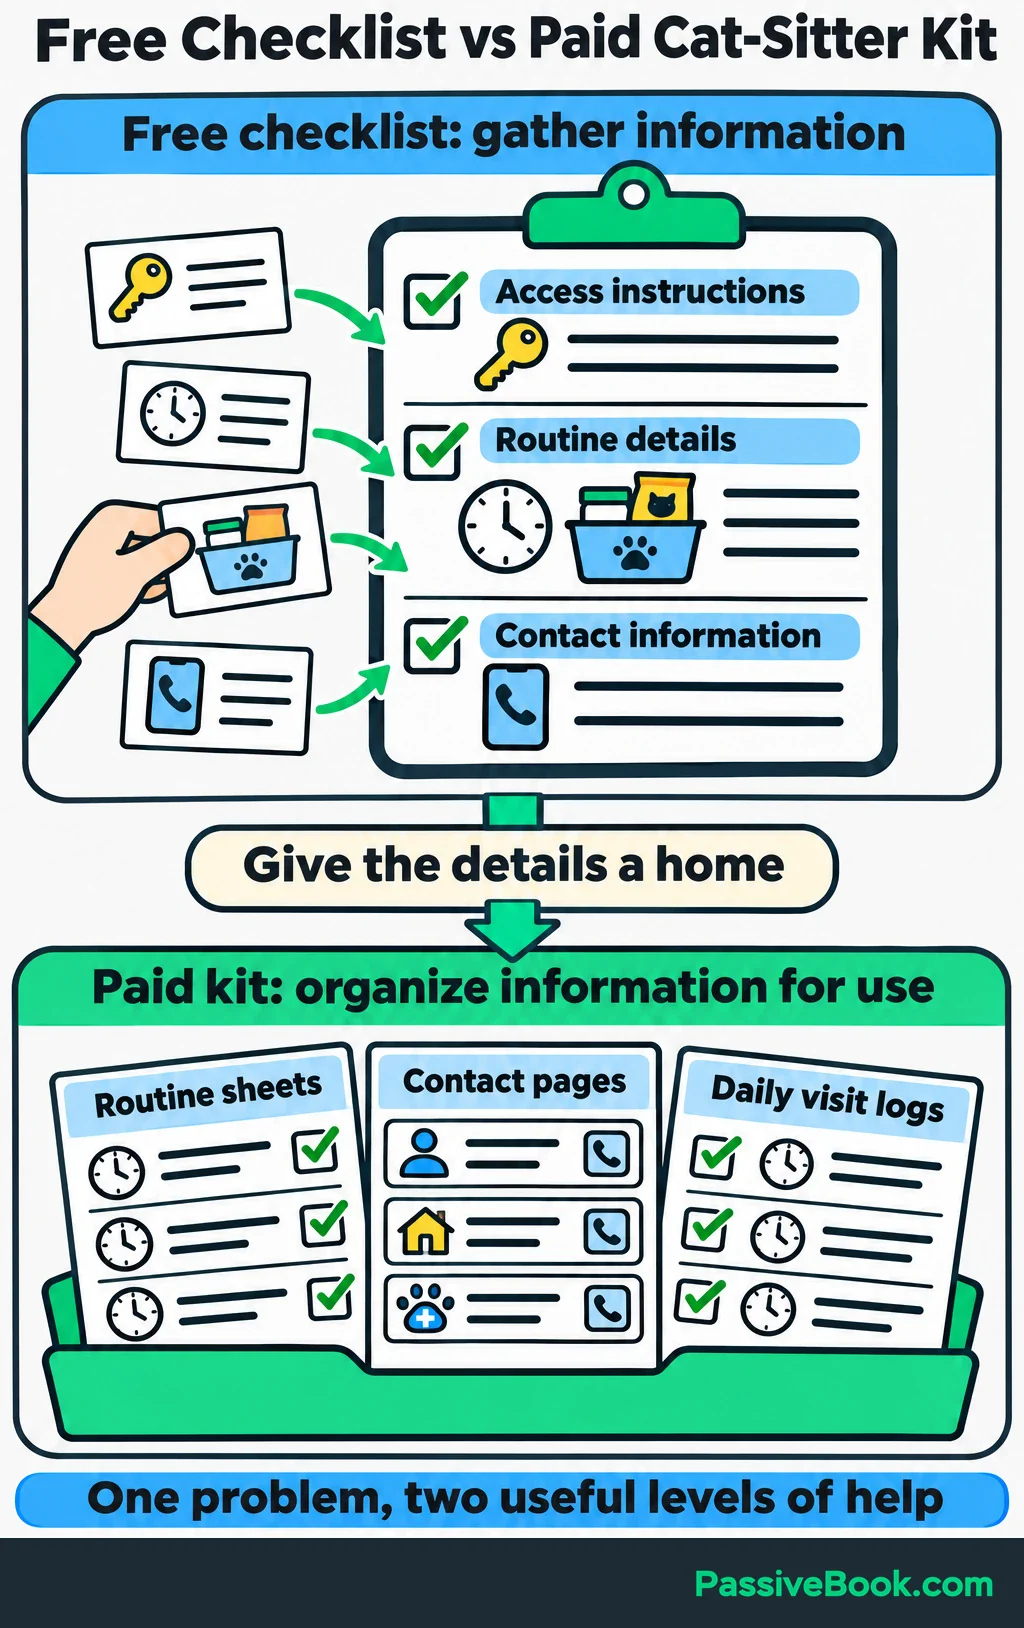
Use a button such as “Send me the checklist.” An email address is enough unless another field has a clear purpose.
Describe the follow-up beside the form: the checklist, two useful emails about organizing the handover, and an introduction to the paid kit. Link your privacy notice and collect any marketing permission required where you operate.
For UK individual subscribers, unsolicited email marketing generally needs consent unless a qualifying soft opt-in applies. A download request alone is not blanket permission for future promotions. The ICO explains the consent and unsubscribe requirements.
Write the Sales Page
Your sales page should help someone judge the offer without needing to email you for basic details.
Use this structure:
- Outcome: What will the buyer be able to organize or complete?
- Problem: What makes that task awkward now?
- Demonstration: What does the product look like in use?
- Contents: What is included, and what does each part do?
- Suitability: Who will find it useful, and what does it require?
- Purchase details: What does it cost, and how is it delivered?
- Questions: What might still stop someone buying?
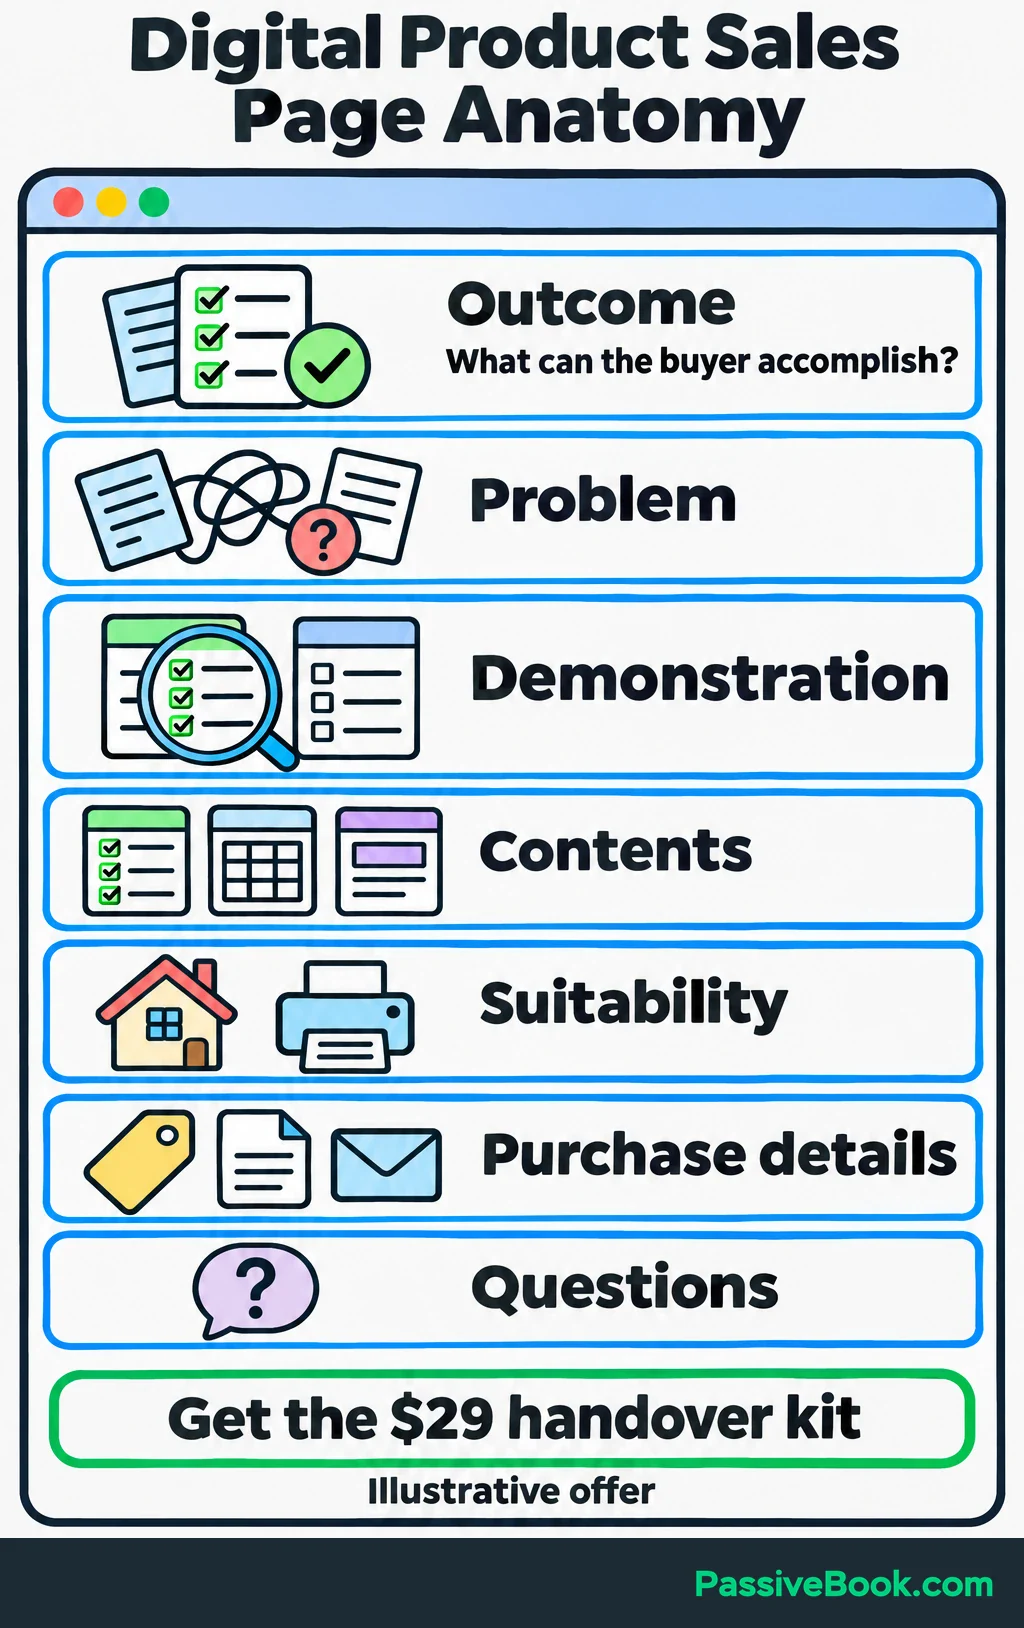
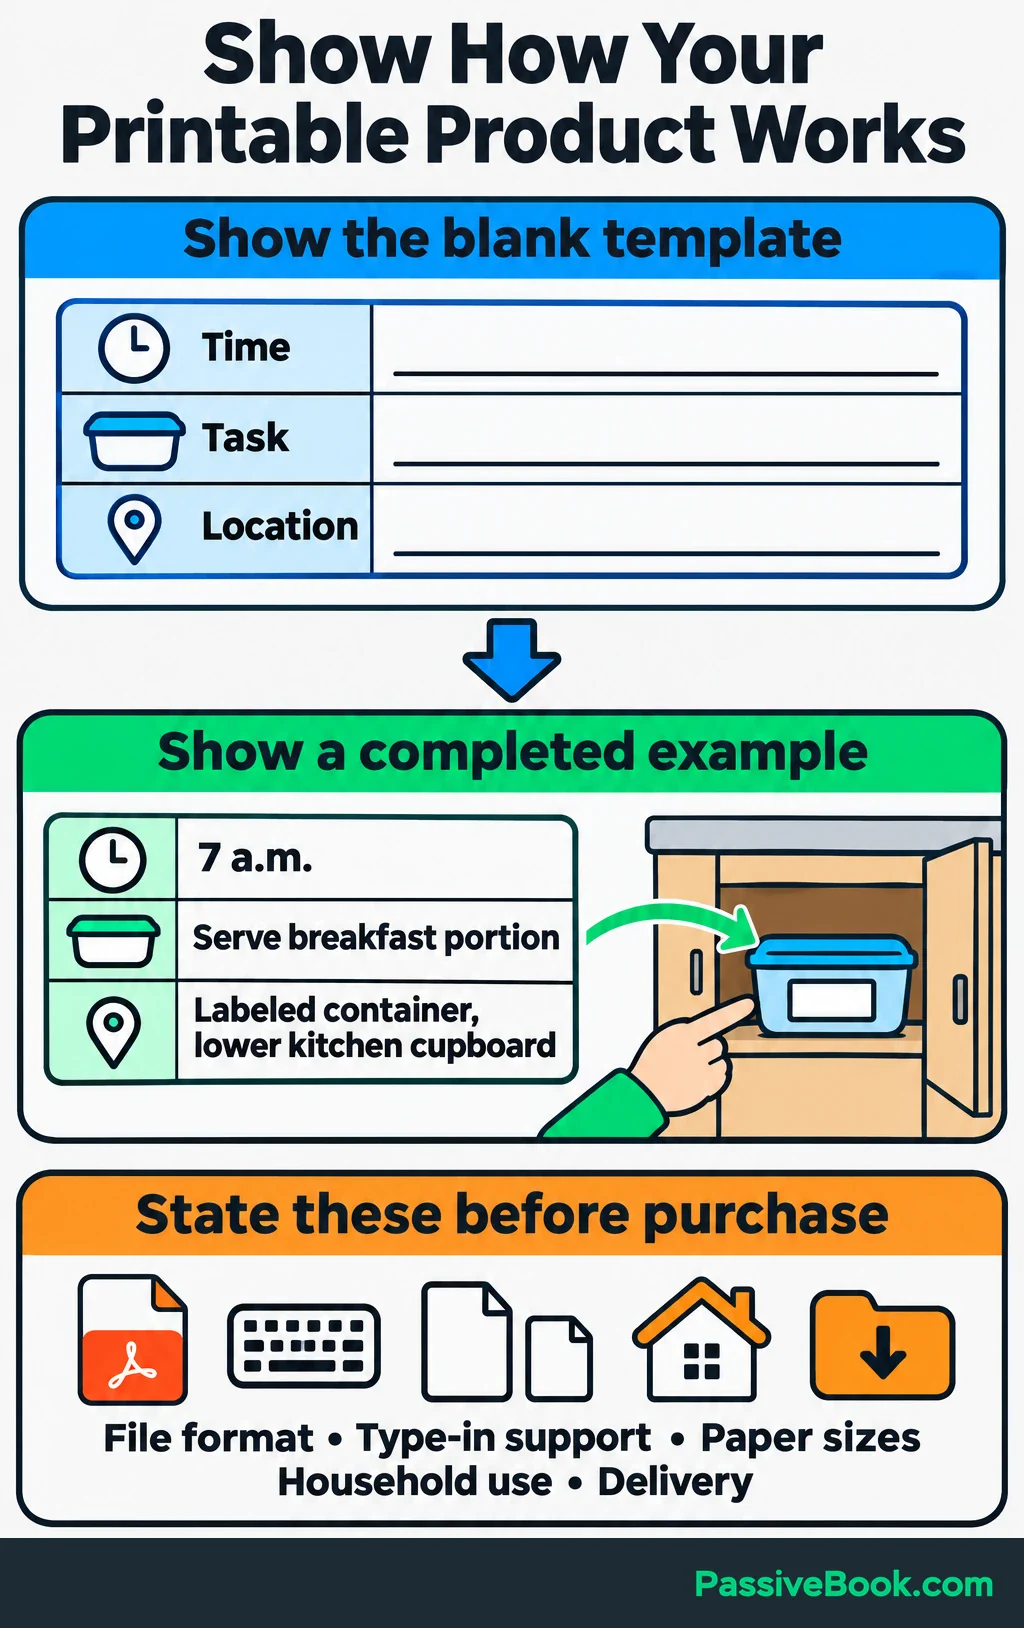
For the handover kit, show a completed routine sheet beside a blank one. Explain that the free checklist helps gather information, while the paid pages organize it for use during the sitter’s visits.
State that the kit contains printable PDFs, whether buyers can type into them, which paper sizes are included, and how household sharing works. These are purchase details, not fine print to hide at the bottom.
If you’re stuck turning those details into copy, the AI Copywriting Studio can write a first draft around your offer. It also drafts the follow-up emails, so you don’t have to explain the same product again from scratch.
Free AI Copywriting Studio
Use a specific button: “Get the $29 handover kit.” Make the total payable amount clear before payment, including any applicable additions.
If you have no testimonials, demonstrate the product. A readable preview gives someone evidence they can assess. Invented praise gives them a reason to distrust everything else.
For an inquiry funnel, replace the purchase button with a short form. Ask only what you need to assess the request, and explain the next step and expected response time.
Connect Checkout and Delivery
Connect the purchase button to the correct product, currency, and price. Check that the sales page and checkout describe the same purchase.
After successful payment, provide:
- Confirmation: A clear statement that the order succeeded.
- Receipt: A record of what was paid.
- Access: A working download link.
- First task: One useful place to begin.
- Help: A monitored contact address.
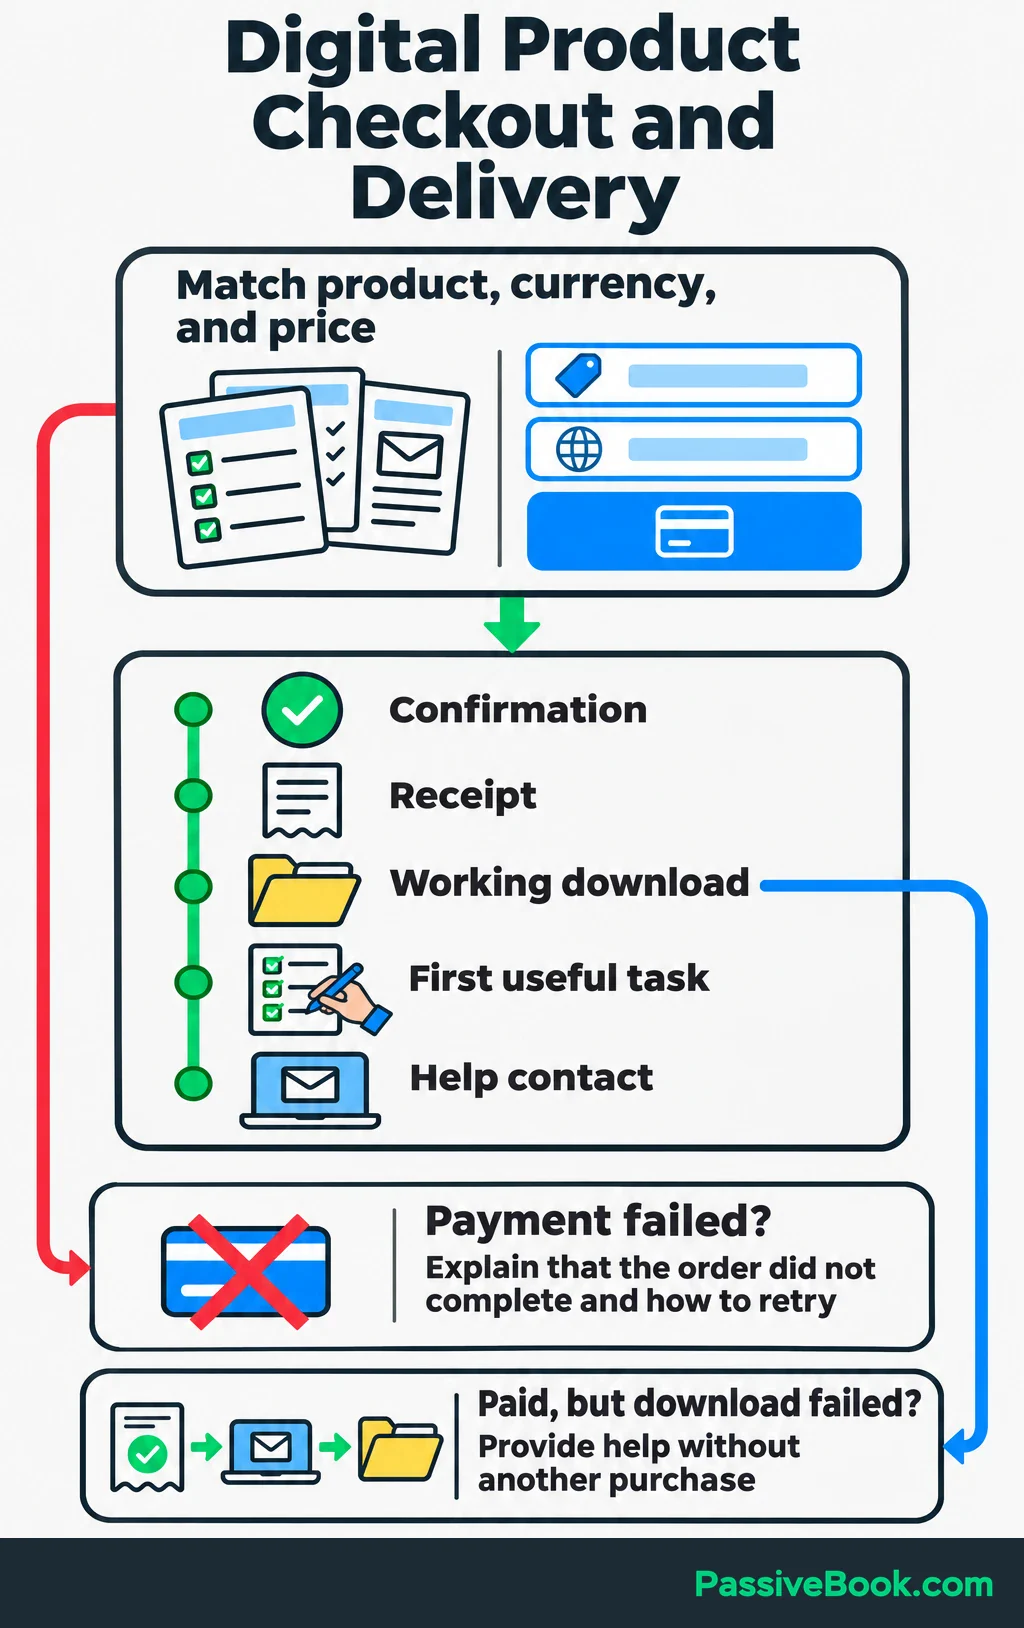
For the kit, the first task could be completing the contact page and printing a fresh routine sheet.
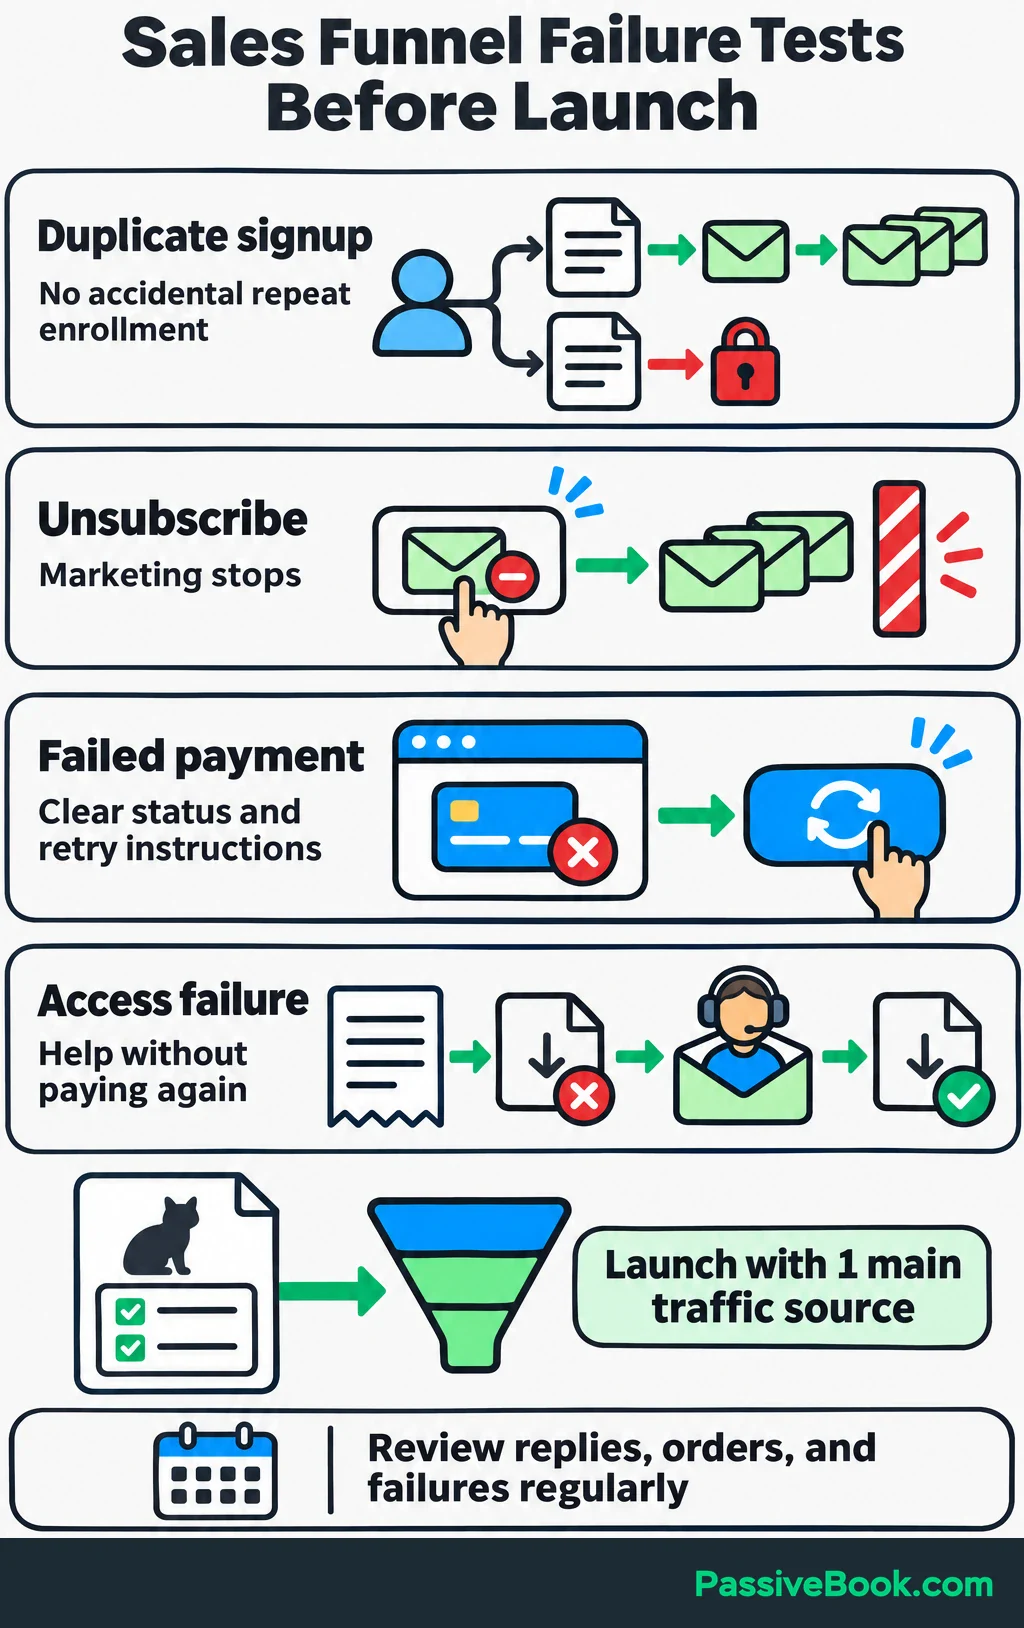
Also check what happens after a failed payment. The buyer needs to know the order did not complete and how to retry. Someone whose download fails needs a way to request access without paying again.
5. Create and Automate Useful Email Follow-up
Write a Short Sequence That Supports the Decision
Give each email one purpose and one main next action. Start by delivering what you promised, then show its use and answer a practical buying question.
Here is a complete three-email sequence you can adapt. Replace the bracketed text and links before sending, and use your provider’s working unsubscribe footer.
Email 1 — Send immediately
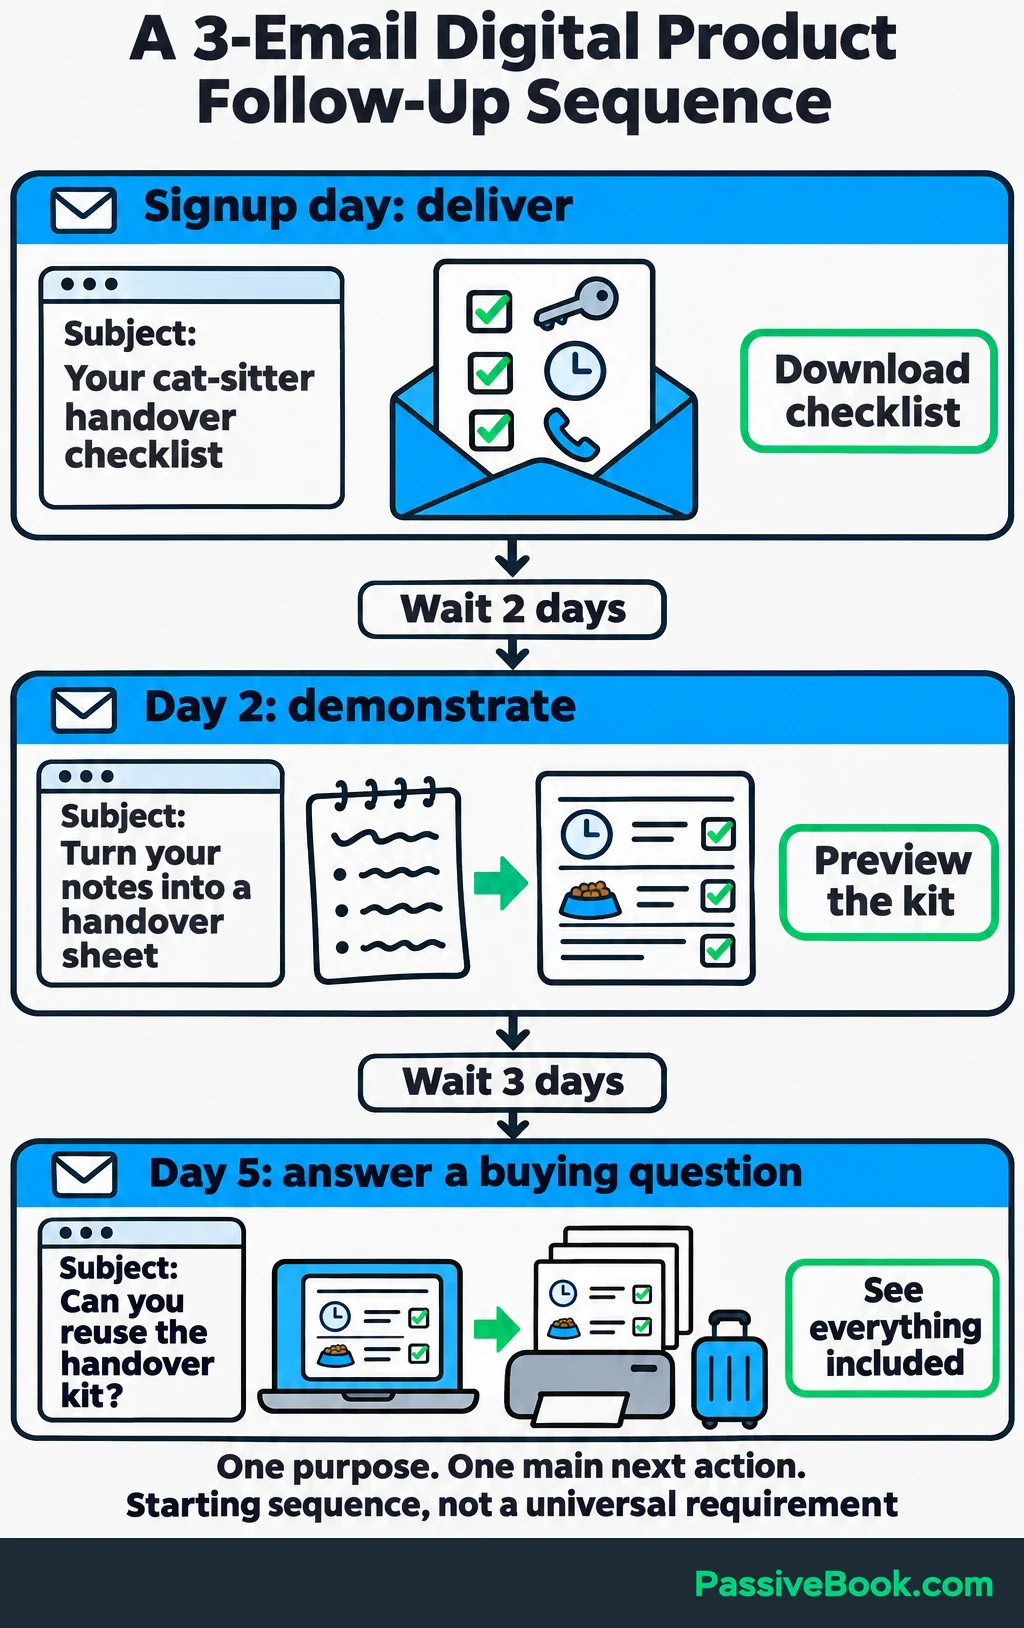
Subject: Your cat-sitter handover checklist
Hi,
Here’s your checklist: [Download link]
Start with the details you already know, such as where you keep supplies and how the sitter will get inside. Leave gaps visible so you can finish them before the handover.
In my next email, I’ll show you how to turn those notes into a routine sheet.
[Your name]
[Business name and mailing address]
[Unsubscribe link]
Email 2 — Send two days later
Subject: Turn your notes into a handover sheet
Hi,
Turn one checklist note into a routine the sitter can follow.
For example, “Food is in the kitchen” could become “At 7 a.m., serve the breakfast portion from the labeled container in the lower kitchen cupboard.”
The Cat-Sitter Handover Kit gives your notes a consistent place, with routine sheets, contact pages, and daily visit logs.
You can preview the pages here: [Sales page link]
[Your name]
[Business name and mailing address]
[Unsubscribe link]
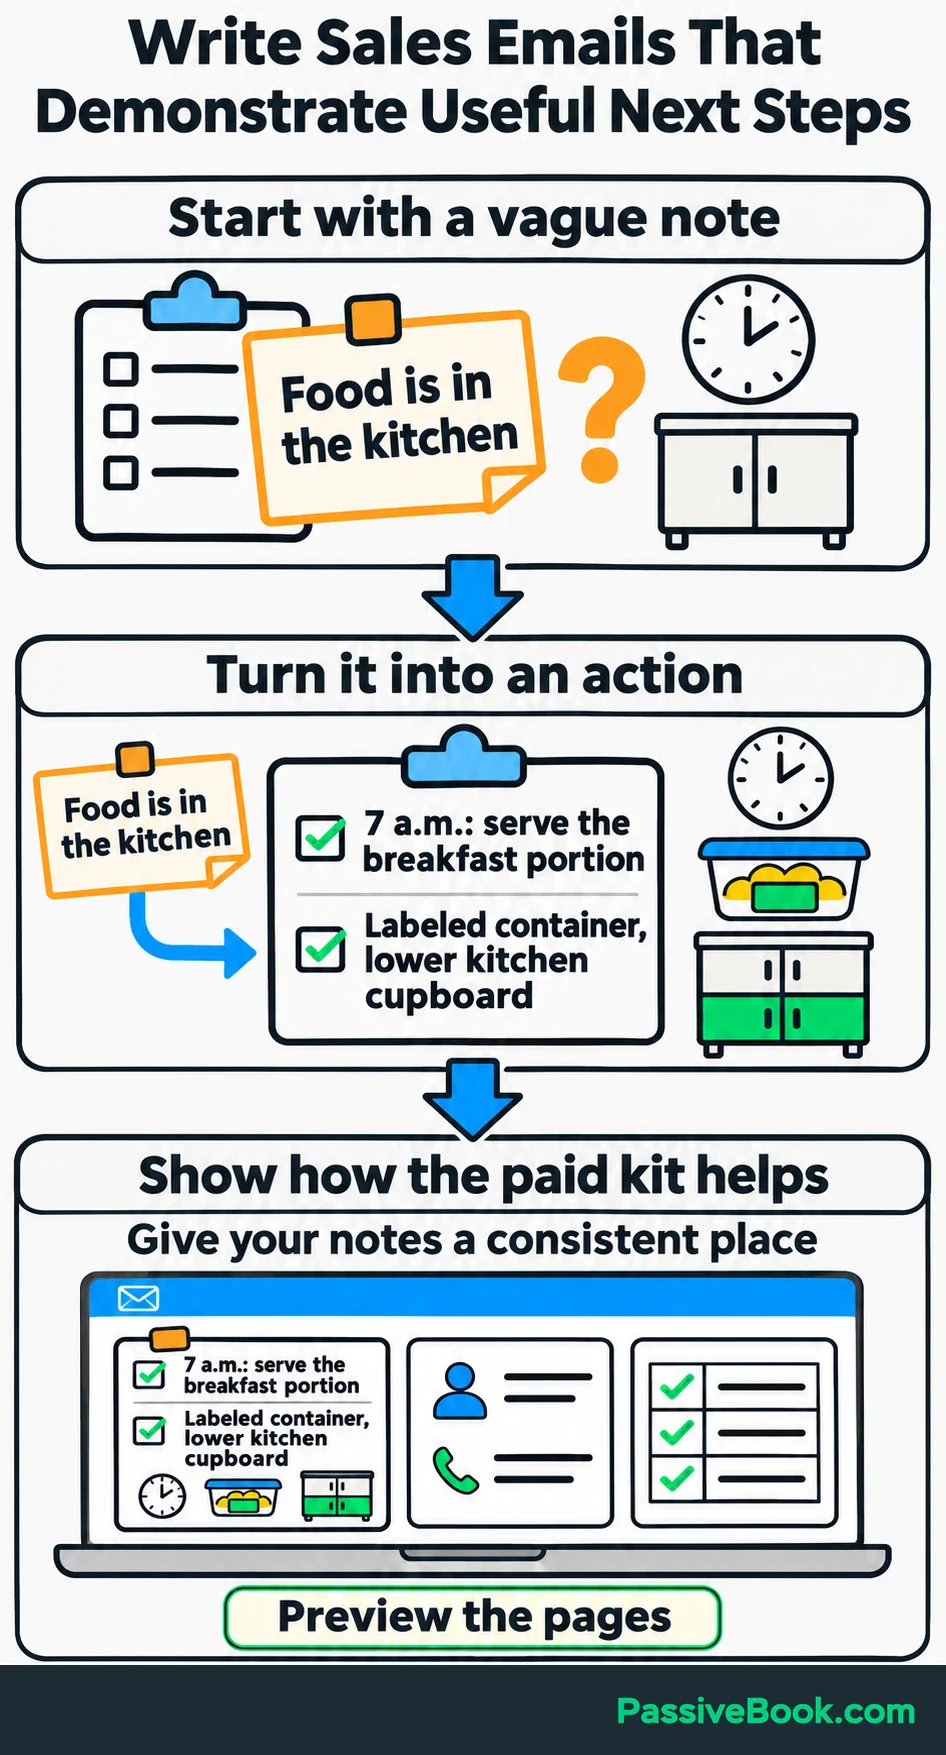
Email 3 — Send three days later
Subject: Can you reuse the handover kit?
Hi,
You can print a fresh set of the kit’s pages for another trip and update the details that have changed.
Keep your original download, fill in the current routine, and share the completed sheets with your sitter. The purchase covers use for your own household.
If that would help with your next handover, you can see everything included here: [Sales page link]
[Your name]
[Business name and mailing address]
[Unsubscribe link]
These delays put the emails on signup day, day two, and day five, giving someone time to use the checklist between messages. Treat the timing and number of emails as a starting point.
For a direct-purchase funnel, you can skip this promotional sequence and write useful onboarding instead. For an inquiry funnel, acknowledge the request and explain what happens next.
Set the Entry, Purchase and Exit Rules
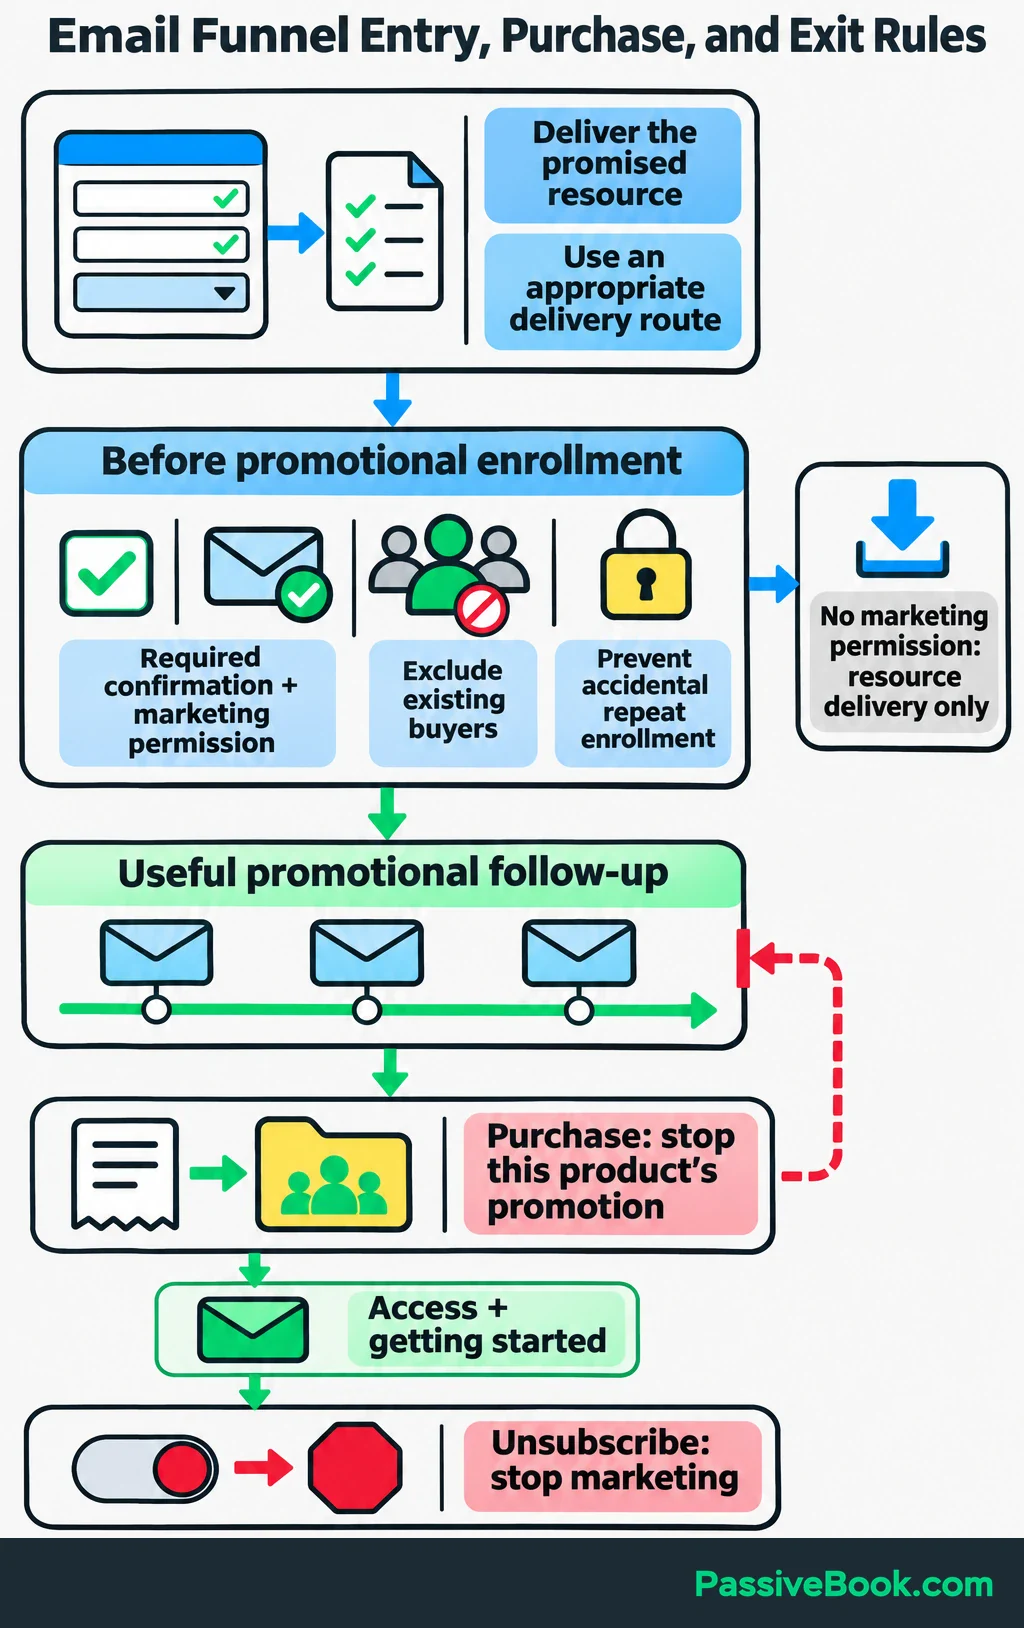
Write the automation rules in plain language before building them.
A subscriber should enter after requesting the relevant resource, completing any required confirmation, and giving the necessary marketing permission. Someone who requests delivery without marketing permission should still receive the promised resource through an appropriate delivery route.
Prevent accidental repeat enrollment, and stop marketing after unsubscribe.
Before activation, authenticate your sending domain by adding the records your provider supplies to your domain settings. Use a reply address you monitor. MailerLite requires authentication for custom sending domains beyond its trial allowance.
Then connect payment to a buyer tag or group. That marker should prevent buyers from entering or continuing promotion for the product they already own.
In MailerLite, start the sequence when someone joins your checklist group, using the “Joins a group” trigger. Set the product’s “Action after checkout” to add purchasers to a buyer group. Exclude that group from the sequence and enable exit when someone joins an excluded group. MailerLite’s exclusion rules require this group trigger to stop a sequence already underway. Keep repeat enrollment disabled unless you have a reason to allow it.
The buyer should now receive access and getting-started messages through the purchase route. Test this while a contact is waiting between promotional emails. That is where a missing exit rule becomes visible.
6. Track the Transitions That Lead to Sales
Track the actions in your chosen path: signup-page visits, signups, sales-page visits, checkout starts, and paid purchases.
Start with the reports you already have. Your checkout records are the reference for actual sales. An email click shows interest, but it doesn’t confirm payment.
Keep a simple scorecard with:
- Reporting group: Entry dates, traffic source, and time allowed for follow-up.
- Stage counts: Eligible entrants and completed next actions.
- Sales: Buyers, orders, and gross revenue.
- Costs: Refunds, variable selling costs, and funnel operating expenses.
- Time: Acquisition work and maintenance hours.
For each transition, count the people who completed the next action from the group eligible to take it. Divide that number by the eligible entrants, then multiply by 100.
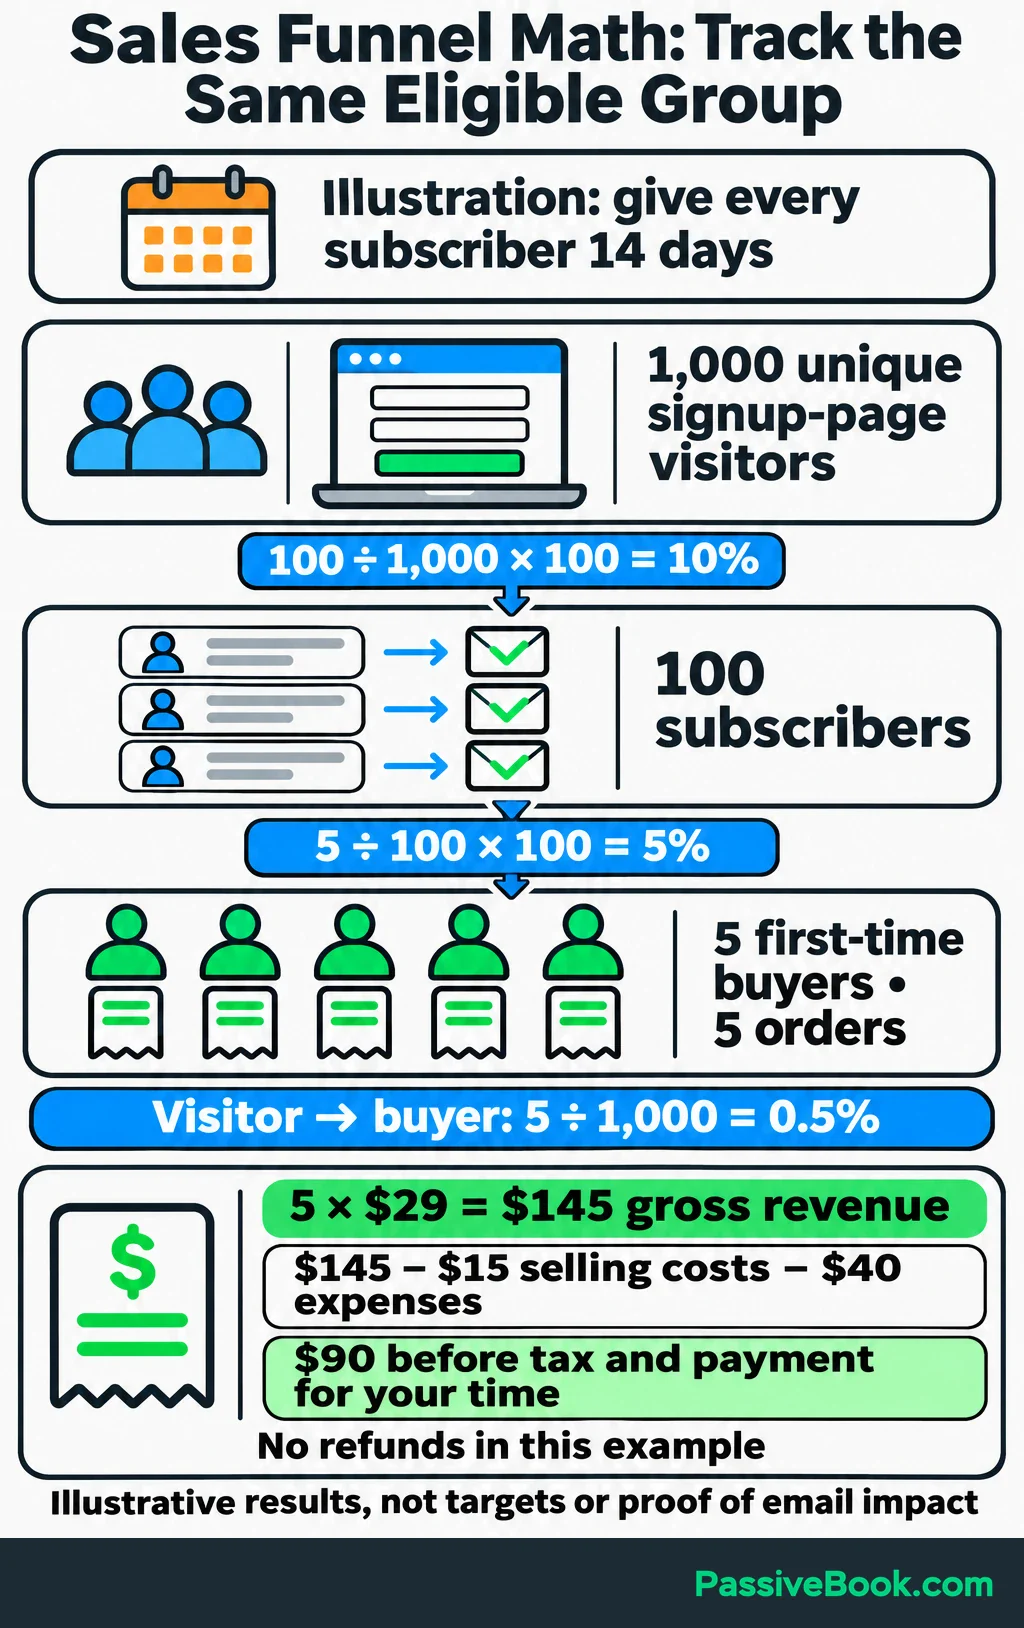
Suppose 1,000 unique visitors reach the example signup page and 100 become subscribers. Of those subscribers, five make their first purchase within 14 days of subscribing, each buying one $29 kit. Wait until every subscriber has had that full observation window.
| Transition | Calculation | Result |
|---|---|---|
| Visitor to subscriber | 100 subscribers ÷ 1,000 visitors × 100 | 10% |
| Subscriber to buyer | 5 buyers ÷ 100 subscribers × 100 | 5% |
| Visitor to buyer through this path | 5 buyers ÷ 1,000 visitors × 100 | 0.5% |
| Gross revenue from these purchases | 5 orders × $29 | $145 |
These are illustrative results, not targets. They show how many subscribers bought within 14 days, but they don’t prove that the emails caused those purchases. Record purchases made without subscribing separately.
To judge profitability, subtract refunds, selling costs, and operating expenses. With no refunds, $15 in total variable selling costs, and $40 in funnel expenses, this example leaves $90 before tax and payment for your time.
Keep people, sessions, and orders distinct. Five orders might come from fewer than five buyers.
If you use Google Analytics, add consistent campaign labels to links you share elsewhere. The source identifies the site, such as Pinterest; the medium identifies the channel, such as social; and the campaign identifies the promotion, such as your handover checklist.
7. Test the Journey and Launch With One Traffic Source
Follow the journey from a real entry link on your phone. Don’t begin from the page editor, where everything already looks familiar.
Check the complete route:
- Open the content and follow its resource link.
- Submit the signup form and complete any confirmation.
- Download and open the resource.
- Check the emails, previews, and purchase links.
- Complete a test purchase using your checkout’s supported testing method.
- Verify confirmation, receipt, download access, and buyer identification.
- Confirm that the buyer stops receiving the sales sequence.
- Test duplicate signup, unsubscribe, and failed-payment behavior.
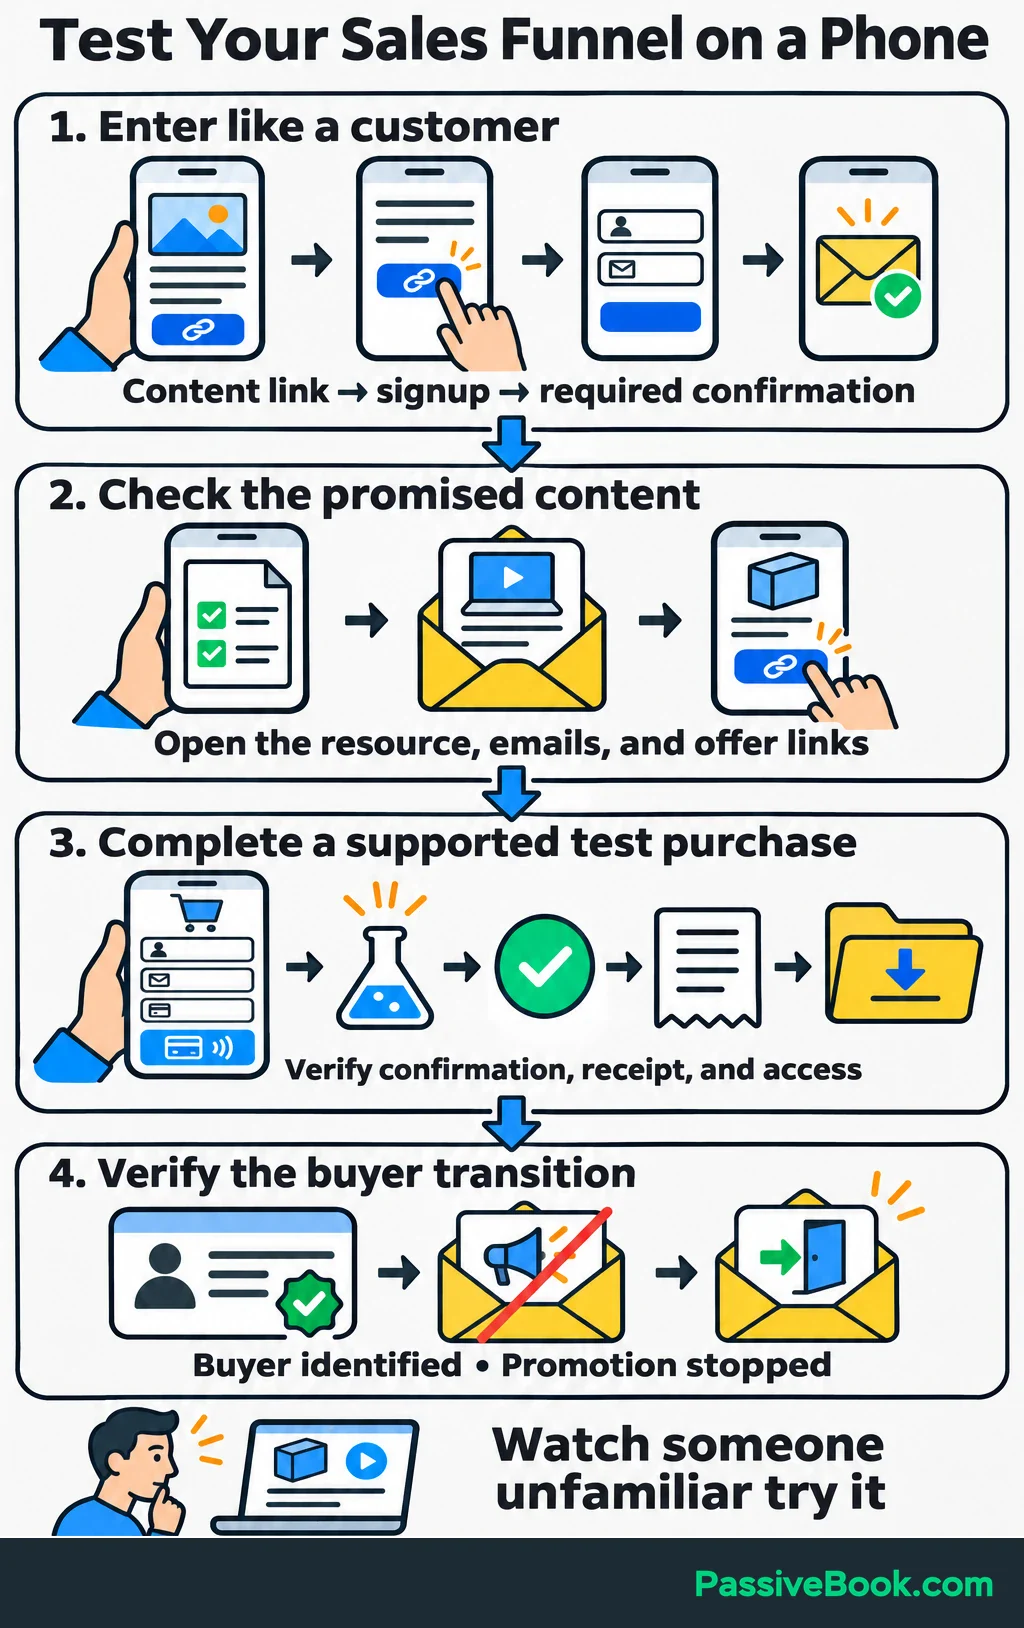
Ask someone unfamiliar with the offer to try it, too. Watch where they pause. “I wasn’t sure what was included” tells you more than “Looks good.”
Then choose one traffic source where people seek help with the problem. Paid advertising is optional, and I would wait until the purchase and delivery route works.
For the example, publish an article about preparing a cat-sitter handover. Show a completed checklist excerpt and link naturally to the free version. Include the paid kit where its extra pages help with the task.
Blogging and Pinterest are my active channels at Passive Book. I like building around useful content people can find later, but I would still launch this funnel through one main channel first so the work and reports stay manageable.
You can build in separate work sessions: finish the offer and pages, connect email and payment, then test and publish. A limited schedule is a reason to keep the first version small.
Automate delivery and schedule repeatable distribution. Keep a regular review slot for replies, orders, and failures. Automation can handle the handoffs while you handle the judgment.
8. Improve the Obstacle That Is Costing Sales
When results disappoint, inspect the journey before changing platforms.
Use the observed problem to choose your next action.
| Observed Obstacle | Checks to Perform | First Change | Metric to Review |
|---|---|---|---|
| Few relevant visits | Does the content answer a problem connected to the offer? Is it reaching people seeking that help? | Improve one relevant article and its distribution | Qualified visits to the next page |
| Visits without signups | Does the resource match the content’s promise? Does the form work on mobile? | Clarify the benefit and show the resource | Visitor-to-signup rate |
| Subscribers rarely reach the offer | Are links working? Do the emails demonstrate a useful next step? | Make the connection between resource and product clearer | Subscriber-to-offer visit rate |
| Offer visits without purchases | Can visitors see the contents, format, suitability, and delivery details? | Answer the most repeated purchase question beside the buying action | Offer-visitor-to-buyer rate |
| Checkout starts without payment | Are totals clear and payment methods working? | Fix the observed checkout problem | Checkout completion rate |
| Purchases followed by access requests | Do confirmation and download links work? | Simplify the access instructions | Successful access and support requests |
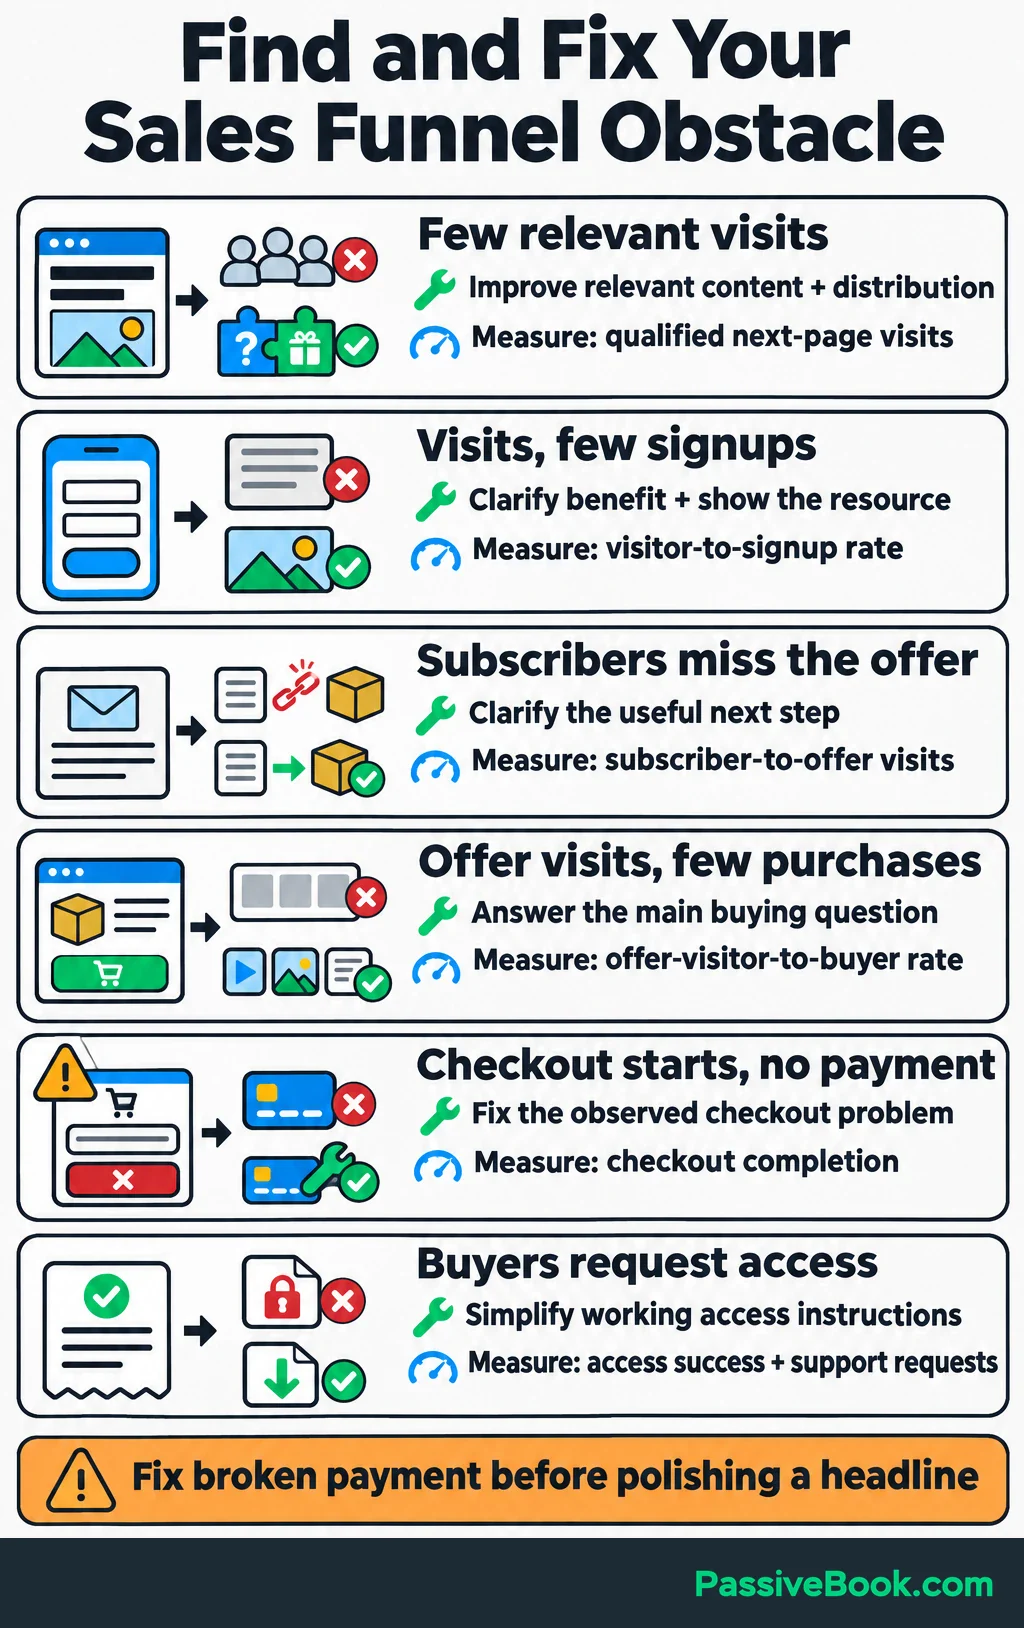
Prioritize the obstacle’s effect on sales. The smallest percentage is not automatically the biggest problem. Broken payment deserves attention before a slightly better signup headline.
For the handover kit, repeated questions about the contents suggest adding a labeled preview beside the purchase button. Record that change and its intended effect, then review whether more offer visitors purchase.
With little traffic, customer questions and observed walkthroughs are especially useful. A couple of extra sales after a change won’t establish cause.
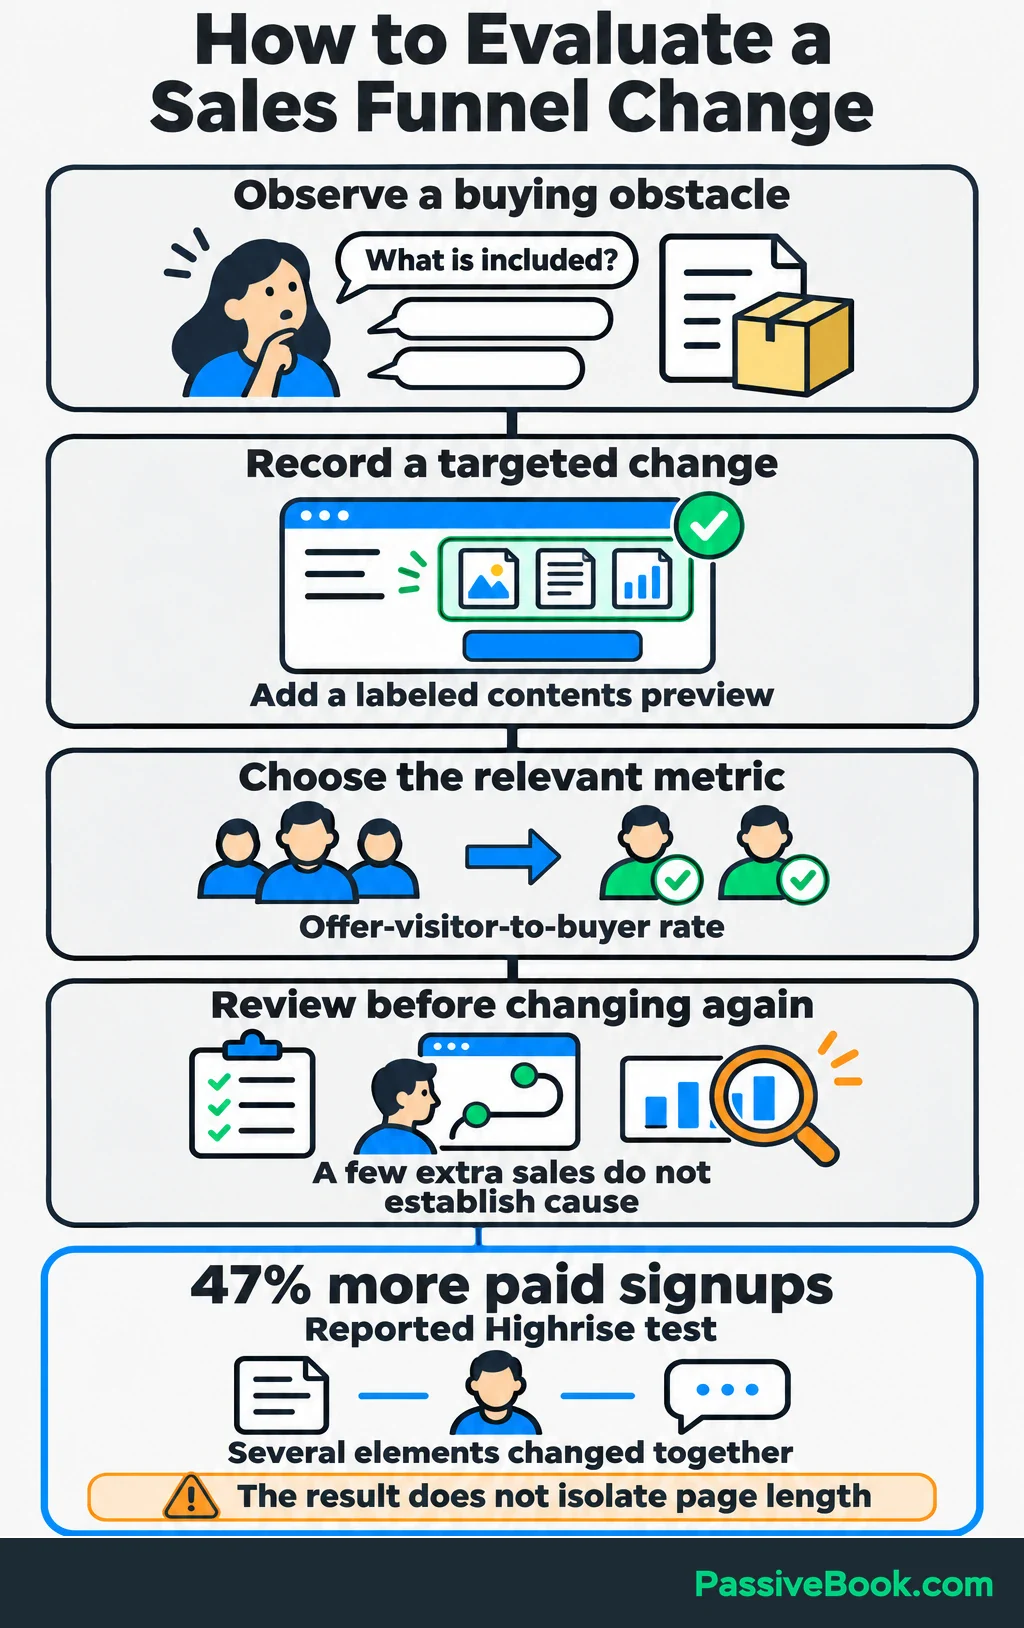
Highrise, a customer-management tool, reported 47% more paid signups when it tested a shorter page featuring a customer photo and testimonial against its preceding long-form design. Several elements changed together, so the result doesn’t establish that shorter pages generally sell better.
My takeaway is to test changes tied to a buying obstacle. Keep a note of what changed, why, and what happened before making another meaningful change.
Expand traffic, offers, or automation once the complete path works and sales justify the costs. Another product should answer a recurring buyer need, not your urge to build something while avoiding the sales report.
What Next?
Write your offer sentence and draw its shortest useful route from discovery to delivery. Mark the first missing connection and make that your next work session.
Use the social buttons to share this guide if a clearer route from content to purchase would make your next business discussion more useful.
Which part of your funnel currently leaves people without a clear next step? Share it in the comments, and bring any other questions about building the route.
Share this post with your friends & followers: