A customer buys your course on Tuesday, then gets an email on Thursday asking whether they’re ready to buy it. The writing might be good, but the timing makes your business look like it missed the sale.
The same problem appears before a purchase. Someone requests a useful download, then gets promotions that barely relate to it. You spend time writing emails, and the reader has to work out why they matter. This guide shows how to turn that disconnected follow-up into an automated journey from the requested download to a relevant offer.
1. Choose a Customer Stage and Sequence Goal
Start with one recurring customer situation and one useful outcome. You might help new subscribers evaluate a product, or help buyers finish their first lesson. Build that journey before trying to automate your whole business.
An email sequence is a connected series of messages that starts when someone meets an entry condition, such as signing up or purchasing. Delays control when messages arrive, and conditions determine which messages still apply. A broadcast is a separate campaign sent to a selected audience.
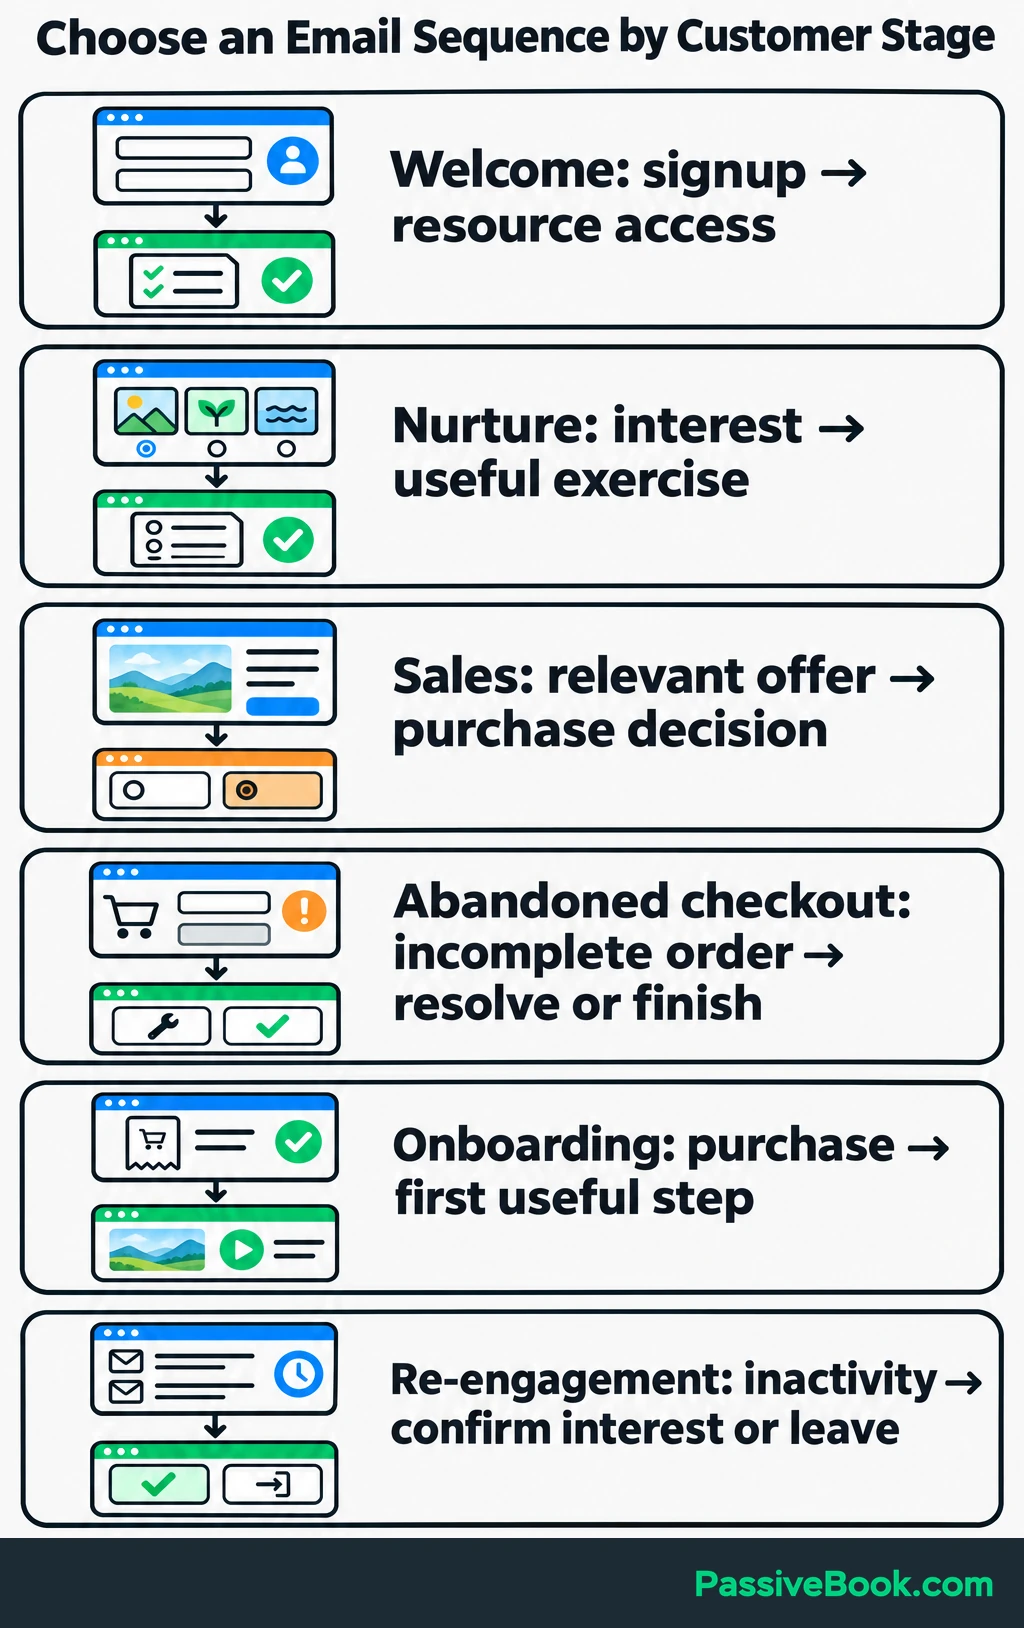
Choose the sequence by the customer’s situation:
| Customer Stage | Sequence Type | Entry Event | Desired Action |
|---|---|---|---|
| Just subscribed | Welcome | Completes signup | Access the promised resource and understand what comes next |
| Exploring a topic | Nurture | Selects an interest | Try a useful exercise or explore relevant guidance |
| Considering an offer | Sales | Qualifies for a relevant offer | Decide whether to purchase |
| Started buying | Abandoned checkout | Leaves an identified checkout incomplete | Complete the order or resolve a buying problem |
| Just purchased | Onboarding | Completes payment | Access the product and take the first useful step |
| No longer participating | Re-engagement | Meets a defined inactivity rule | Confirm interest or leave the marketing list |
These types can work together. A welcome journey can introduce your business, teach something useful, and explain a paid offer.
Throughout this guide, imagine you offer a free watercolor supplies checklist and sell a beginner watercolor landscape course. The products, messages, schedules, and figures in this example are illustrative.
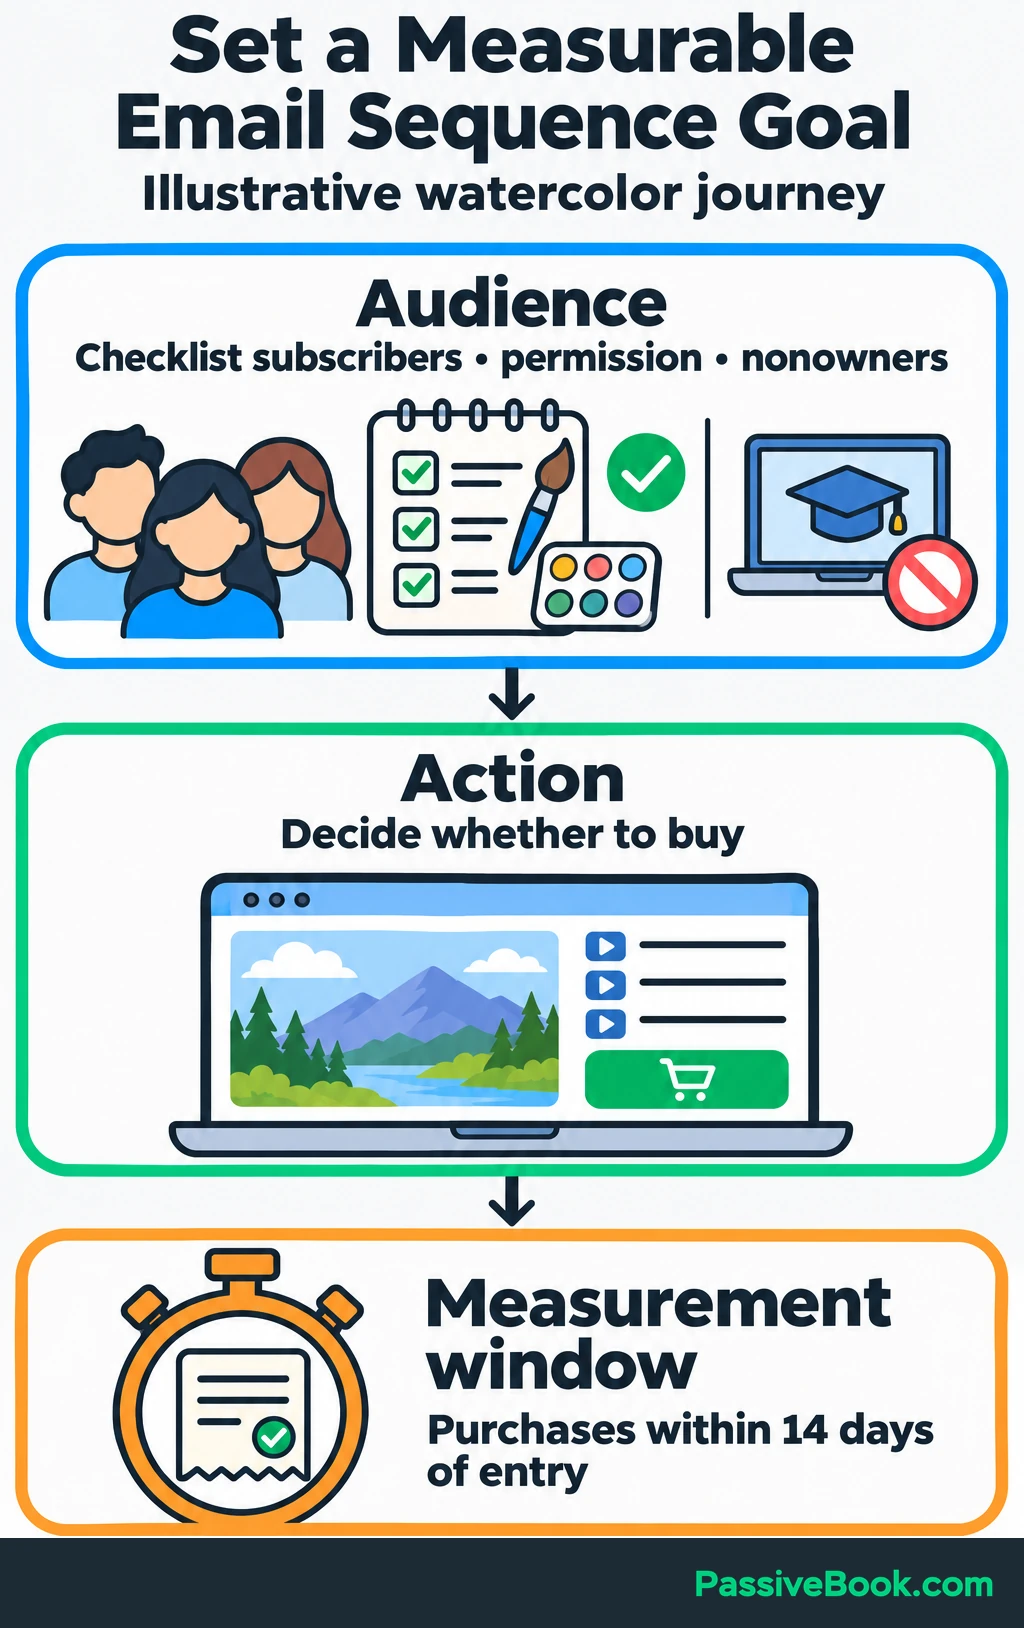
For that business, I would start with this goal:
Help new checklist subscribers who have marketing permission and do not own the course decide whether to buy it. Measure purchases within 14 days of entering the promotional journey.
That statement gives you an audience, an action, and a measurement window.
Choose those before deciding how many emails to write. “Send seven emails” is a production target. “Help a buyer start the first lesson” tells you what the emails need to accomplish.
2. Map the Emails and Sending Rules
Define Entry, Exit, and Handoff Rules
Before opening the automation builder, decide what starts the journey, who qualifies for promotions, and when the emails stop:
- Entry Trigger: The person requests the watercolor supplies checklist.
- Promotional Eligibility: They have appropriate marketing permission and do not already own the landscape course.
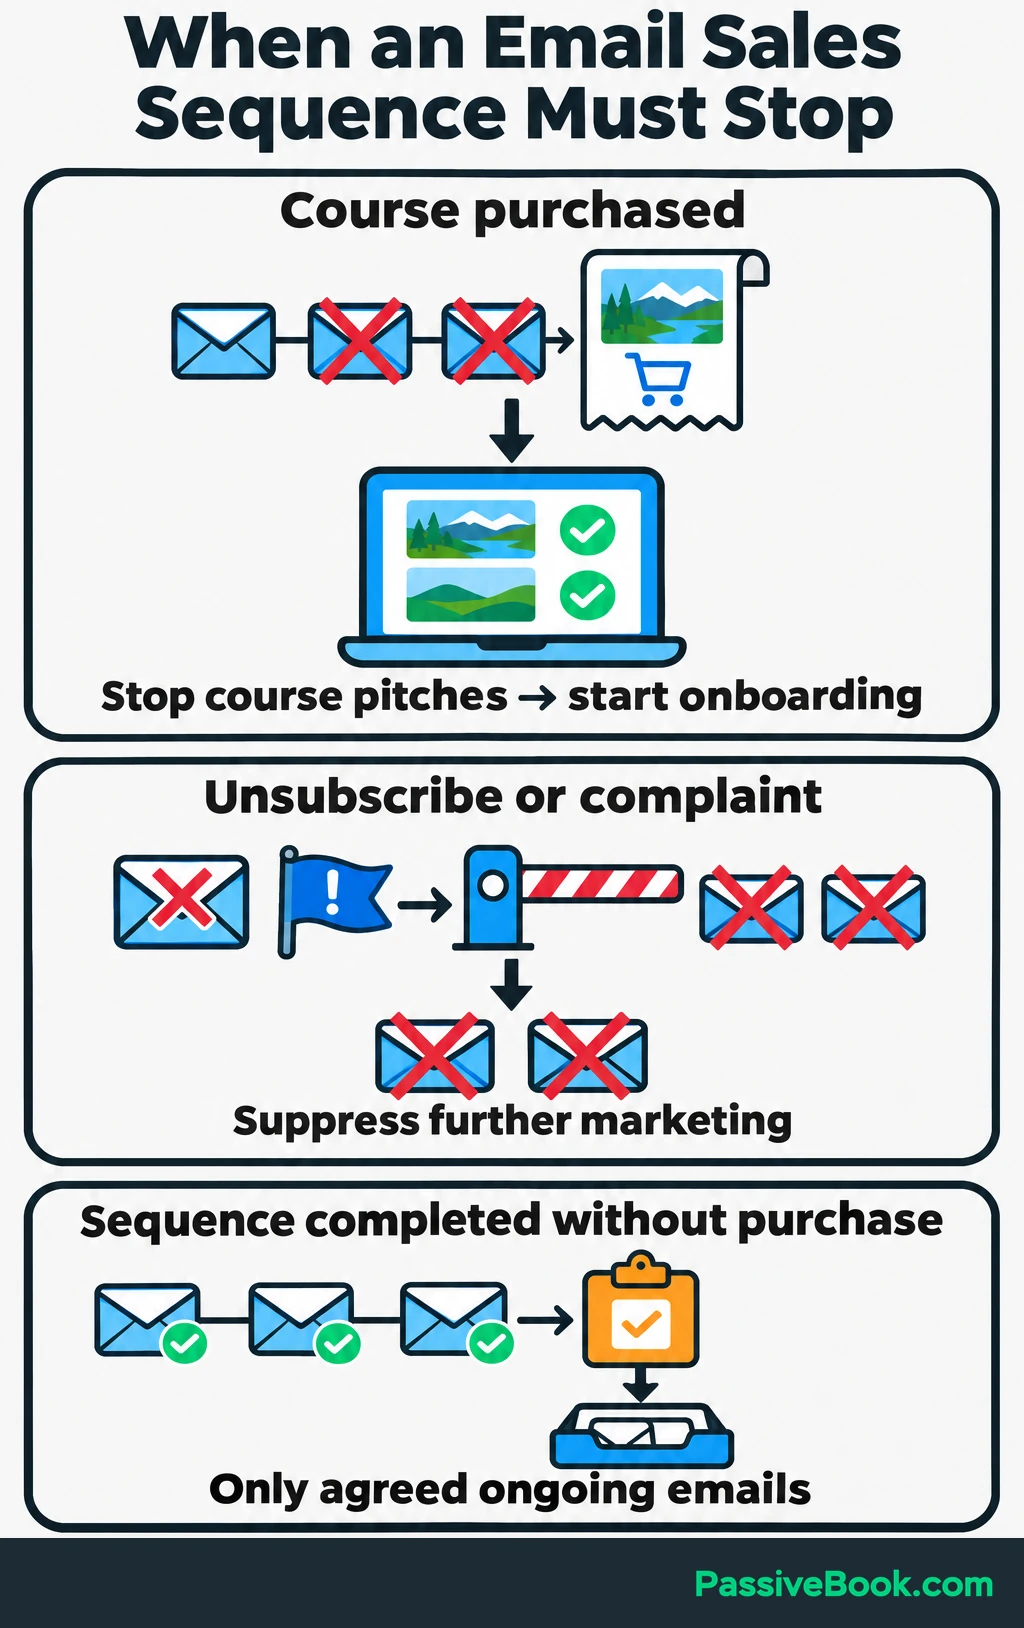
- Purchase Exit: Buying the course stops its promotional emails and starts relevant onboarding.
- Marketing Stop: An unsubscribe or complaint suppresses further marketing.
- Re-entry Rule: Each subscriber enters this welcome journey once.
- Completion Handoff: Nonbuyers receive only the ongoing emails they agreed to receive.
Keep checklist delivery separate from promotional eligibility. Someone who requests the resource should still receive it if they decline marketing or already own the course.
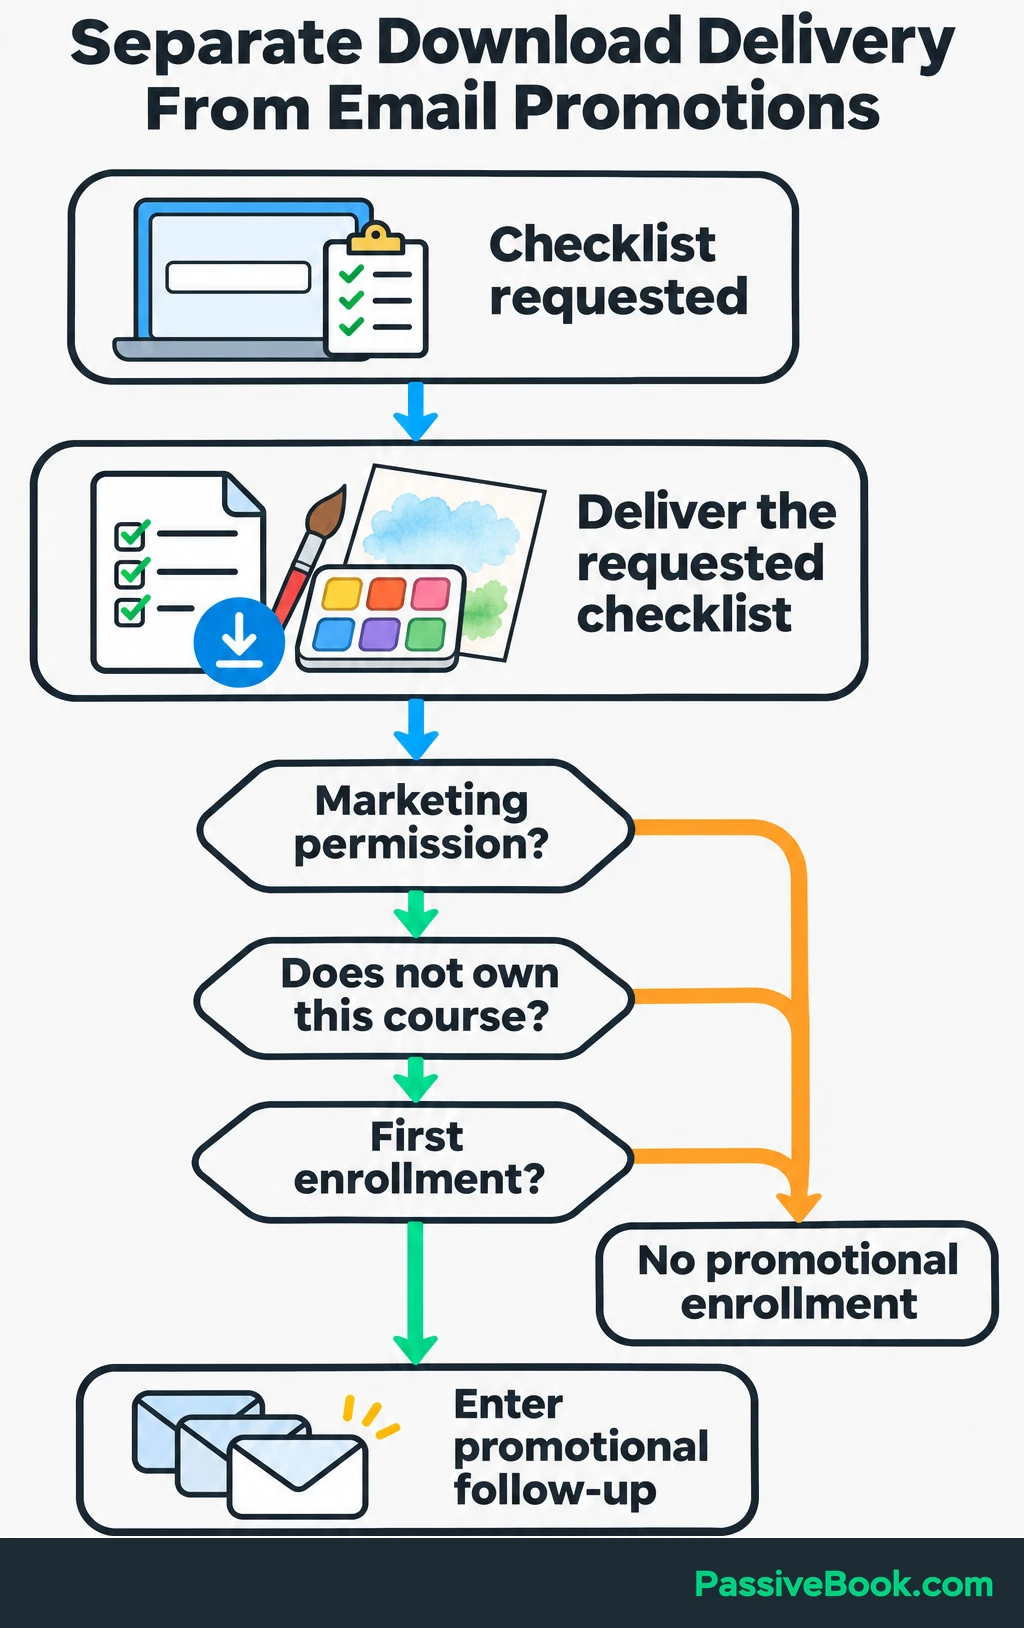
For UK individual subscribers, unsolicited email marketing requires consent or a qualifying soft opt-in, an exception with specific conditions. A free download request alone does not establish permission for later promotions. The ICO explains these electronic marketing requirements.
For this example, I would offer a separate, unticked marketing choice that describes the watercolor tips and course offers. Record the choice, when it was made, and the wording shown.
Collect only details that change the emails or who receives them: the requested resource, stated interest, and course ownership.
On a digital-product site in another niche, I tested a purchase while a promotional sequence was running. The order reached the store, but the email tool still treated my test contact as a prospect. I connected the product-specific purchase event and repeated the test until the remaining pitch was skipped.
That experience is why I check the purchase handoff before polishing subject lines. A friendly greeting cannot rescue an email selling something the reader just bought.
Give Every Email a Useful Job
Work backward from the goal. List what someone needs to receive, understand, try, or decide before the next action makes sense.
Then give each email one main job and one primary call to action, or CTA. A CTA is the action you ask the reader to take, such as downloading the checklist or viewing the course.
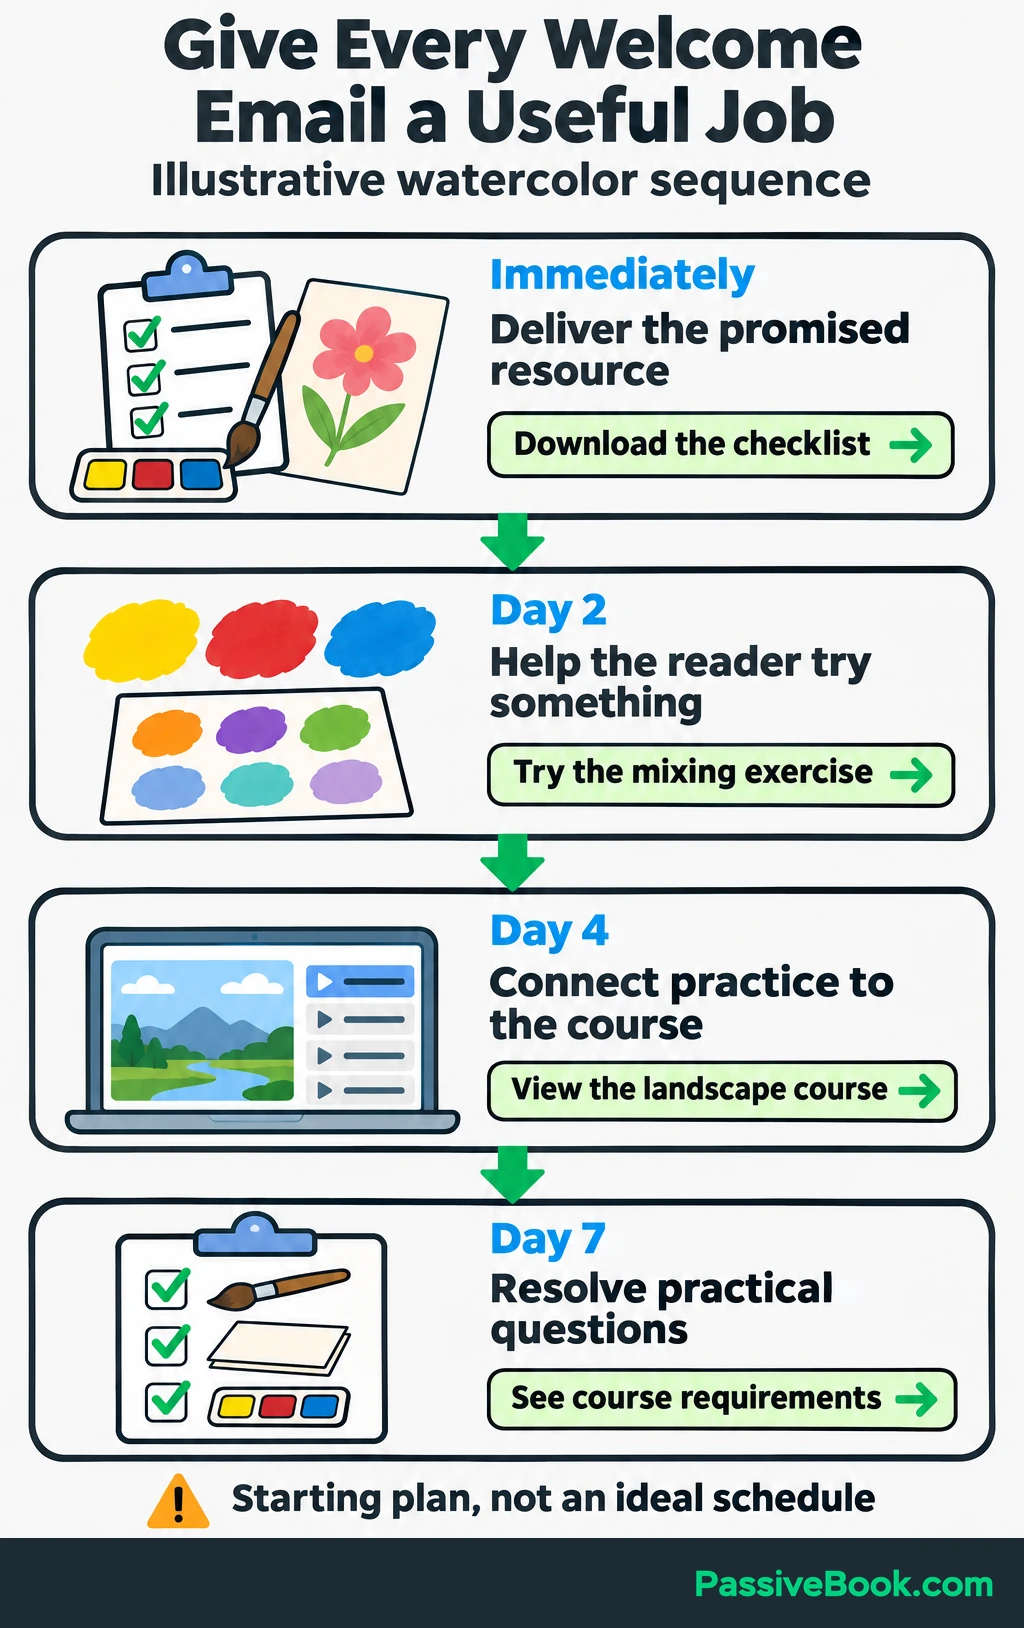
Here is a starting map for the watercolor journey:
| Time Since Signup | Reader Question | Main Content | Primary CTA |
|---|---|---|---|
| Immediately | What supplies do I need? | Checklist and a short note on the essentials | Download your supplies checklist |
| Day 2 | What can I try with these supplies? | A simple color-mixing exercise | Try the color-mixing exercise |
| Day 4 | How would the course help me paint a landscape? | Lesson excerpt, finished project, and course contents | View the landscape course |
| Day 7 | Do I need experience or extra equipment? | Actual prerequisites and how the checklist supplies fit | See the course requirements |
This schedule is a starting plan, not a proven ideal. It gives the reader time to use the checklist before receiving the exercise, then connects that exercise to the course.
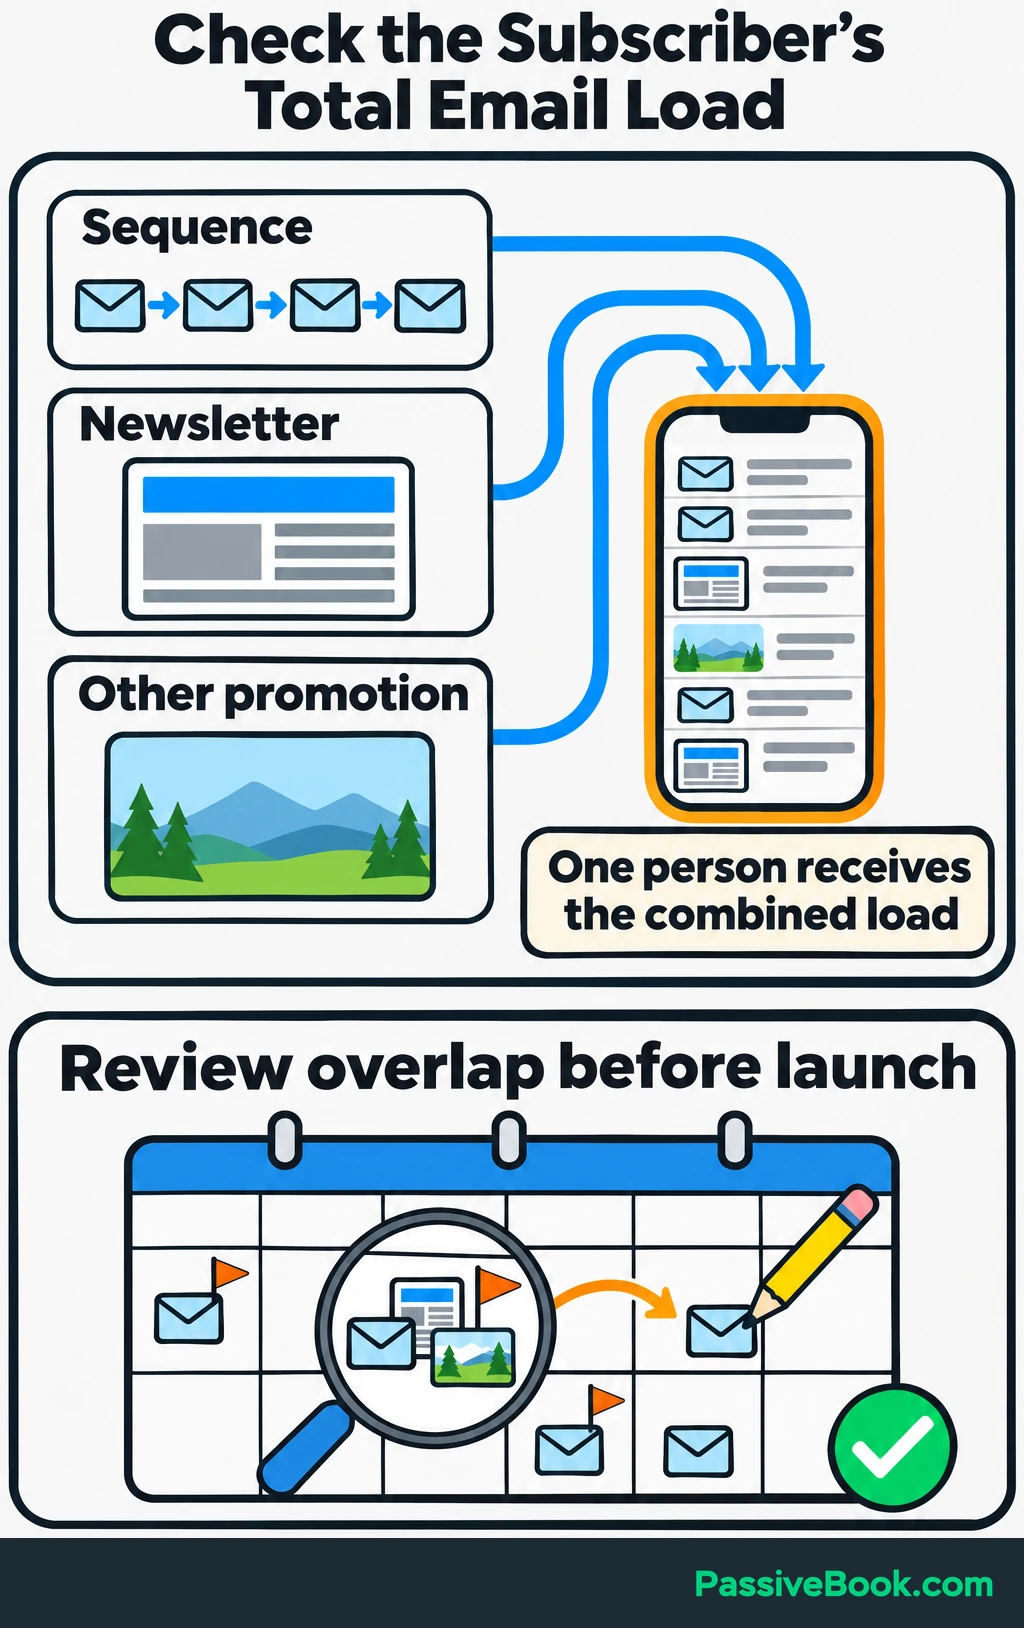
Check the rest of your email calendar too. Four sequence emails may look modest until you add a newsletter and another active promotion.
I would use timed sends for this first version and add branches only when an action changes what the reader needs. A purchase clearly does. An email open usually gives you much less useful information.
Cut any message whose only job is to repeat the previous pitch. Another email earns its place by answering another useful question.
3. Write Emails Around the Next Customer Action
Turn Customer Questions Into Useful Messages
Look through enquiries, replies, reviews, and support conversations. Save the questions in the customer’s own words, then place each answer where it helps someone move forward.
For the watercolor journey, supplies questions belong near the beginning. Questions about lesson access, equipment, or prior experience belong near the course explanation.
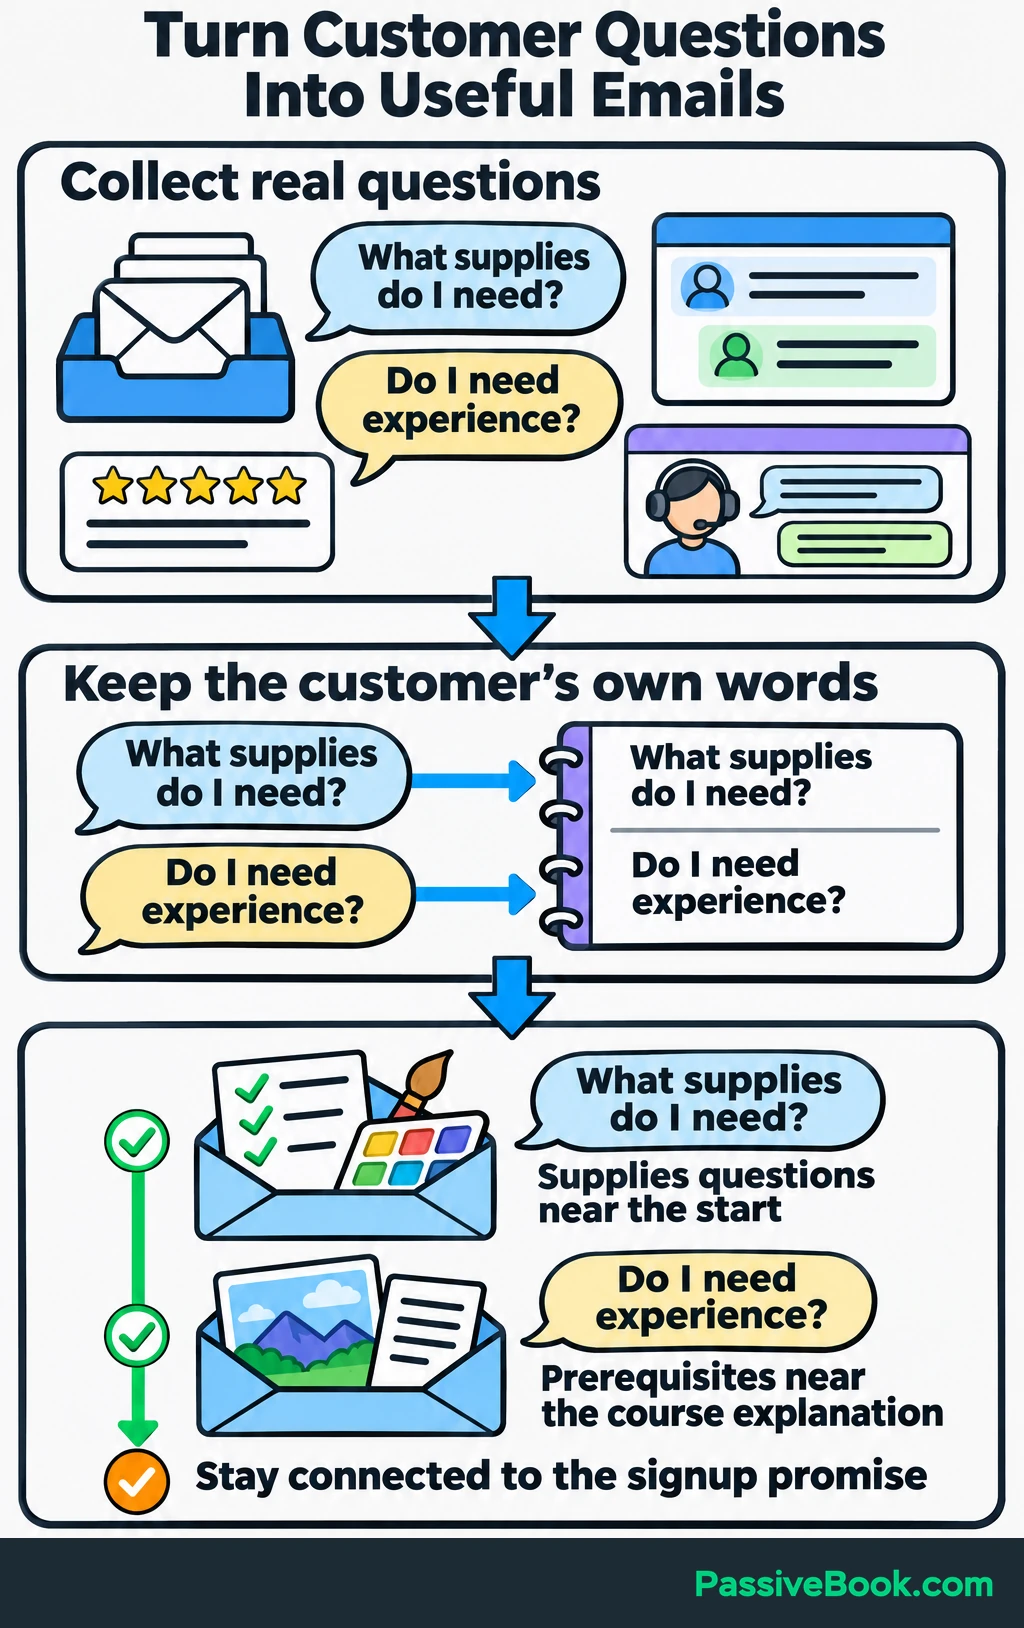
Keep that connection to the signup promise. Someone requested help choosing watercolor supplies, so help them use those supplies before introducing a landscape course.
Useful personalization comes from relevant context:
- Requested Resource: Refer to the supplies checklist they asked for.
- Stated Interest: Use a landscape example if they selected landscape painting.
- Purchase Status: Give customers access guidance instead of another course pitch.
- Optional Details: Use a plain “Hi there” when a first name is missing.
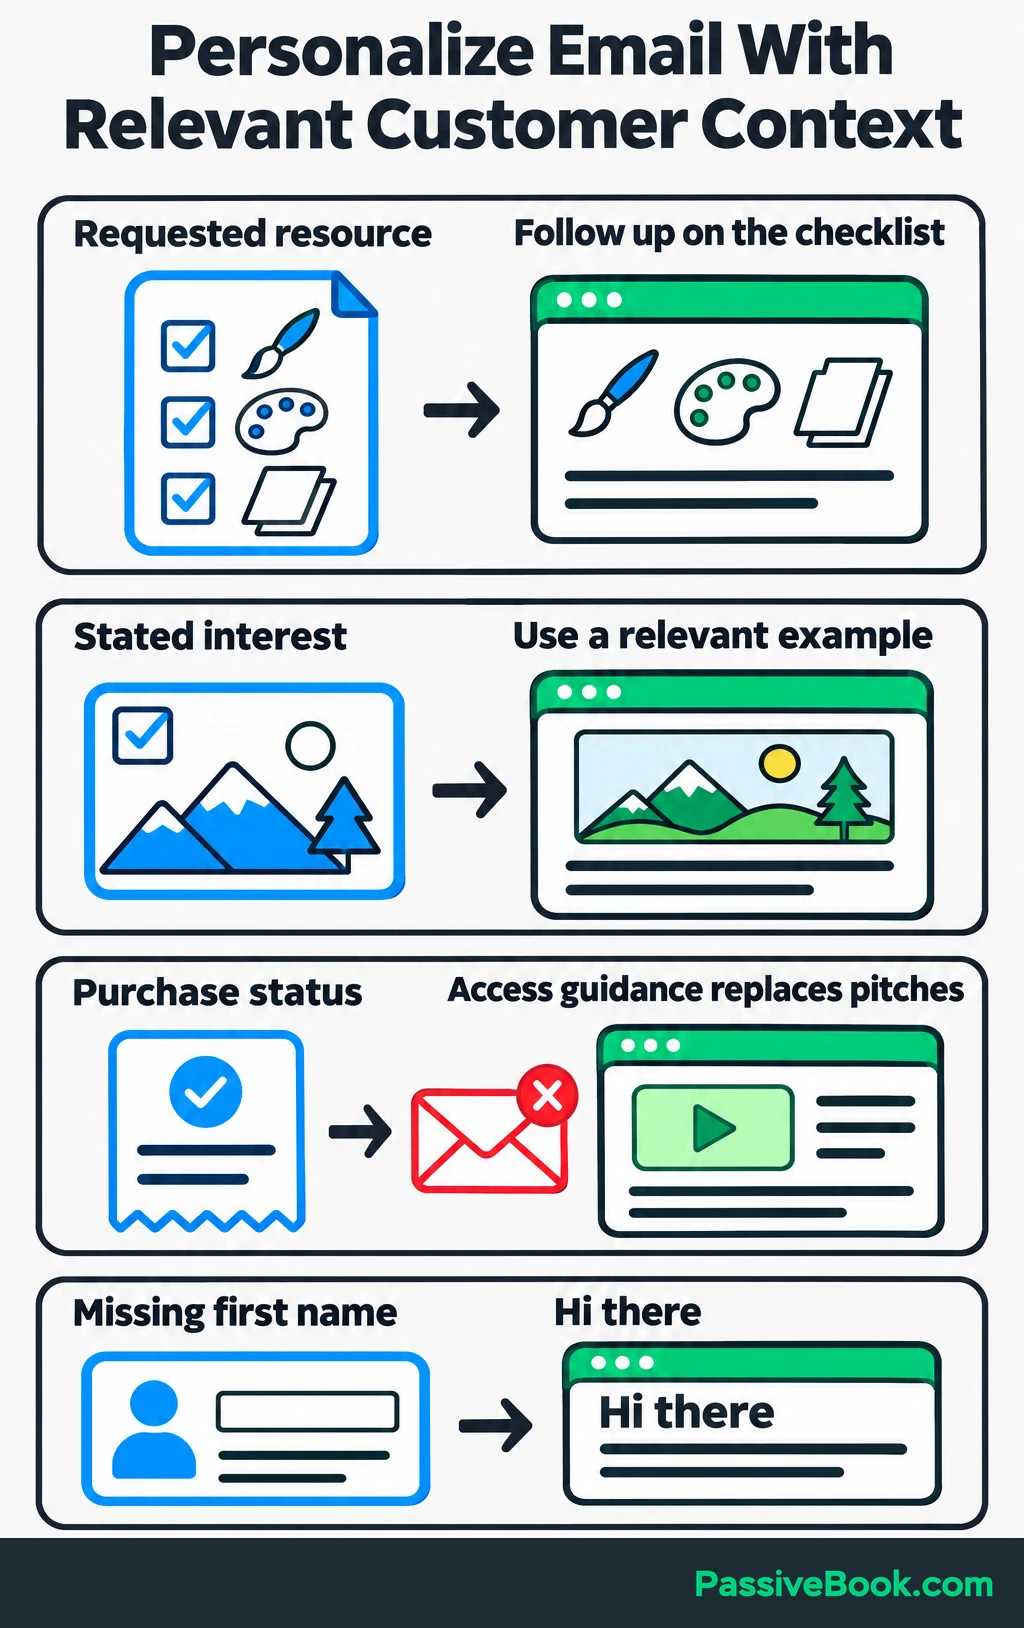
Changing a greeting personalizes the copy. Excluding an existing buyer changes the journey. Both matter, but they solve different problems.
You can also invite a reply when the answer will guide future messages:
What feels hardest about starting your first watercolor painting?
Use that question in an email whose main job is to learn about the reader. I would skip it in the download email if it distracts from getting the checklist.
Draft One Clear Message at a Time
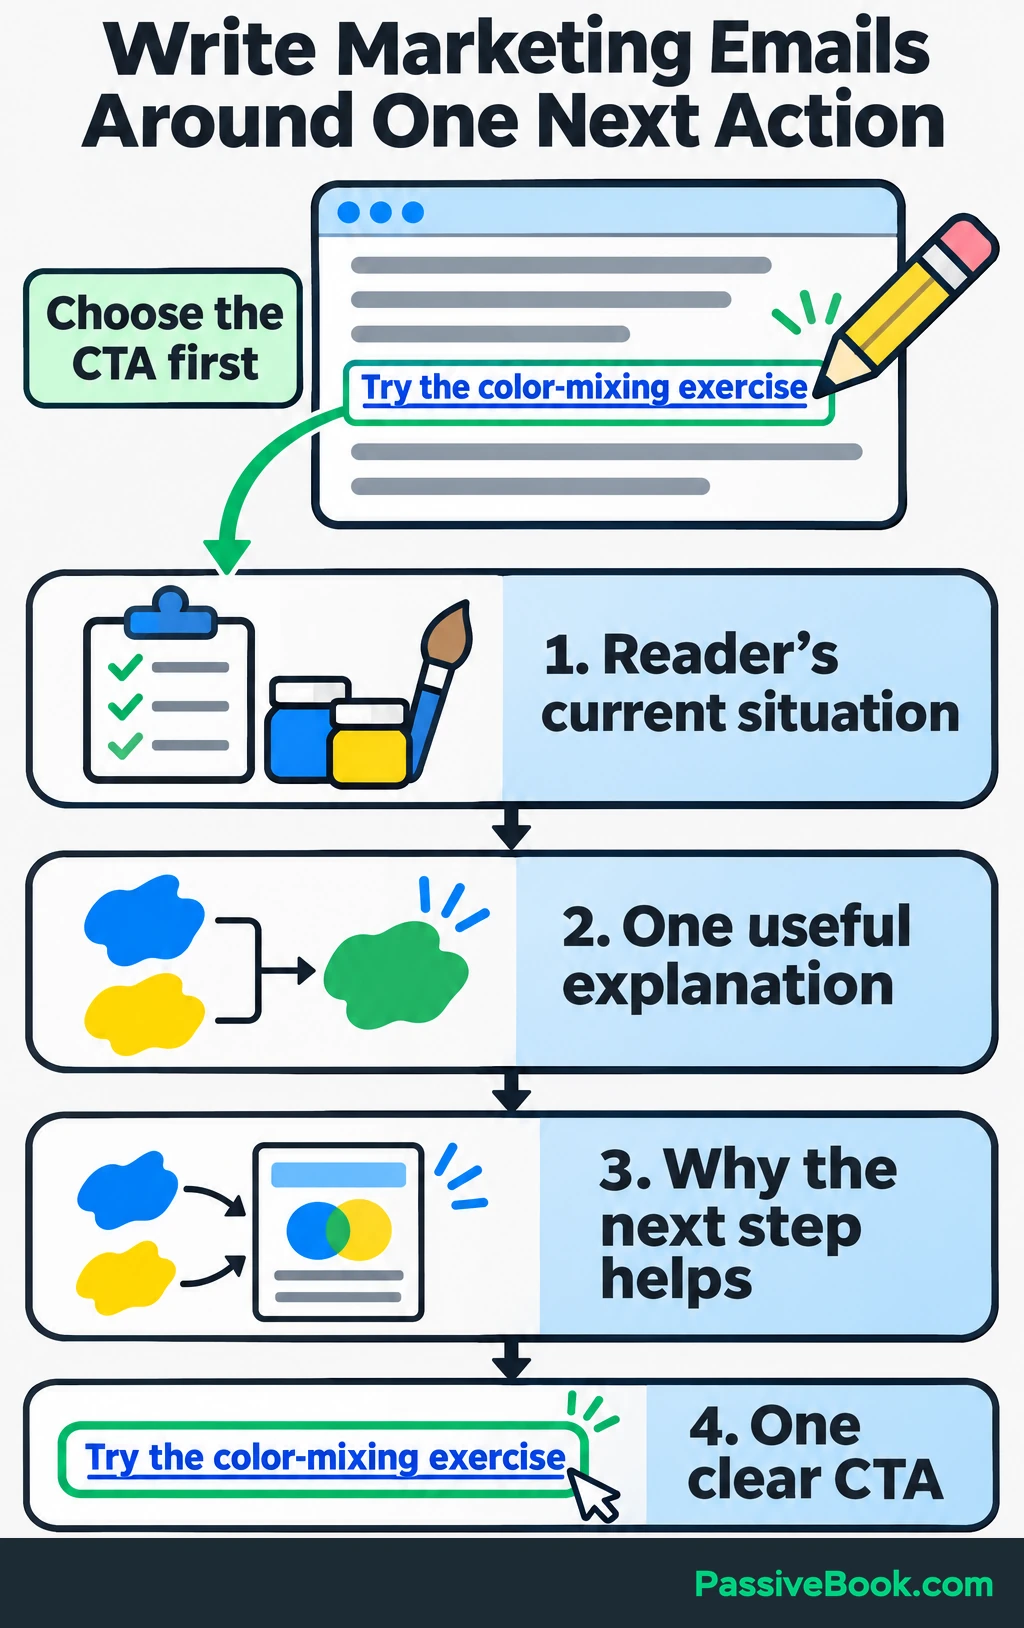
Write the CTA first. Then explain why taking that action would help.
A simple structure works:
- Open with the reader’s current situation.
- Give one useful explanation.
- Connect it to the next action.
- State that action clearly.
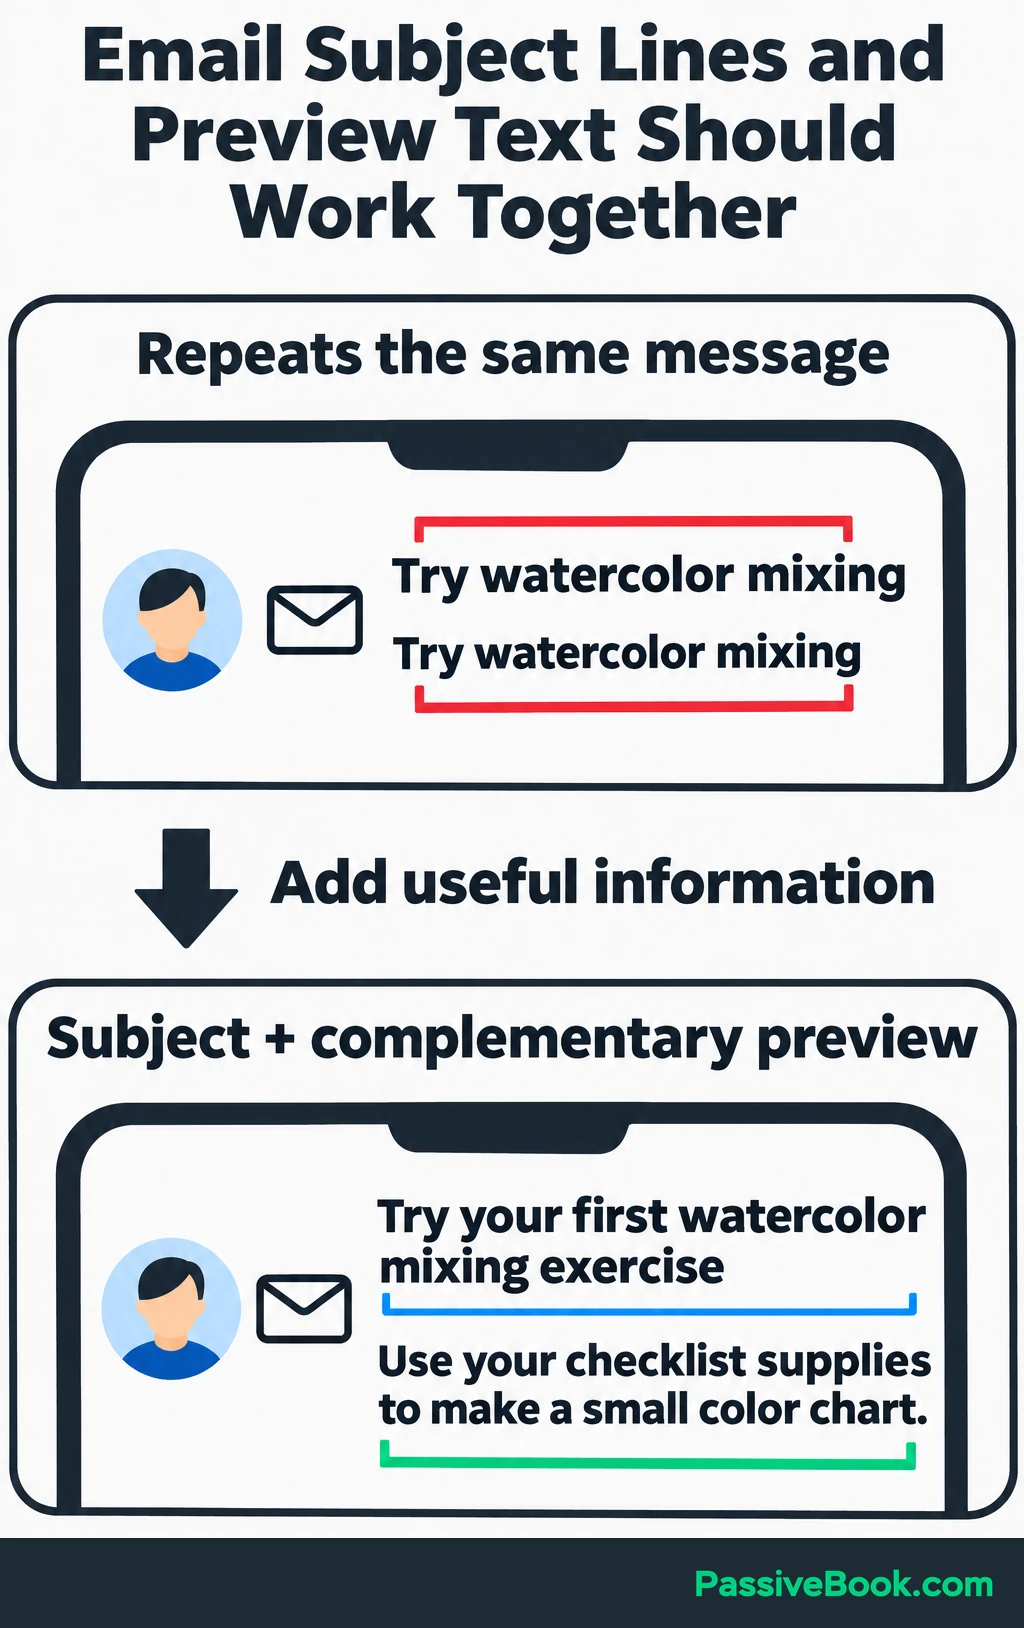
The subject line should describe the value, and the preview text should add information. Avoid using both spaces to say the same thing.
Here is a complete draft for the second email. Replace the bracketed details and connect the exercise link before sending:
Subject: Try your first watercolor mixing exercise
Preview: Use your checklist supplies to make a small color chart.
Hi there,
You have your watercolor supplies checklist. Now let’s put those paints to use.
Before starting a landscape, make a small color chart so you can see how two of your paints mix.
Choose two colors and paint a small patch of each on your paper. Mix them together on your palette, then paint the mixture beside the original colors. Add a little more of one color and paint another patch.
Label the colors you used and let the patches dry. Keep the chart beside you when you paint so you can refer to it.
The exercise sheet gives you spaces for each mixture:
Try the color-mixing exercise: [exercise link]
[Your name]
[Business name]
You’re receiving this because you signed up for watercolor tips and course offers.
[Valid postal address]
Unsubscribe: [unsubscribe link]
The message gives the reader something useful before asking for a click. They can start even if they leave the worksheet for later.
You can use the same approach for your own messages without starting each one from a blank page. Email Copy Studio turns your outline and product details into a connected first draft you can review before adding it to your email tool.
Free AI Messaging Studio


When you introduce the course, explain what buyers actually receive. Show the project, lesson format, prerequisites, price, and access terms. Connect the exercise to a specific lesson rather than saying the course will “transform their creativity.”
A short excerpt might read:
The landscape lesson uses the same color-mixing approach to prepare the sky and foreground colors. You can preview that lesson and see the full project on the course page.
Keep paragraphs short enough to read comfortably on a phone. Use descriptive links, keep essential instructions in text, and add meaningful alternative text to informative images.
For US commercial email, use accurate sender details and truthful subject lines, include required advertising identification, a valid postal address, and an easy opt-out. Opt-outs must be honored within 10 business days; I would configure automatic suppression immediately. See the FTC’s CAN-SPAM guidance.
4. Choose Software That Can Run Your Plan
Check your existing email platform first. Switching tools creates work, so make sure it solves a specific problem.
Your platform needs to recognize signups and purchases, apply eligibility checks, send timed messages, stop irrelevant promotions, and report the outcome.
These are the three options I would consider:
| Platform | Suitable Setup | Workflow Limits | Cost Considerations |
|---|---|---|---|
| MailerLite | A hosted setup for forms, newsletters, and automated follow-up | Free includes three active automations with five steps each. This example needs more steps. | Free includes 250 subscribers and 2,500 monthly emails; budget for a paid plan that supports the complete workflow. |
| Kit | A creator business that wants a hosted email system | The Creator plan includes unlimited email sequences and Visual Automations. | Compare the plan needed for your automation, rather than choosing by subscriber allowance alone. |
| FluentCRM | An existing WordPress business comfortable managing its site | Check which license supports your purchase integration and conditions. | Paid licenses are priced by website count rather than contact count; hosting, maintenance, and delivery remain separate costs. |
MailerLite counts emails and delays as separate steps. Four emails and three delays use seven steps before conditions, so this map exceeds the free allowance in the pricing table.
My preference for an established WordPress business is FluentCRM. It fits the stack I use and recommend, but you also manage the site and sending setup. FluentCRM recommends a dedicated delivery provider, with FluentSMTP connecting services such as Amazon SES. Include that in the budget using its email delivery guidance.
For a hosted setup on a tight budget, I would start by checking MailerLite against the map. I would choose Kit when its creator workflow saves enough setup work to justify the cost.
Whichever tool you choose, confirm that the checkout connection passes both the buyer’s identity and the specific product purchased. A generic “customer” label may not tell the automation whether someone owns this course.
Use a built-in connection where possible. If a necessary signup or purchase event cannot reach the email platform directly, use Make or n8n to pass that data between the apps.
5. Build the Automation From Your Map
Start with a recognizable sender name and a reply address you check. Then authenticate your sending domain.
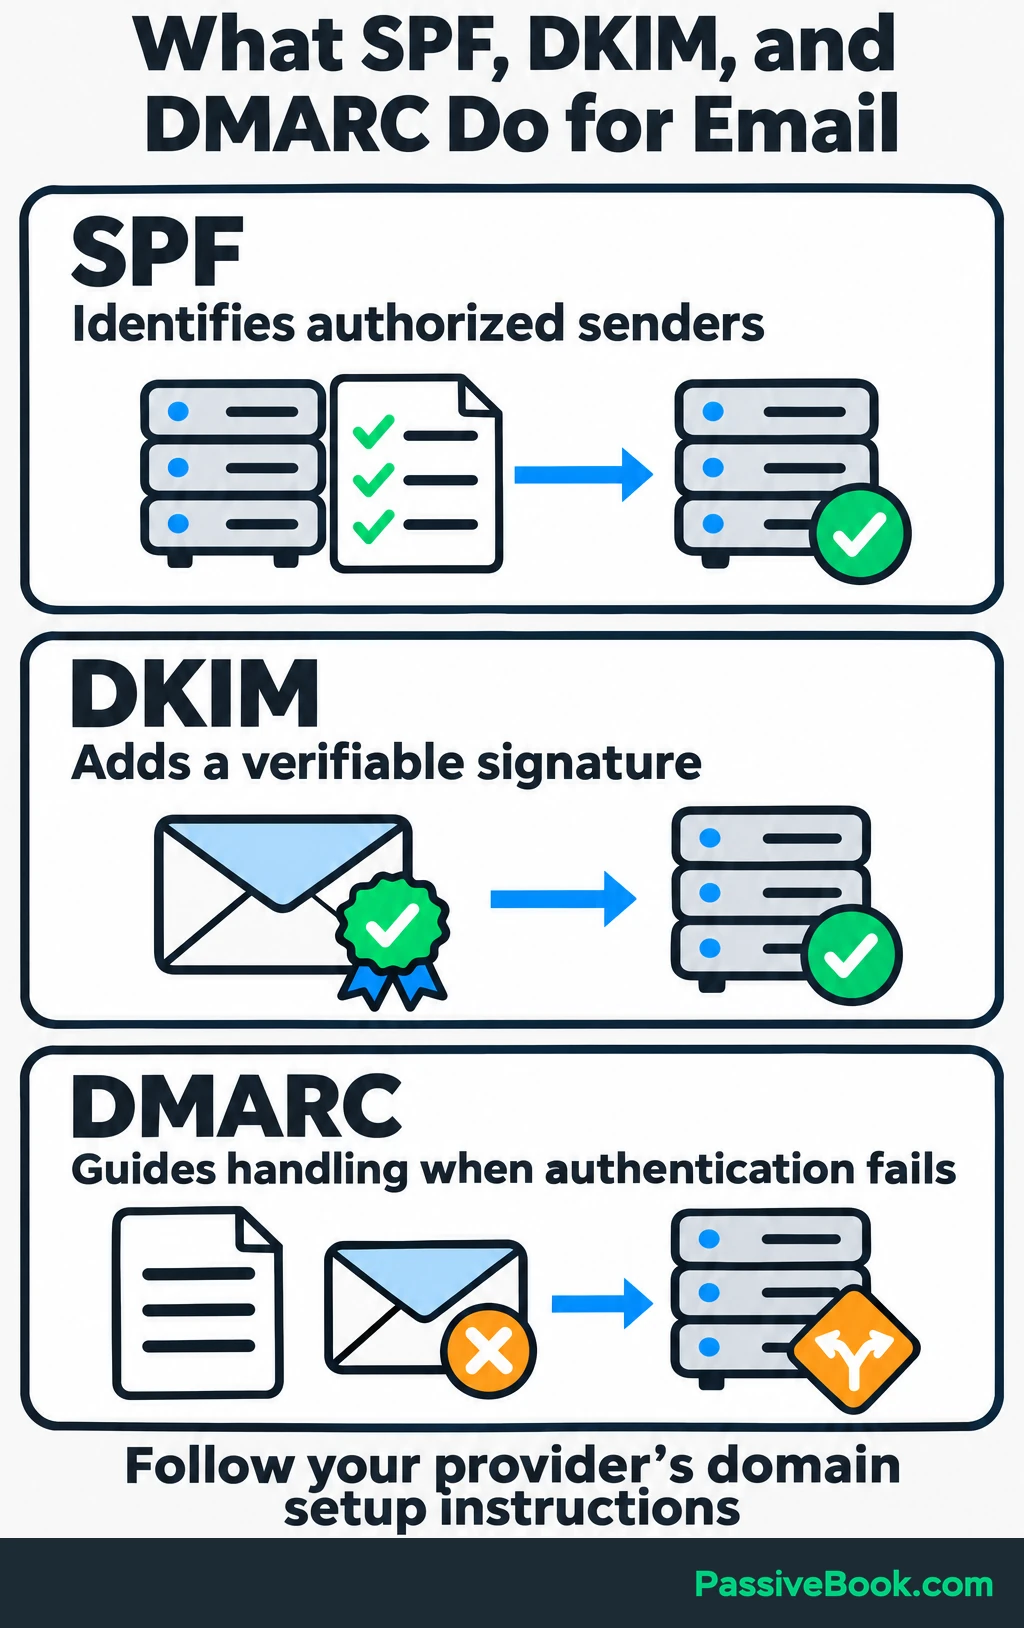
Follow your email provider’s instructions to add authentication records to your domain. SPF identifies authorized senders, DKIM adds a signature receiving services can verify, and DMARC tells them how to handle messages that fail authentication. Google recommends all three in its email sender guidance.
Build the journey in this order:
- Connect the checklist form and course checkout. Confirm that both update the correct contact.
- Configure immediate checklist delivery independently of promotional eligibility.
- Apply the marketing-permission and course-ownership checks.
- Add the follow-up emails and delays from your map.
- Set purchase exits and check ownership again before promotional sends.
- Stop marketing after an unsubscribe or complaint, and block sends to addresses that return permanent delivery failures, called hard bounces.
- Disable repeat enrollment and set the completion handoff.
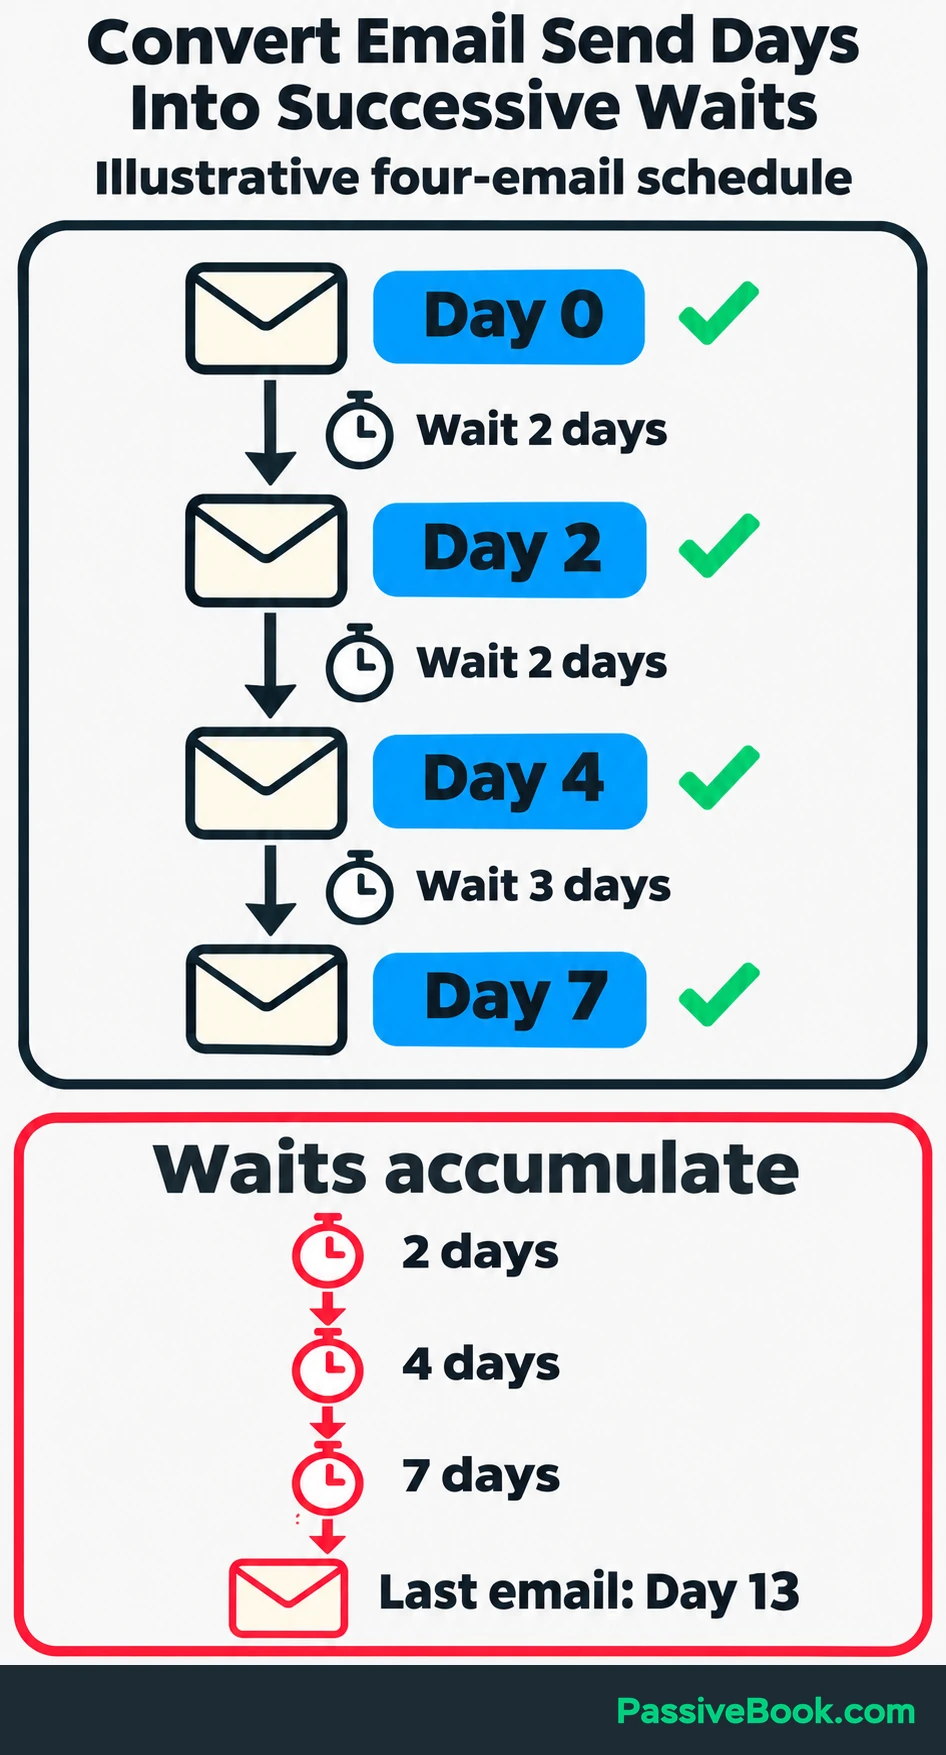
Translate dates into successive waits carefully. Emails scheduled for days 0, 2, 4, and 7 require waits of two days, two days, and three days.
If you enter waits of two, four, and seven days, the last email arrives on day 13. The software will happily follow the wrong instructions.
Check the timezone and sending-window settings too. A rule that postpones emails until weekday mornings should not hold back a requested checklist.
When several journeys can overlap, choose a priority. For this example, I would stop course promotions after purchase and prioritize access and onboarding messages. I would also avoid sending an unrelated promotional broadcast on the same day as a scheduled course pitch.
Add consistent tracking labels to links so you can distinguish visits from each email. Connect the purchase event as well, because link tracking alone cannot tell you who bought.
Save the workflow with enrollment inactive until the full journey passes testing.
6. Test the Complete Journey and Launch
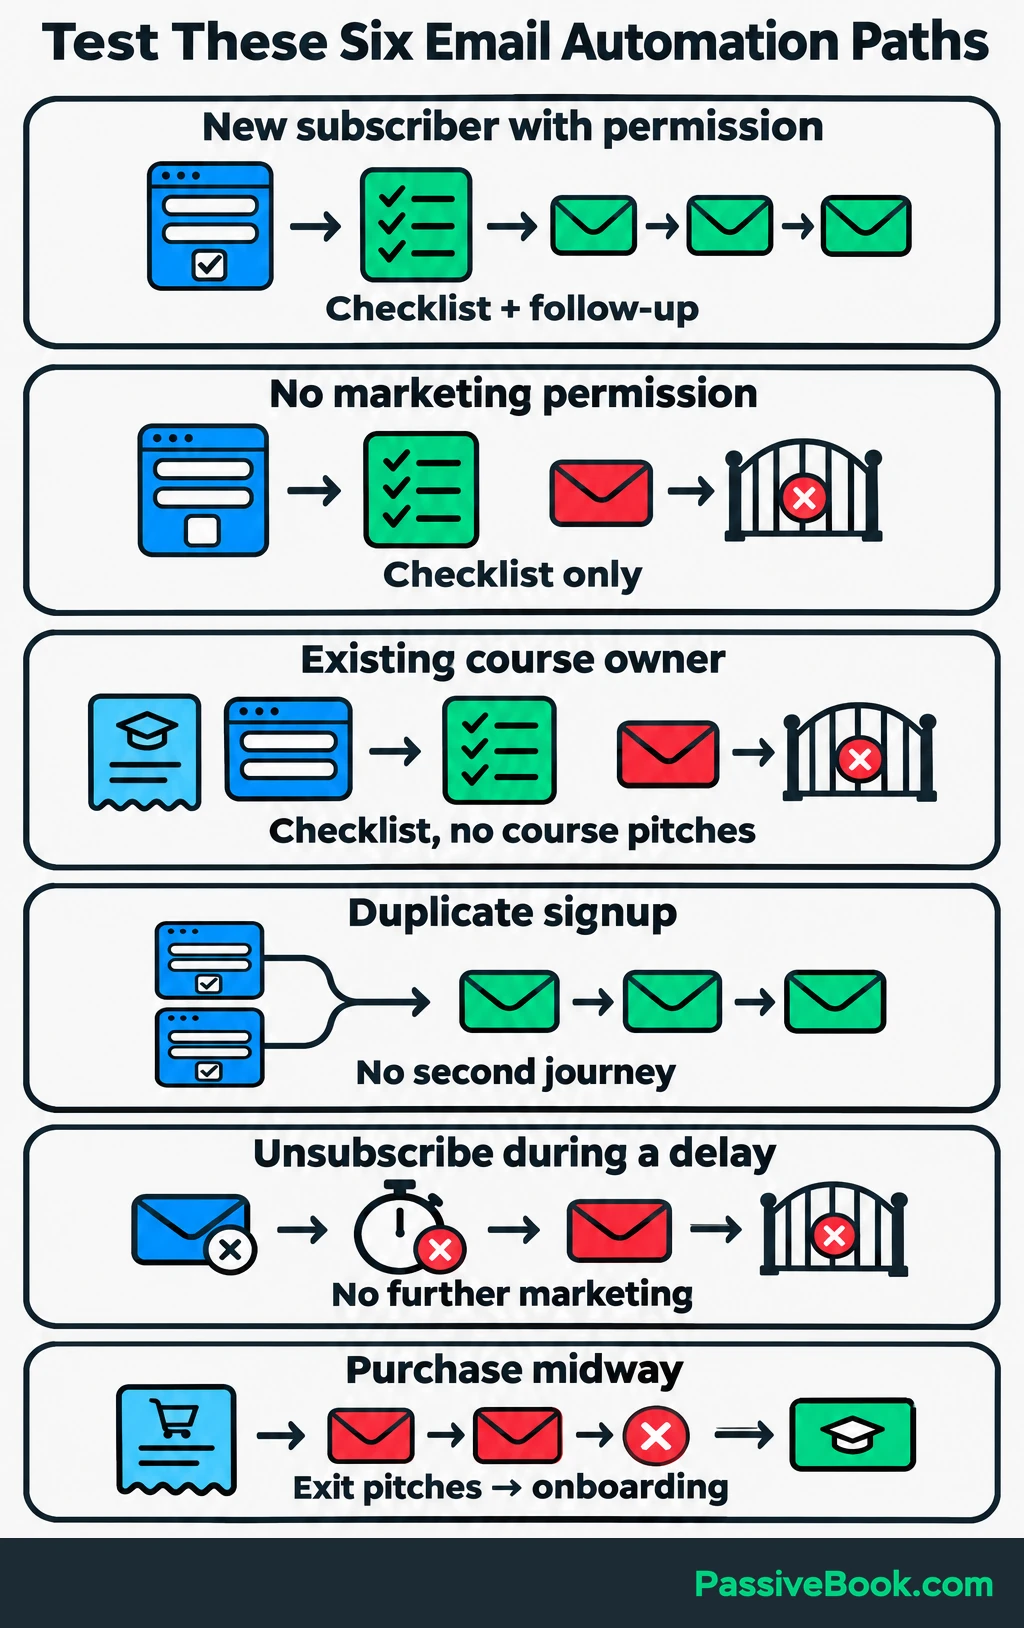
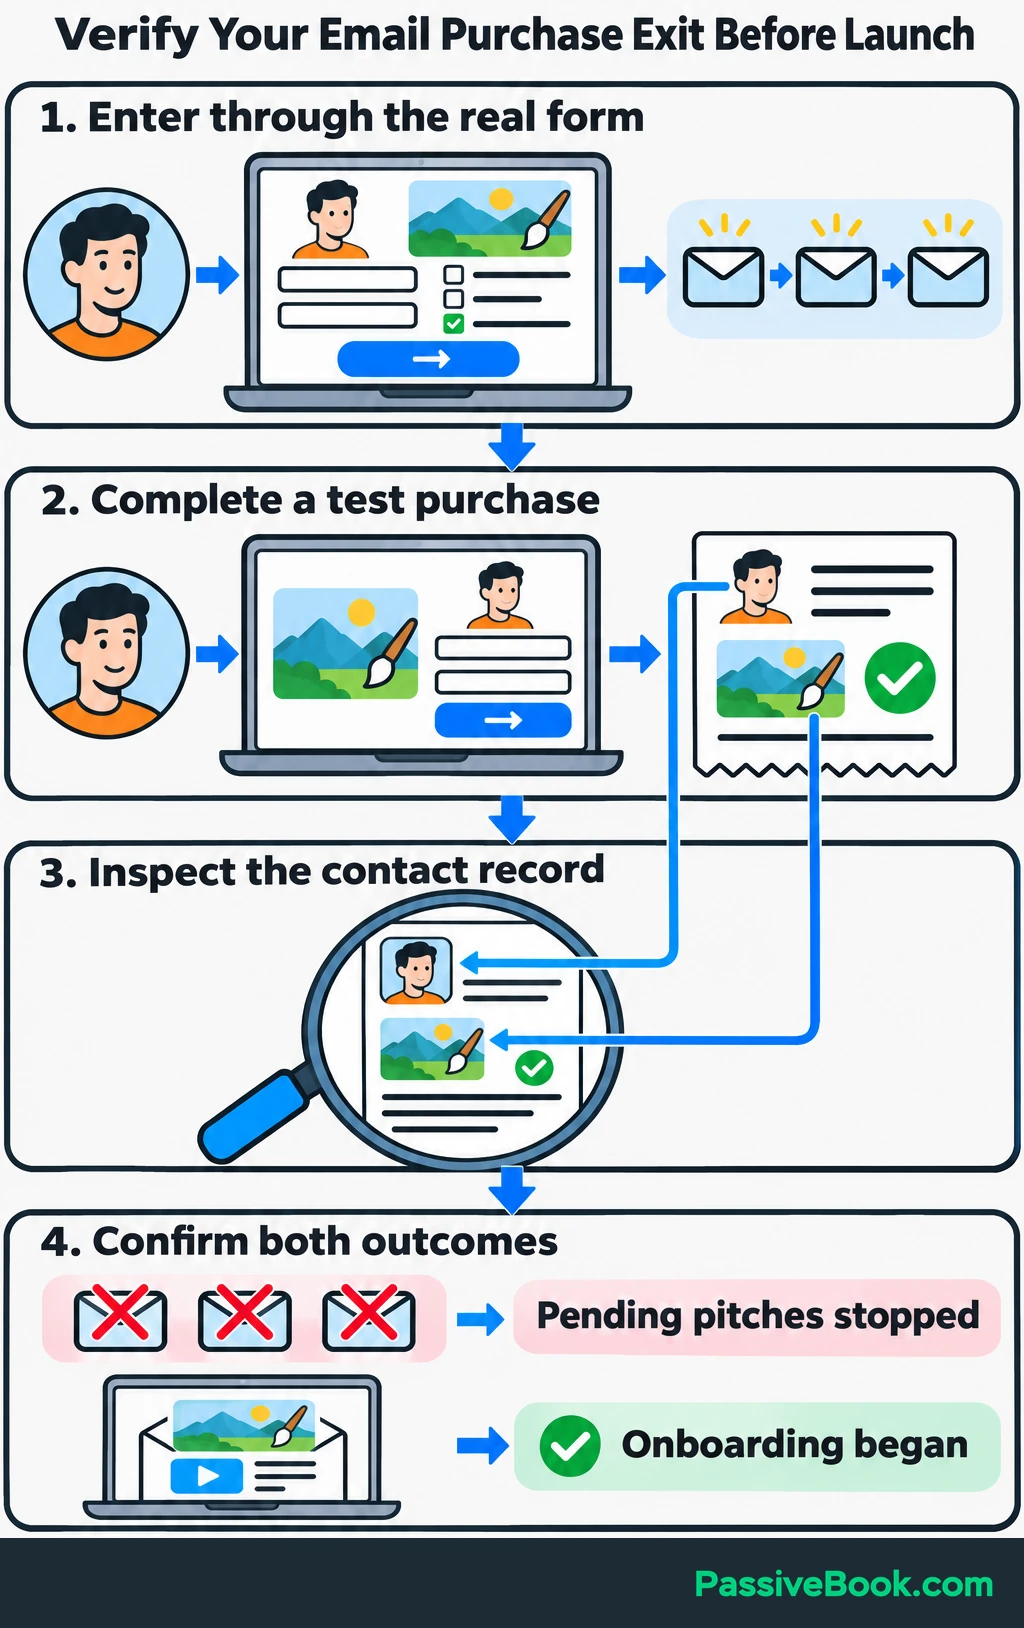
Use test contacts to enter through the real signup form. A preview email can show you the layout, but it cannot prove that the entry rules, delays, and purchase exits work.
Check these cases before launch:
| Test Case | Expected Result |
|---|---|
| New subscriber with marketing permission | Receives the checklist and enters the follow-up journey |
| Checklist requester without marketing permission | Receives the checklist without promotional enrollment |
| Existing course customer | Receives the requested checklist without course pitches |
| Duplicate signup | Does not start a second promotional journey |
| Unsubscribe during a delay | Receives no further marketing messages |
| Course purchase midway through | Leaves course promotions and receives relevant onboarding |
Open the emails on a phone and check the greeting fallback, downloads, links, and reply address. Confirm that each CTA reaches the intended page.
Then complete a test purchase. Inspect the contact’s record to see whether the course purchase arrived, which pending messages stopped, and whether onboarding began.
Use shortened delays in a separate test version if necessary. Before activating the production version, compare every wait against the original map.
Launch to the intended audience and inspect the first live journeys. Watch for failed sends, duplicate enrollment, missing purchase events, and unexpected delays.
Add existing subscribers deliberately, using the same eligibility rules. Turning on an automation should not become an excuse to push the entire database through it.
If a functional error appears, pause the affected workflow while fixing it. More subject-line editing will not repair a broken purchase connection.
7. Improve the Sequence From Customer Outcomes
Review results for subscribers whose measurement window has ended. In the watercolor example, include an entrant only after they have had 14 days to buy.
Track the journey from delivery to the goal:
- Delivery: Failed sends, bounces, and delivery problems.
- Resource Use: Unique checklist and exercise clicks.
- Offer Interest: Unique visits from course links.
- Customer Outcome: Purchases within the defined window.
- Revenue: Recorded order value, with refunds and costs accounted for separately.
- Negative Feedback: Unsubscribes, complaints, and recurring concerns in replies.
For purchase conversion, count unique buyers from the eligible entry group and divide by everyone in that same group.
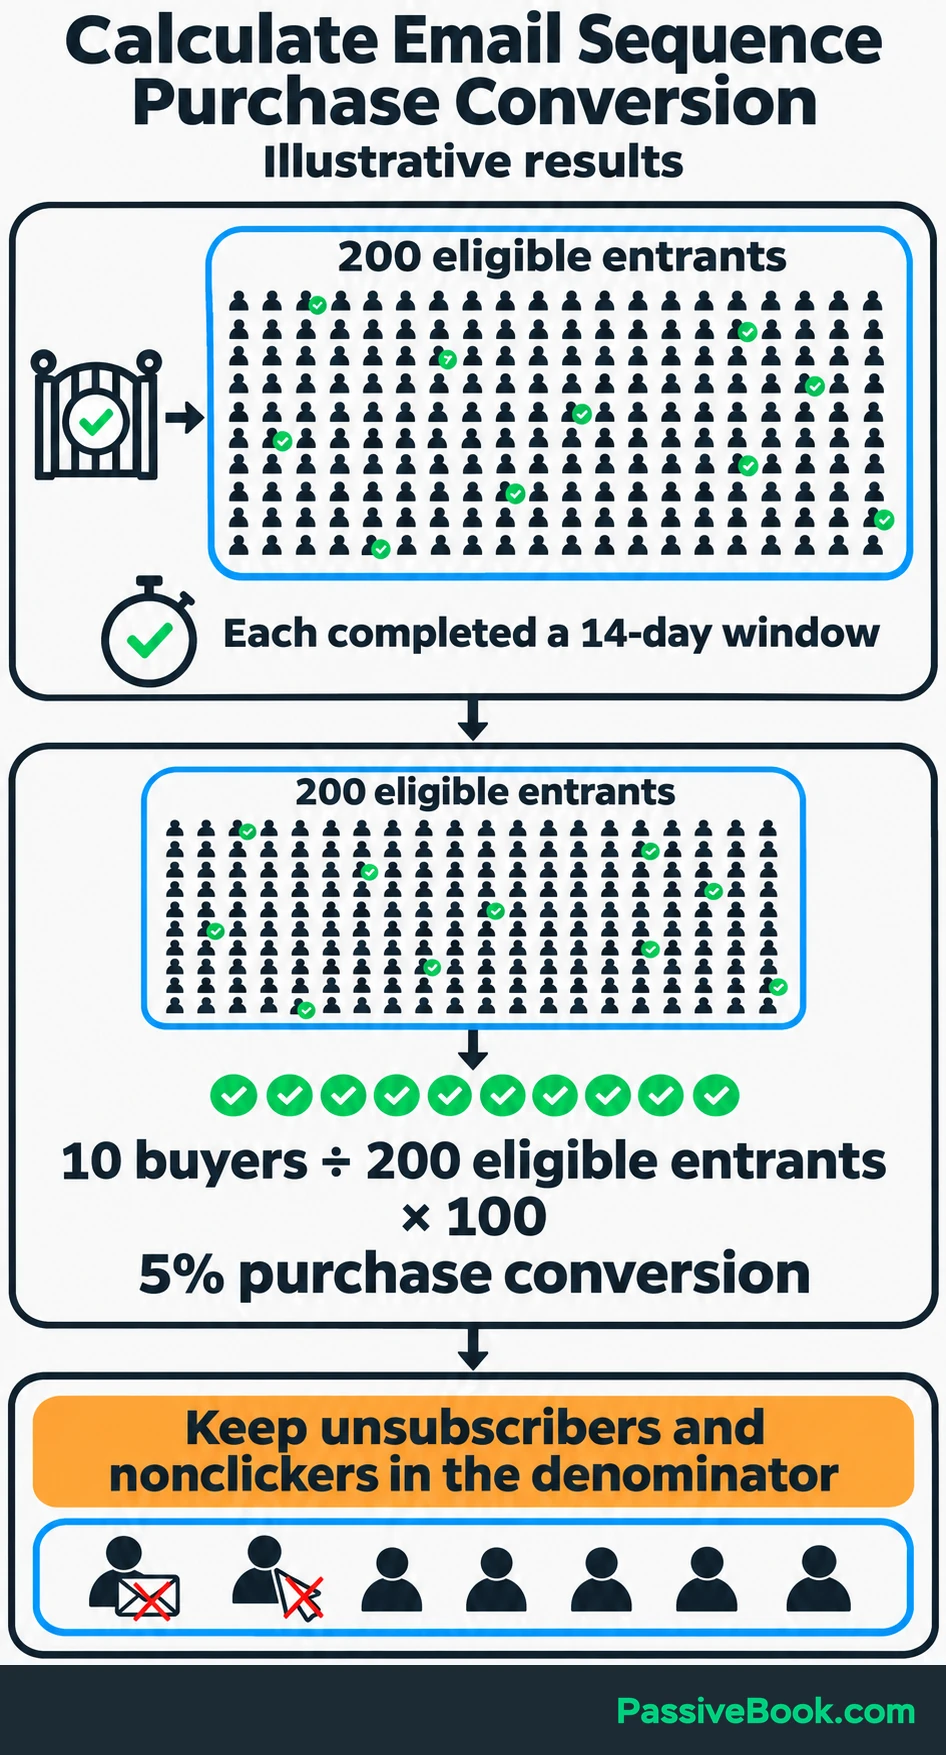
For illustration, suppose 200 eligible subscribers entered, all completed their 14-day window, and 10 bought within their respective windows:
10 buyers ÷ 200 eligible entrants × 100 = 5% purchase conversion
Keep people who unsubscribed or never clicked in that denominator. Removing them would make the result look better without improving the sequence.
Treat opens as a secondary signal. Privacy features and automated security checks can inflate opens and clicks, as Mailchimp explains in its bot-activity guidance. Compare engagement reports with replies, actual site visits, and completed purchases.
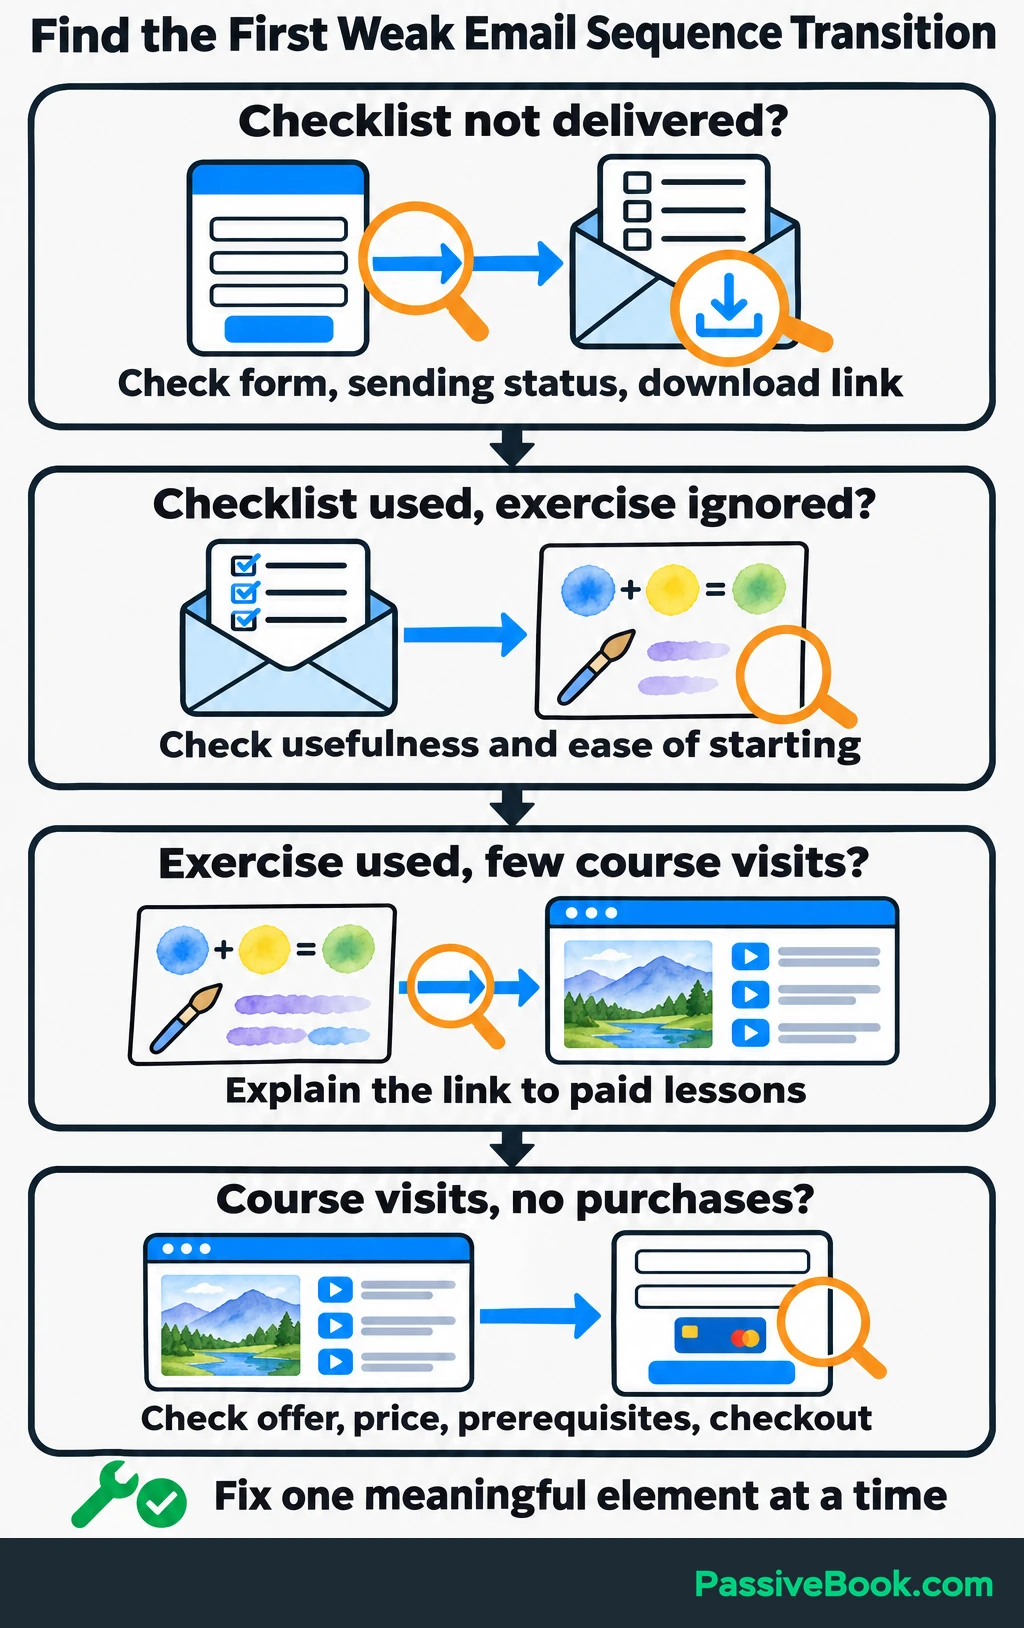
Find the first weak transition before changing the whole sequence:
| What You Observe | What I Would Check First |
|---|---|
| Checklist delivery fails | Form connection, sending status, and download link |
| Checklist clicks happen, but exercise clicks are weak | Whether the exercise feels useful and easy to start |
| Exercise gets interest, but few people visit the course | Whether the email explains the connection to the paid lessons |
| Course visits happen without purchases | Offer clarity, price, prerequisites, checkout, and payment errors |
| Buyers keep receiving pitches | Purchase identification, exit rules, and checks before sends |
| Unsubscribes rise after one message | A mismatch with the signup promise, repetition, or overlapping sends |
With a small list, fix broken functions and recurring customer questions first. Two purchases in one group and three in another are not enough for a grand theory about subject lines.
Change one meaningful element at a time, such as the opening, CTA, offer explanation, or delay. Compare groups with the same eligibility rules and complete measurement windows.
Keep product details and links current, and repeat the purchase-exit test whenever you change the checkout or its connection. Automation saves manual follow-up, but it still needs maintenance.
What Next?
Write one sequence goal and map its entry, purchase exit, and next customer action before opening your email tool. That gives you a concrete plan to build and test.
Use the social buttons to share this guide when you want to turn scattered follow-ups into a repeatable customer journey.
Which customer transition would be most useful to automate in your business? Leave your answer, along with any other questions, in the comments.
Share this post with your friends & followers: